
If you plan on jumping into Unity Addressables Pooling, be careful. You better make sure the object pool is not empty.

In previous posts, I showed you how to load content in your game without limits.
Well, sure there are limits, but you are not likely to reach them if you did a good job at implementing your asset content management system. And I’m pretty sure you’ll get it right enough if you followed my advice.
But so far, I can say we are missing one important piece of the puzzle, though. I mean, we’re missing many, but today I want to focus on a very specific one: latency.
What’s latency?
Latency is the time it takes between starting something and finishing it. It is some sort of delay that we usually want to avoid.
You suffer latency when cooking your microwave popcorn, for instance. There, you start the microwave and have to wait for 3 to 5 minutes. And we want to eat popcorn right away, so this kind of latency is bad.

When we get into the field of games, things get worse than cooking popcorn.
In games, milliseconds matter. Everything above 20ms makes competitive multiplayer a bit more unfair.
But in this post, we’re not talking about multiplayer games. We will be talking about the latency we suffer when we load and display an asset using Addressables for Unity.
And actually, we will do something about it.
We’ll implement a simple Unity Addressables Pooling System.
Will you jump in the pool?

Level 1 Developer: Simple Unity Addressables Loading
Yes, I know. We’ve done this several times.
We take a prefab, mark it as Addressable and we assign it to a script that loads the prefab whenever it makes sense.
And this gives you big benefits over traditional asset management workflows based on direct references. In short, using Addressables gives you…
To read more on this, visit my introductory post on Unity Addressables Benefits: 3 Ways to Save Your Game.
In this blog post, I’ll stick to showing my tremendously complex sample project setup.
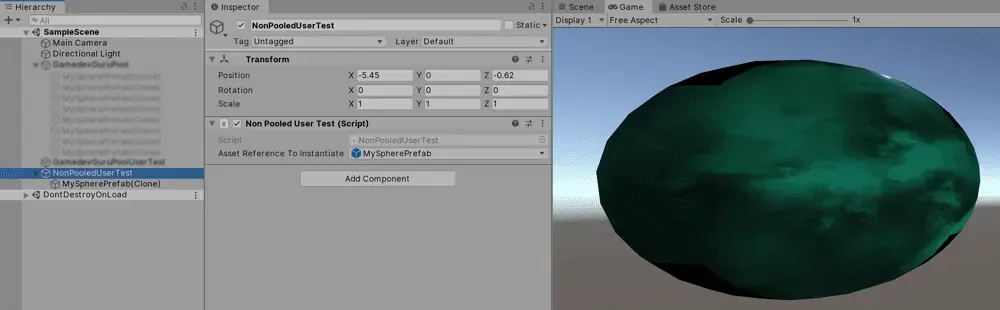
Oh nevermind, it was just a prefab instantiated through the Addressables API…
This works most of the time just fine for any game.
However…
This loading and instantiation process has some latency to it. Unity has to fetch the required asset bundle, load the prefab and its dependencies and instantiate.
The loading process should take well below 1 ms.
But things get messy when we add more complexity to this object. If we add animators, particle systems, rigid bodies and such, Unity can surely end up stealing 10 ms away from us. Activating these components can take a significant amount of time.
And if the asset bundles are served over the network and they were not ready, then we’re speaking of seconds, even minutes.
How terrifying would your game be if by the time your final boss is spawned the player already reached the end of the dungeon?

This is my guess: as terrifying as profitable.
A typical solution in Unity relies on adding object pools.
There’re many object pools you can find online for Unity. The issue is, they’re not Addressables-ready.
But now, you’ll get one.

Level 2 Developer: Unity Addressables Pooling
Let me warn you here: the needs for a pooling system greatly vary from project to project.
Here I’ll be giving you a simple system that you can tweak to match your needs.
This is what you’ll want from this pooling system:
In case you were wondering: yes, I re-used the icons from the previous section. Busy times here.
Before we jump into the code, I’ll show you the test I prepared.
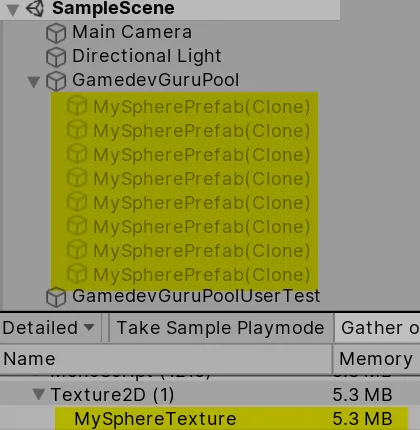
1. Warm-up the asynchronous pool
By now, the prefab and its content are not loaded in memory. The pool is enabled and loads the prefab based on Addressables.
Then, it instantiates several objects and deactivates them all, paying the price of Awake, Start, OnEnable and OnDisable.
By now, the prefab contents are in memory.
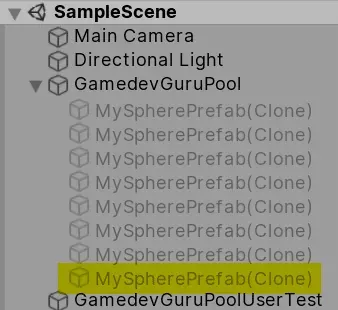
2. Helping our Gameplay: take an item from the pool
A user takes an item from the pool and puts it somewhere in the scene through the synchronous method *Take*().
The user pays the activation (*OnEnable*) time, which depends on the complexity of their prefab.
3. Saving CPU time: return the item to the pool
The user gets tired of their new toy and returns it to the pool.
The pool deactivates it and puts it under its hierarchy, paying the price of *OnDisable*.
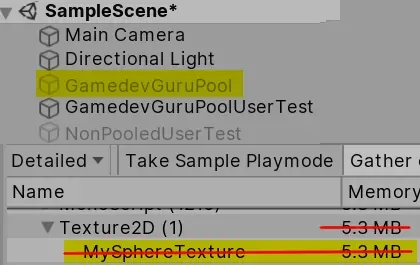
4. Freeing up memory: disable the pool
After some time, we know we will not need this item anymore.
We disable the pool and therefore it’ll **free up all the used memory**, even though the indirect reference is still present in the pool.
The strength of this method relies on memory management. We pay the memory price when we decide to.
With traditional Unity Object Pools, we paid the memory overhead all the time, even if the prefab was never instantiated.Now, how does the code look like?
public class GamedevGuruPoolUserTest : MonoBehaviour
{
    [SerializeField] private AssetReference assetReferenceToInstantiate = null;

    IEnumerator Start()
    {
        var wait = new WaitForSeconds(8f);

        // 1. Wait for pool to warm up.
        yield return wait;

        // 2. Take an object out of the pool.
        var pool = GamedevGuruPool.GetPool(assetReferenceToInstantiate);
        var newObject = pool.Take(transform);

        // 3. Return it.
        yield return wait;
        pool.Return(newObject);

        // 4. Disable the pool, freeing resources.
        yield return wait;
        pool.enabled = false;

        // 5. Re-enable pool, put the asset back in memory.
        yield return wait;
        pool.enabled = true;
    }
}
That’s a pretty normal piece of code for testing.
If there’s anything relevant to mention is line 13. Why do we look for the pool passing our asset to GetPool?
The idea behind that is that you might need several pools, one for each asset type, so you need a way to identify the pool you want to access.
I don’t particularly like static methods that access static variables, but you should adapt the code to the needs of your game.
By the way, you don’t need to copy all the code yourself. I prepared a repository you can access for free.
Visit the GitHub Repository
And how’s the code for the pool itself?
public class GamedevGuruPool : MonoBehaviour
{
    public bool IsReady { get { return loadingCoroutine == null; } }

    [SerializeField] private int elementCount = 8;
    [SerializeField] private AssetReference assetReferenceToInstantiate = null;

    private static Dictionary<<span class="pl-k">object</span>, <span class="pl-en">GamedevGuruPool</span>> allAvailablePools = new Dictionary<object, GamedevGuruPool>();
    private Stack pool = null;
    private Coroutine loadingCoroutine;

    public static GamedevGuruPool GetPool(AssetReference assetReference)
    {
        var exists = allAvailablePools
            .TryGetValue(assetReference.RuntimeKey, out GamedevGuruPool pool);
        if (exists)
        {
            return pool;
        }

        return null;
    }

    public GameObject Take(Transform parent)
    {
        Assert.IsTrue(IsReady, $"Pool {name} is not ready yet");
        if (IsReady == false) return null;
        if (pool.Count > 0)
        {
            var newGameObject = pool.Pop();
            newGameObject.transform.SetParent(parent, false);
            newGameObject.SetActive(true);
            return newGameObject;
        }

        return null;
    }

    public void Return(GameObject gameObjectToReturn)
    {
        gameObjectToReturn.SetActive(false);
        gameObjectToReturn.transform.parent = transform;
        pool.Push(gameObjectToReturn);
    }


    void OnEnable()
    {
        Assert.IsTrue(elementCount > 0, "Element count must be greater than 0");
        Assert.IsNotNull(assetReferenceToInstantiate, "Prefab to instantiate must be non-null");
        allAvailablePools[assetReferenceToInstantiate.RuntimeKey] = this;
        loadingCoroutine = StartCoroutine(SetupPool());
    }

    void OnDisable()
    {
        allAvailablePools.Remove(assetReferenceToInstantiate);
        foreach (var obj in pool)
        {
            Addressables.ReleaseInstance(obj);
        }
        pool = null;
    }

    private IEnumerator SetupPool()
    {
        pool = new Stack<GameObject>(elementCount);
        for (var i = 0; i < elementCount; i++)
        {
            var handle = assetReferenceToInstantiate.InstantiateAsync(transform);
            yield return handle;
            var newGameObject = handle.Result;
            pool.Push(newGameObject);
            newGameObject.SetActive(false);
        }

        loadingCoroutine = null;
    }
}
I know, somewhat long, but I want to post it here so I can explain what’s going on.
Like I said before, in line 14 we’re getting the right pool for you, as in this article we aim to have a pool per prefab. We use the runtime key for this matter, which is the string we use to identify our addressable assets. Other variations can include using generics and enums to use a single pool object instead.
In lines 30-33, we take one object from the pool, we parent it and then activate it. You might want to add more arguments to this function, such as position and rotation.
We do the opposite in lines 41-43. Like the child who rebels and leaves home only to come back after just an hour, we accept it back. We deactivate it and parent it back to our pool game object.
And then it is time to warm-up the pool and empty it in lines 52 and 60. We pre-warm the pool when it is enabled by instantiating and deactivating 8 prefabs. Finally, we call Addressables.ReleaseInstance to free up memory.
The strategy here is clear: enable the pool when we suspect we will need it and disable/destroy it when we don’t.

Level 3 Developer: Smart Unity Addressables Pooling
There are so many variations of Unity Addressables Pooling systems.
It all really depends on your objectives for your game.
Performance
You could, for instance, prioritize performance. If that is the case, you certainly don’t want to activate/deactivate entire game objects on pool’s Take and Return calls.
Activations are extremely expensive. What you want there is to enable/disable certain components instead, such as renderers, animators, canvases, etc.. You’d stop paying the draw calls while not paying activation times.
Something you could also avoid is excessive parenting, as we also pay a high price for it.
If this is your case, you might want to go for PerformancePool.
Automatic Pooling
If performance is not required and you’d rather save time, you can also make your life easier and still get the benefits of pooling.
You could go for the AutomaticPool component, which will take care of loading and unloading prefabs for you. What is more interesting, it’ll free up its entire memory after a certain time has passed without users requiring the prefab.

If you are interested in these Plug And Play components, you’ll be happy to know they are included in the Addressables for the Busy Developer course.
Highly-skilled game developers and I will start a sprint to transform and level up the way we make games in Unity
Join us in the quest towards game performance mastery.
What did you think of the article?
Ruben