
Welcome to this Unity Addressables Tutorial.
You are leading a team of programmers and artists to port a good-looking PS4 VR game to Oculus Quest. You have one month to halve your memory budget and 6 months to complete it.
Well? What’s your first move? Let’s bring Unity Addressables to the table.
You realize you have to tackle quite many challenging tasks at once. I bet some might be personally more concerning than others, depending on your expertise level in each area. If you had to pick one that robbed your sacred sleep the most, which one would it be?
My initial guess would be this: above 70% of the readers would say CPU/GPU performance is the biggest concern when porting a title to Quest. And to that I say: you can very well be right. Performance is one of the toughest areas to improve on in a VR game. For optimizations of this kind, you require in-depth knowledge about the product, which is a time-intensive process. Sometimes you even cannot just optimize further, which usually ends in dropping expensive gameplay or graphics features. And not meeting people’s expectations is a dangerous place to be.
Performance, performance, performance.. The word might let some chills go down your spine. What can you expect in this regard from the Quest platform? How does it perform? The thing is, if you have had some development experience in it, you will probably know that in spite of being mobile hardware, it is astonishingly powerful.
But Ruben! Don’t give me that crap. I tell you my phone slows down significantly the time I open a second browser tab. How dare you say mobile platforms can be so performaning?
I read your mind, didn’t I? The massive difference lies on Quest’s active cooling system, which gives it a huge boost on its attainable CPU/GPU hardware levels that no other mobile platform can offer. It is a powerful fan that will prevent your hair from gathering dust and avoid melting the CPU together with your face (the GoT crown scene comes to mind).
Additionally and on the side of the Quest software, the more specialized OS is better optimized for virtual reality rendering (surprise) than the generic Android variant. Mobile hardware has been catching up with standalone platforms so quickly in the last few years.
But, at the same time, I cannot deny that our task of constantly rendering at 72 fps will prove to be challenging, especially for VR ports coming from high-end platforms. To be more precise, when we talk about the Oculus Quest, you have to picture yourself a Snapdragon 835 with a screen, a battery, four cameras and a fan.
What could look like a disadvantage can actually be thought of as an edge. This mobile platform is a well researched piece of s*** hardware. One can say there are a myriad of known tricks you can pull off to quickly reduce the CPU and GPU load up to an acceptable point. If it is of your interest, you will be able to read about it in upcoming posts. As of now, we will take performance out of the equation for this post.
What might catch your attention in our challenge is that, compared to the PS4, there is a single hardware characteristic literally halved on the Quest: the RAM capacity. That’s right, we go from 8 to 4GB RAM. This is an approximation since, in both platforms, the operating system does not allow you to use it all so it can keep track of a few subsystems for the ecosystem to work. On the Quest you will be able to roughly use up to 2.2 GB of RAM before things get messy.
Ruben, what do you exactly mean by messy? The thing is, proper memory handling is crucial for your game. This is so because you have two constraints:
- Hard memory constraint: if you go above a certain threshold, the OS will just kill your game
- Soft memory constraint: above another certain limit, the OS might decide to kill your game when your user minimizes your game, takes the headset off or you go out of the Oculus guardian area
Obviously, you do not want any of the two to happen in your game. Can you picture an angry player who just lost his last two hours of gameplay? Yes, they will go to your store and nothing pretty will come out of their mouth.

The thing is, the guaranteed availability of 2.2GB of RAM is not much, honestly. It’s usually not a problem for new projects where you track your stats constantly from the beginning, but it definitely is an issue for a port to a severely downgraded hardware.
If you dealt with similar ports in the past, you will quickly realize how extremely challenging it can become to decrease your game’s RAM budget by half. It grandly depends on how well the game architecture was prepared for such a change, but in most cases this will temporally transform you into a tear-producing machine.
The most popular strategies to reduce memory pressure include tweaking asset compression settings, optimizing scripts, reducing shader variants, etc.. Depending on the specifics of your project, tweaking texture import settings is your first go-to solution, but if you need to you can also resort to compressing meshes, animations and audio. The problem is that those techniques are usually complex in nature and will have a ceiling limit.
Not all platforms support the same import settings; targeting several devices will dramatically increase your build pipeline overhead, not to mention QA, art, design and programming complexity. Does this Android device support ASTC, or just ETC2 (if at all)? Oh, we also want to build 64 bit builds, but also keep the players on the 32 bit versions. How many split-APKs should we create, and worse, manage and test, for each update we do on the game? You want to make your life easier, so you should not rely exclusively on these techniques.
We would like to go further. As usual, we want to keep things as simple as possible (TM), especially if you are doing a port. Redesigning the entire game for performance’s sake is a worse option than just not porting it. For that matter and in today’s topic, I will offer you one of the biggest gains for the buck: I will show you how to halve a project’s memory budget in matter of hours. Boom!
Wouldn’t that be useful?
Go ahead, go ahead… ask me: is it really possible for me? The answer is: it depends on your starting point, but in my experience, YES. Unity Addressables can be of a great value here. The catch? You must be willing to put in the work and to master the process. But this workflow will earn you the title of employee of the month.
If you are interested, keep reading.
In this post you and I will go through the journey of moving from a traditional asset management to an addressables-based asset management system. To illustrate the process on this tutorial, we will port a simplified old-school project to the new era of Unity Addressables.
Now, you might ask me: why don’t you just show me the real-life work you did?
In a non-competitive world I would just show you all the material I created. In the real world though, that is likely to get me canned. And worse, busted.
What I will do instead is to offer you my guidance so you and I iterate on project that absolutely represents the difficulties you could find tomorrow in your next project. And we will do so by first welcoming Unity’s Addressables to our family of suggested packages.
In this tutorial I will get you started in Addressables ASAP so you can implement your own Unity Addressables system in a matter of minutes.
Unity Addressables: Why?
Time to pay attention to this very important section. Our goal is to diagnose easy memory gains and implement them fast. There are several ways to do this, but one of the most powerful yet simplest methods to pick the low-hanging fruits by loading the initial scene and opening up the profiler. Why this?
Because an unoptimized game architecture can frequently be diagnosed at any point during gameplay, so the quickest way to check this is by profiling the initial scenes. The reason for this is the common over-usage of singleton-like scripts containing references to every single asset in the project just in case you need it.
In order words, in many games there is usually an almighty script causing an asset reference hell. This component keeps each asset loaded at all times independently from whether it’s used or not at that time point.
How bad is this?
It depends. If your game is likely to be constrained by memory capacity, it is a very risky solution, as your game will not scale with the amount of assets you add (e.g. think of future DLCs). If you target heterogeneous devices, such as Android, you don’t have a single memory budget; each device will offer a different one, so you settle for the worst case. The OS can decide to kill your app at any point if our user decides to answer a quick message in Facebook. Then the user comes back and surprise, all their game is gone for good.
How fun is that?
Zero. Unless you are overworked and sleep deprived, a situation which might grant you a desperation laugh.
To complicate matters further, if later on you decide (or someone decides for you) to port your game to another less powerful platform while keeping cross-play working, good luck. You don’t want to get caught in the middle of this technical challenge.
On the other side, is there a situation where this traditional asset management solution works just fine? The answer is yes. If you are developing it for a homogeneous platform such as PS4 and most requirements are set from the beginning, the benefits of global objects can potentially outweigh the extra added complexity of a better memory management system.
Because let’s face it: a plain, good old global object containing everything you need is a simple solution, if it works well enough for you. It will simplify your code and will also preload all your referenced assets.
In any case, the traditional memory management approach is not acceptable for developers seeking to push the boundaries of the hardware. And as you are reading this, I take you want to level up your skills. So it is time for just doing that.
Greet Unity Addressables Tutorial.

Unity Addressables Tutorial: Requirements for our project
If you are planning on just reading this blog entry, your screen will suffice. Otherwise, if you want to do this along with me, you will need:
- Functional hands
- Overclocked brain
- Unity 2019.2.0f1 or higher
- The level 1 project from GitHub (download zip or through command line)
- Willingness to get your hands dirty with Unity Addressables
The git repository will contain three commits, one per skill level-up section in the blog (unless I messed up at some point, case in which I will commit a fix).
Download the project in ZIP format directly from GitHub
Or alternatively, visit the GitHub Repository

Level 1 Developer: Traditional Asset Management
We are starting here with the simplest asset management method here. In our case, this entails having a list of direct references to skybox materials in our component.
If you are doing this with me, the setup is a simple 3 step process for dummies:
<img src="https://img.icons8.com/pastel-glyph/64/000000/path-steps.png" alt="" loading="lazy"/>
1. Download the project from git
In the previous section you will find a link to the ZIP file, but if you are adept with the command line you may also run the command listed.
2. Open the project in Unity
Open Unity Hub and press on the add (an existing project) button. Navigate to the downloaded directory and open it.
3. Hit the damn play button!
Just press CTRL + P (or CMD + P).
Good, good. You can click a few buttons and change the skybox. This is so original… and boring. I take it, no Unity Addressables Tutorial yet.
In a short moment you and I will see why we need to endure this short-lasting boredom.
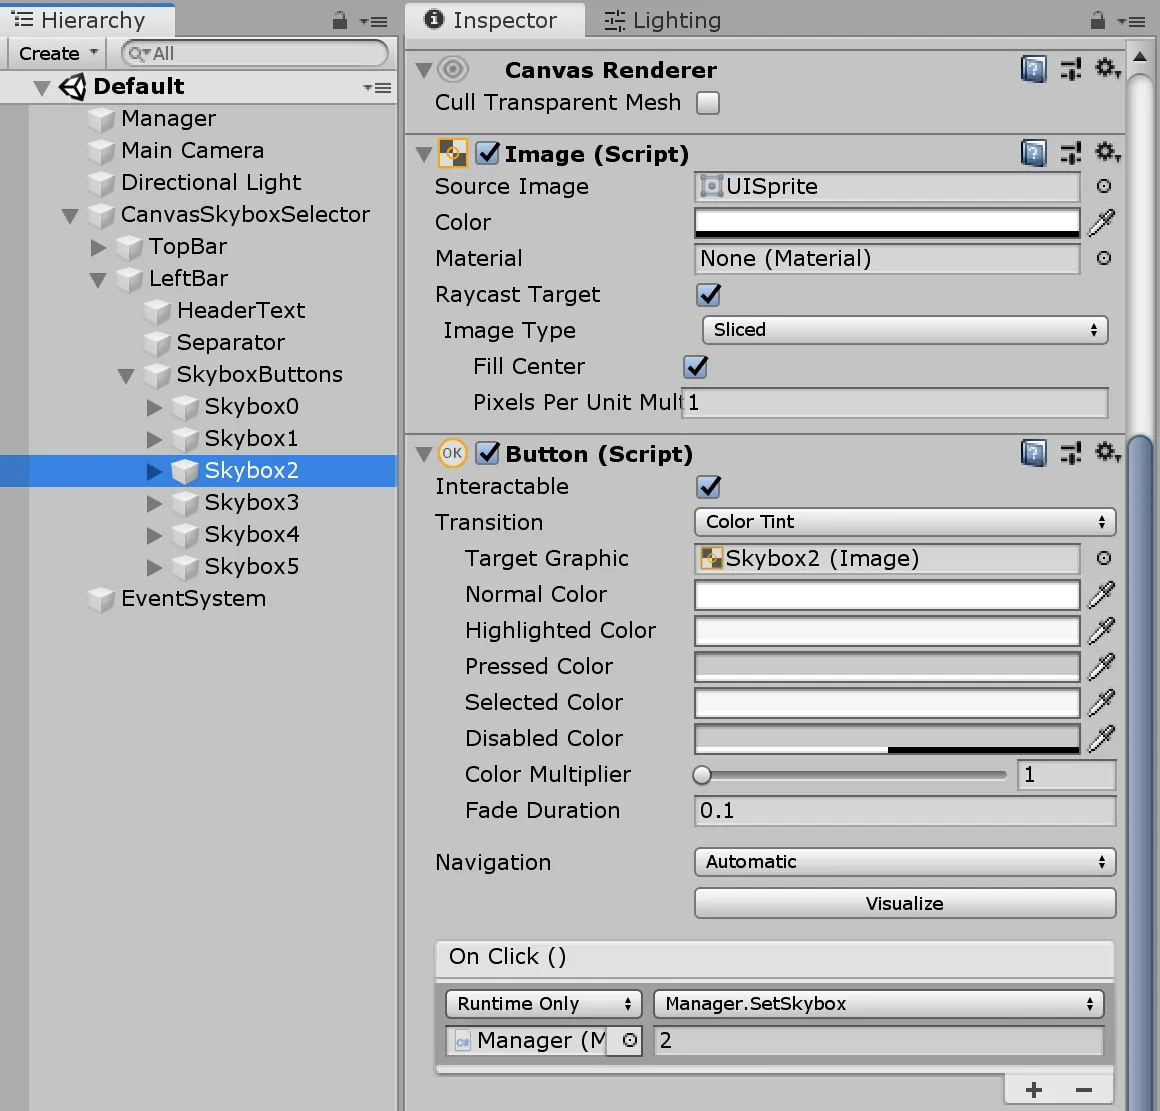
To start with, how is our project structured? It pivots around two main systems. On the one side, we have our SkyboxManager game object. This component is the main script holding the references to the skybox materials and switches between them based on UI events. Easy enough.
public class SkyboxManager : MonoBehaviour
{
    [SerializeField] private Material[] _skyboxMaterials;

    public void SetSkybox(int skyboxIndex)
    {
        RenderSettings.skybox = _skyboxMaterials[skyboxIndex]; // Set the current renderscene skybox material through RenderSettings API
    }
}
The SkyboxManager offers the UI system a function to apply a specific material to the scene settings through the usage of the RenderSettings API.
Secondly, we have our CanvasSkyboxSelector. This game object contains a canvas component, rendering a a collection of vertically-distributed buttons. Each button, when clicked, will invoke the aforementioned Manager function to swap the rendered skybox based on the button id. Put in another way, each button’s OnClick event calls the SetSkybox function on the Manager. Isn’t that simple?
Once we’re done daydreaming how immersive it was to play X2, it’s time to get our hands dirty. Let’s launch the multisensory experience and open the profiler (ctrl/cmd + 7; or Window – Analysis – Profiler). I take you are familiar with this tool, otherwise you know what to do with the top record button. After a few seconds of recording, stop it and see the metrics for yourself: CPU, memory, etc.. Anything of interest?
Performance is pretty good, which is nothing surprising considering the scope of the project. You could literally turn this project into a VR experience and I assure you that your users will not fill any of the bile buckets that so many players filled when playing Eve: Valkyrie.
In our case, we will be focusing on the memory section. The simple view mode will display something as depicted below:
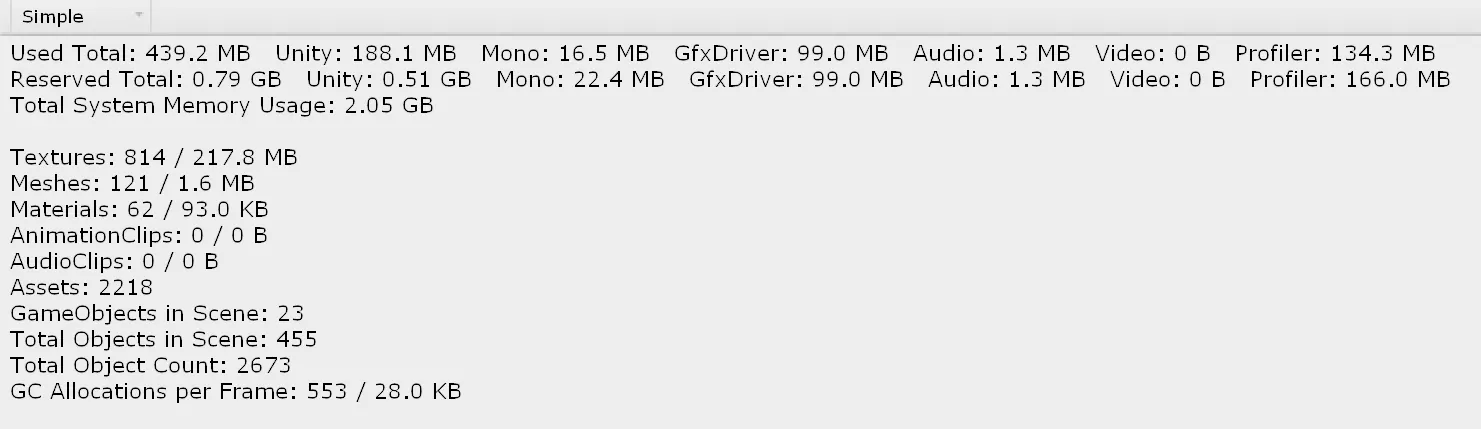
The numbers on the texture size look pretty oversized for just displaying a single skybox at any given time, don’t you agree? Surprise incoming: this is the pattern you will find in many unoptimized projects you are likely to suffer lead. But heck, in this case it’s just a collection of skyboxes. In others, it will be more about characters, planets, sounds, music. You name it, I have it.
If dealing with many assets falls under your responsibility, well, then I am glad you are reading this article. I will help you transitioning to scalable solution.
Time for magic. Let’s switch the memory profiler to detail mode. Have a look!
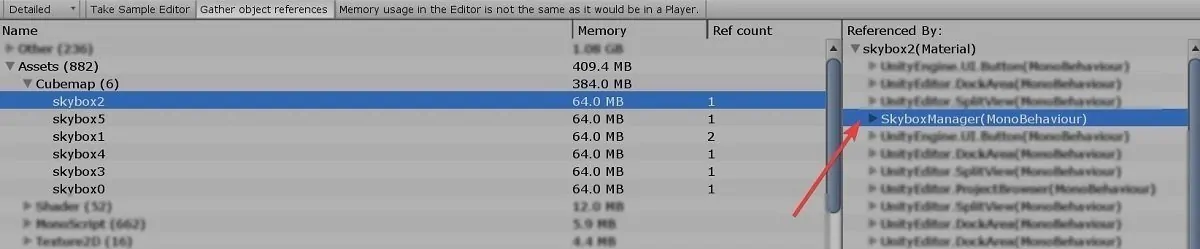
Holy crap, what happened there? All skybox textures are loaded in memory, but only one is displayed at any given time. You see what we did? This rookie architecture produced the whoooooooping figure of 400mb.
This is definitely a no-go, considering this is just a small piece of a future game. Addressing this very problem is the foundation for our next section.
Come with me!
- Traditional asset management entails direct references
- Therefore you keep all objects loaded at all times
- Your project will not scale this way
Level 2 Developer: Unity Addressables Tutorial on Workflows
In video- games you start at level 1, which is great, but once you know the gameplay rules it is time to leave the safe city walls in our quest to level up. That is exactly what this section is about.
Grab the level 2 project below:
Download the project in ZIP format directly from GitHub
Or alternatively, visit the GitHub Repository
As we previously saw in the profiler, we have all skyboxes loaded in memory even though only one is actively used. That is not a scalable solution, as at some point you will be limited on the amount of different variations of assets you can offer to your players. An advice? Don’t limit the fun of your players.
Here, let me help you. Take my shovel so we can dig the so needed tunnel to escape the prison of traditional asset management. Let’s add a new fancy tool to our toolbox: the API of Unity Addressables.
The first thing we need to do is to install the Addressables package. For that, go to Window → Package Manager, as shown below:

Once installed, it’s time to mark the materials as addressables. Select them and activate the addressables flag in the inspector window.
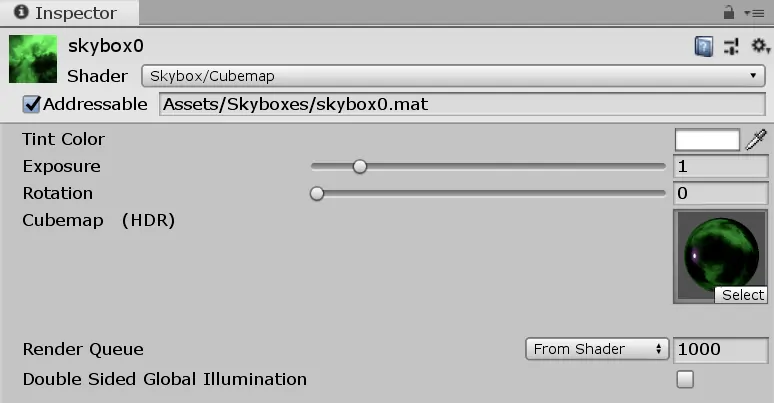
What this will do is to ask Unity politely to include those materials and their texture dependencies in the addressables database. This database will be used during our builds to pack the assets in chunks that can easily be loaded at any point during in our game.
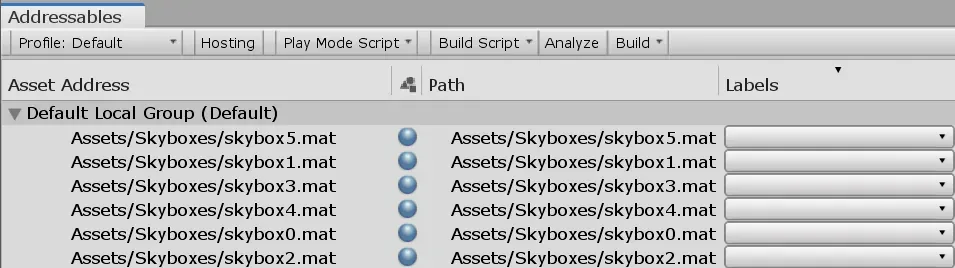
I’ll show you something cool now. Open Window → Asset Management → Addressables. Guess what’s that? It’s our database screaming to go live!
My dear reader: that was the easy part. Now comes the fun part.
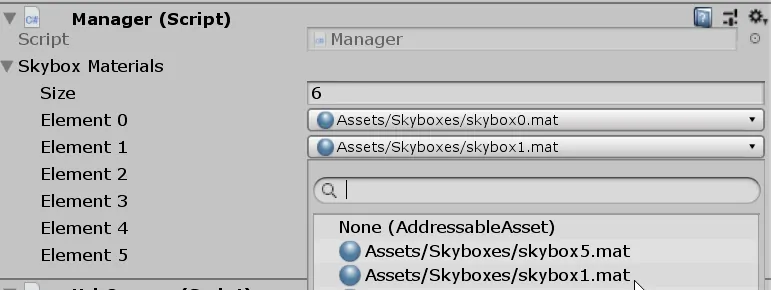
I want you to pay a visit to an old friend of ours from the previous section: Sir SkyManager. If you check it, you will notice it is still holding direct references to our assets! We don’t want that.
We are teaching our manager to use indirect references instead – i.e. AssetReference (in Unreal Engine you might know them as soft references).
Let us do just that, let’s beautify our component:
using UnityEngine;
using UnityEngine.AddressableAssets;
using UnityEngine.ResourceManagement.AsyncOperations;

public class SkyboxManager : MonoBehaviour
{
    [SerializeField] private List<AssetReference> _skyboxMaterials;

    private AsyncOperationHandle  _currentSkyboxMaterialOperationHandle;

    public void SetSkybox(int skyboxIndex)
    {
        StartCoroutine(SetSkyboxInternal(skyboxIndex));
    }

    private IEnumerator SetSkyboxInternal(int skyboxIndex)
    {
        if (_currentSkyboxMaterialOperationHandle.IsValid())
        {
            Addressables.Release(_currentSkyboxMaterialOperationHandle);
        }

        var skyboxMaterialReference = _skyboxMaterials[skyboxIndex];
        _currentSkyboxMaterialOperationHandle = skyboxMaterialReference.LoadAssetAsync<Material>();
        yield return _currentSkyboxMaterialOperationHandle;
        RenderSettings.skybox = _currentSkyboxMaterialOperationHandle.Result;
    }
}
What happens here is the following:
- A major change happens in line 7, where we hold a list of indirect references (AssetReference) instead of direct material references. This change is key, because these materials will NOT be loaded automatically just by being referenced. Their loading will have to be made explicit. Afterwards, please reassign the field in the editor.
- Line 13: since we are now in an asynchronous workflow, we favor the use of a coroutine. We simply start a new coroutine that will handle the skybox material change.
- We check in lines 18-20 whether we have an existing handle to a skybox material and, if so, we release the skybox we were previously rendering. Every time we do such a load operation with the Addressables API, we receive a handle we should store for future operations. A handle is just a data structure containing data relevant to the management of a specific addressable asset.
- We resolve specific addressable reference to a skybox material in line 23 and then you call its LoadAssetAsync function, over which you can yield (line 25) so we wait for this operation to finish before proceeding further. Thanks to the usage of generics, there’s no need for sucky casts. Neat!
- Finally, once the material and its dependencies have been loaded, we proceed to change the skybox of the scene in line 26. The material will be offered in the Result field that belongs to the handle we used to load it.
Keep in mind: this code is not production-ready. Do not use it when programming an airplane. I decided to favor simplicity over robustness to keep the matter simple enough.
Enough with explanations. It is time you and I saw this in action.
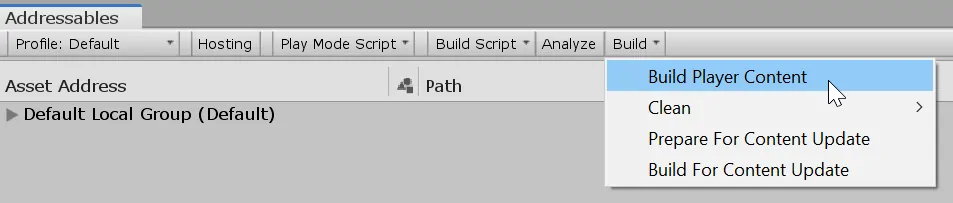
If you would be so kind to perform the following steps:
- In the addressables window, cook the content (build player content)
- Then make a build on a platform of your choice
- Run it and connect the (memory) profiler to it.
- Protect your jaw from dropping.

Isn’t asset cooking delicious?
I like happy profilers. And what you saw is the happiest profiler the world has ever seen. A satisfied profiler will mean several things. For one, it means happy players playing your game in a Nokia 3210. It also means happy producers. And as of you, it means a happy wallet.
This is the power of the Addressables system.
Addressables which comes with little overhead on the team. On the one side, programmers will have to support asynchronous workflows (easy-peasy with Coroutines). Also, designers will have to learn the possibilities of the system, e.g. addressable groups, and gather experience to make intelligent decisions. Finally, IT will be delighted to set up an infrastructure to deliver the assets over the network, if you opt to host them online.
I have to congratulate you. Let me tell you what we have accomplished:
- Appropriate memory management.
- Faster initial loading times.
- Faster install times, reduced in-store app size.
- Higher device compatibility.
- Asynchronous architecture.
- Opening the door of storing this content online → decoupling data from code.
I would be proud of such a gain. It’s for sure a good return on investment.
Oh, and make sure to mention your experience with Addressables in job interviews.
INTERMEDIATE: Instancing and reference counting
So far, so good. We applied the Unity addressables workflow to skyboxes, which was easy enough. The reason for its simplicity is that you only have a single skybox active at a time, so it is straight-forward to manage their life-cycle.
But skyboxes are not the only type of assets you will have to manage in a game, right?
At some point you might want to add variations of characters, for instance. Those might be your own character or also other players and enemies. You see the increased difficulty here? Now, it is not a matter of unloading an asset and loading the next one. The asset you want to unload might, for instance, still be in use by another instance.
How do we do the memory management in this case?
Luckily for you and for me, Unity handles this for us with its integrated reference counter. This means: every time you instantiate an asset (such as a character prefab), a reference number will be increased for you automatically. Every time you release the asset, the reference counter will decreased. If at any point, this numbers drops to zero — i.e. no instance exists — then the asset will be ready to be unloaded from memory. Both operations can be done with the following constructs:
var operationHandle = prefabMaterialReference.InstantiateAsync(transform, true);
yield return operationHandle;
// …Addressables.ReleaseInstance(operationHandle);
Note that the traditional Unity versions of Instantiate and Destroy will not update the reference count; those will only be affected by the usage of the Addressables InstantiateAsync and ReleaseInstance variants.
So, avoid using Instantiate and Destroy while using Addressables for now.
OPTIONAL: Alternative loading strategies
If you would rather work with hardcoded asset string identifiers instead of with AssetReferences, you may do so in our Manager class by using an alternative construct: The behavior is similar, it will return you an async operation handle you can yield on. Thanks to its generic form, the Result field will be of the type you originally passed to the method invocation.
_currentSkyboxMaterialOperationHandle = Addressables.LoadAssetAsync<Material>("Skybox" + skyboxIndex);
Those string identifiers you pass into the function are set in either the inspector of your asset or in the addressables main window. Alternatively, it is also possible to load all assets belonging to a label as we will see in the next section. This might be useful for, let’s say, preloading all enemies that will eventually spawn in level 4.
- Addressables-based asset management scales just well
- Addressables introduces asynchronous behavior
- Do not forget to cook content on changes!

Level 3 Developer: The Guru’s way for Unity Addressables
In the previous section, we achieved the biggest bang for the buck. We leveled up our skills by moving from a traditional asset management system to an addressables-based workflow. This is a huge win for your project, as a small time investment gave your project the room to better scale in assets while keeping your memory usage low. That accomplishment indeed made you step up to level 2, congrats! However, one question is yet to answer:
Is that it?
No. We barely scratched the surface of Addressables, there are further ways to improve your project with this game-changer package.
Of course you do not have to memorize all the details regarding Addressables, but I highly suggest you to have an overview of them because down the road you are likely to encounter further challenges and you will be thankful to have read a bit further. That’s why I prepared an extra short guide for you.
There you will learn about the following aspects:
- The Addressables window: the details matters
- Addressables profiling: don’t leak a (memory) leak ruin your daymatters
- Network delivery: reduce the time-to-play user experiencematters
- Build pipeline integrationmatters
- Practical strategies: speed up your workflow, trash your 10-minute coffee breaksmatters
And more importantly, answer questions such as:
- What is the hidden meaning behind Send Profiler Events?
- How useful is the AddressableAssetSettings API?
- How do I integrate this all with the BuildPlayerWindow API?
- What’s the difference between Fast Mode, Virtual Mode and Packed Mode?
You can get immediate access to your free PDF and more in TheGamedevGuru University (type your email below to get your personal invitation).
Free resource download
Sign up to unlock this resource and related performance materials.
Already a member? Open this resource.
Conclusions
At the beginning of the post I presented you the challenge I had: halving the memory budget of the project being developed for Oculus Quest in just a month. The result? Task accomplished.
This is what I have to say about this almighty Unity package: the Addressables system saved my butt. It made the timed task possible by avoiding a massive game redesign; those are nearly impossible to pull off in the setting of our port.
Addressables is a promising system. On the one hand, Unity developers are working hard to improve it further. On the other hand, it is production ready and documentation is available.
This means: you can start today using it in your projects. If you followed the article and the guide, it should take you little time to get it running in your project.
Consider it a medium-term investment. You will invest some time this week in order to gain it back during the upcoming months/years of your project. Not only you will benefit from it, but more players will be able to play your game due to supporting more devices.
Let me know what you think
Free resource download
Sign up to unlock this resource and related performance materials.