There is a single thing that has killed the GPU performance of thousands of mobile games: the famous Unity Overdraw. Do you know what overdraw is and what is doing to you?
Don’t let overdraw ruin your game…
Prepare for it.
- Learn what overdraw is and how it destroys your game’s GPU performance (especially on mobile and VR)
- Discover 3 techniques to measure your game’s overdraw
- Prepare your strategy to reduce Unity overdraw

1. What Is Overdraw in Unity?
Picture it’s Monday.
You finally get to wake up by the time the fourth alarm rings at 08:40.
You’re afraid you’ll be late to work, so there’s only time to put your clothes on and to GTFO.
It’s freezing cold outside. But that doesn’t matter.
Listening to your enraged boss would be much worse than suffering from hypothermia, experience has taught you.
So you get into the car and crank the engine.
It’s only 10 minutes to 9:00. If your math doesn’t fail you, you can make it on time to work within 5 minutes.
There’s only one problem: the windshield is frozen and you can’t see a thing.
You do all your best to unfreeze it within your time budget. That takes you about 5 minutes, which leaves absolutely no room for any other surprise.
Great…
As you’re driving, you notice your windshield is fogging up.
Fuck, this can’t be happening, you think.
You sit in impossible angles to see through the small pixels of windshield that aren’t clouded yet.
But the fog is getting so bad that you can only see through by opening your side window and sticking your head out of the car while somehow manage to shift gears.
You certainly didn’t learn this technique in driving school.
In a short moment of sanity, you decide the risk of beheading is just not worth the gain…
You admit defeat…
You do it the safe way and arrive 15 minutes late to work.
The grin at your boss’ face says it all. You’re screwed.
… There have been better Mondays for you.
If you didn’t notice, back in the car you suffered several episodes of overdraw.
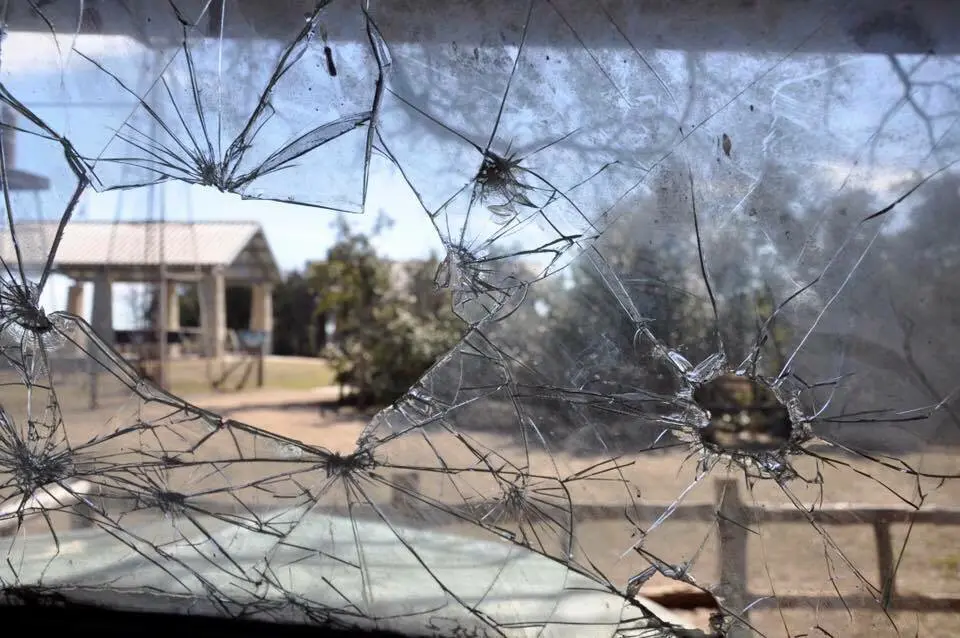
The fogged windshield was something you could call overdraw. It adds an intermediate layer of visual effects between you and the scene you want to see (the kids crossing the street).
Unity overdraw is what happens when you draw the same pixels more than once (in a frame):
- The first draw call comes from the street in front of you.
- The second draw shows the kids crossing the street.
- The third draw is about the fogged windshield that makes it dangerous to drive.
- And the last draw comes from the clouded glasses you’re wearing.
Four layers of overdraw here, which is similar to what would happen with Unity rendering: you render a whole screen, which is composed of millions of pixels. If these pixels are drawn more than once (and they will), then you’re causing a bad time to your GPU in terms of overdraw.
This happens most frequently with transparent geometry, as first you draw the opaque world and then you blend (draw) it with your semi-transparent objects.
To put things worse: a simple post-processing effect such as color grading will probably touch every single pixel at least once. This adds one level of overdraw, as it is redrawing every pixel of your screen.
If your post-processing effect is only affecting the left side of your screen, then it’ll add half a level of overdraw (0.50x), as it’ll touch the half of your screen pixels.
And so on.
Sadly, the same overdraw that caused you to arrive late to work will also cause your GPU to deliver frames too late.
Overdraw can be the difference between rendering at 60 fps or at 30fps (or worse).
Unity overdraw is one of the biggest performance problems for VR and mobile games (including Switch, PSVR and Oculus Quest).
Do you know why overdraw is one of the worst things you can do to your GPU.

2. Why Overdraw Sucks for Unity Performance
The purpose of rendering is to put images to your screen (at a very fast pace). This is done by rendering your scene through specific steps (draw calls).
These intermediate rendering steps do not happen in the screen but in intermediate areas called frame buffers.
A frame buffer is like an empty canvas where painters draw into.
If you think of a painter, well… every stroke costs them some time, especially if they have to change the colors they ‘re painting with.
In terms of graphics programming, that frame buffer is a special texture. And drawing into frame buffers is expensive for many reasons.
Every time you paint a pixel, you transfer key information pieces out and in from that buffer.
This drawing operation costs memory bandwidth.
By producing overdraw, you’re increasing the memory bandwidth your game consumes.
And guess what? This bandwidth consumption is particularly bad on tile-based rendering architectures, which happens to be all mobile platforms.
Overdraw is especially tricky on VR games for two reasons:
- Screen resolution: the amount of pixels you draw each frame is already high.
- You have a much lower performance budget for VR games than for traditional titles, e.g. 120Hz vs. 60Hz.
I hope you kinda got the concept of overdraw, because now I’ll show you different ways to measure it.
3. Three Methods to Measure Overdraw in Unity
3.1. Unity: Overdraw Visualization Mode
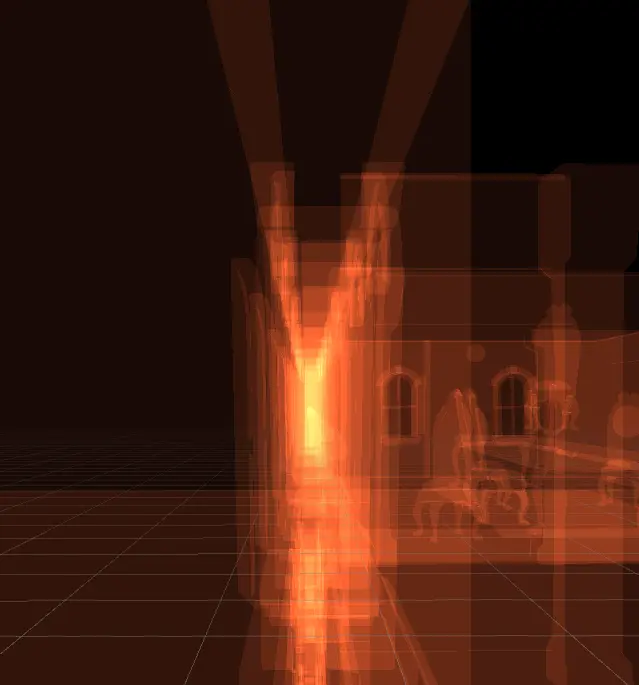
Perhaps the simplest and fastest method to get an idea of our overdraw levels in our scenes is to use Unity’s built-in overdraw view mode.
On the top-right corner of the scene view, click on the visualization type drop down. There, select overdraw.
You’ll see a visualization that looks much like below.
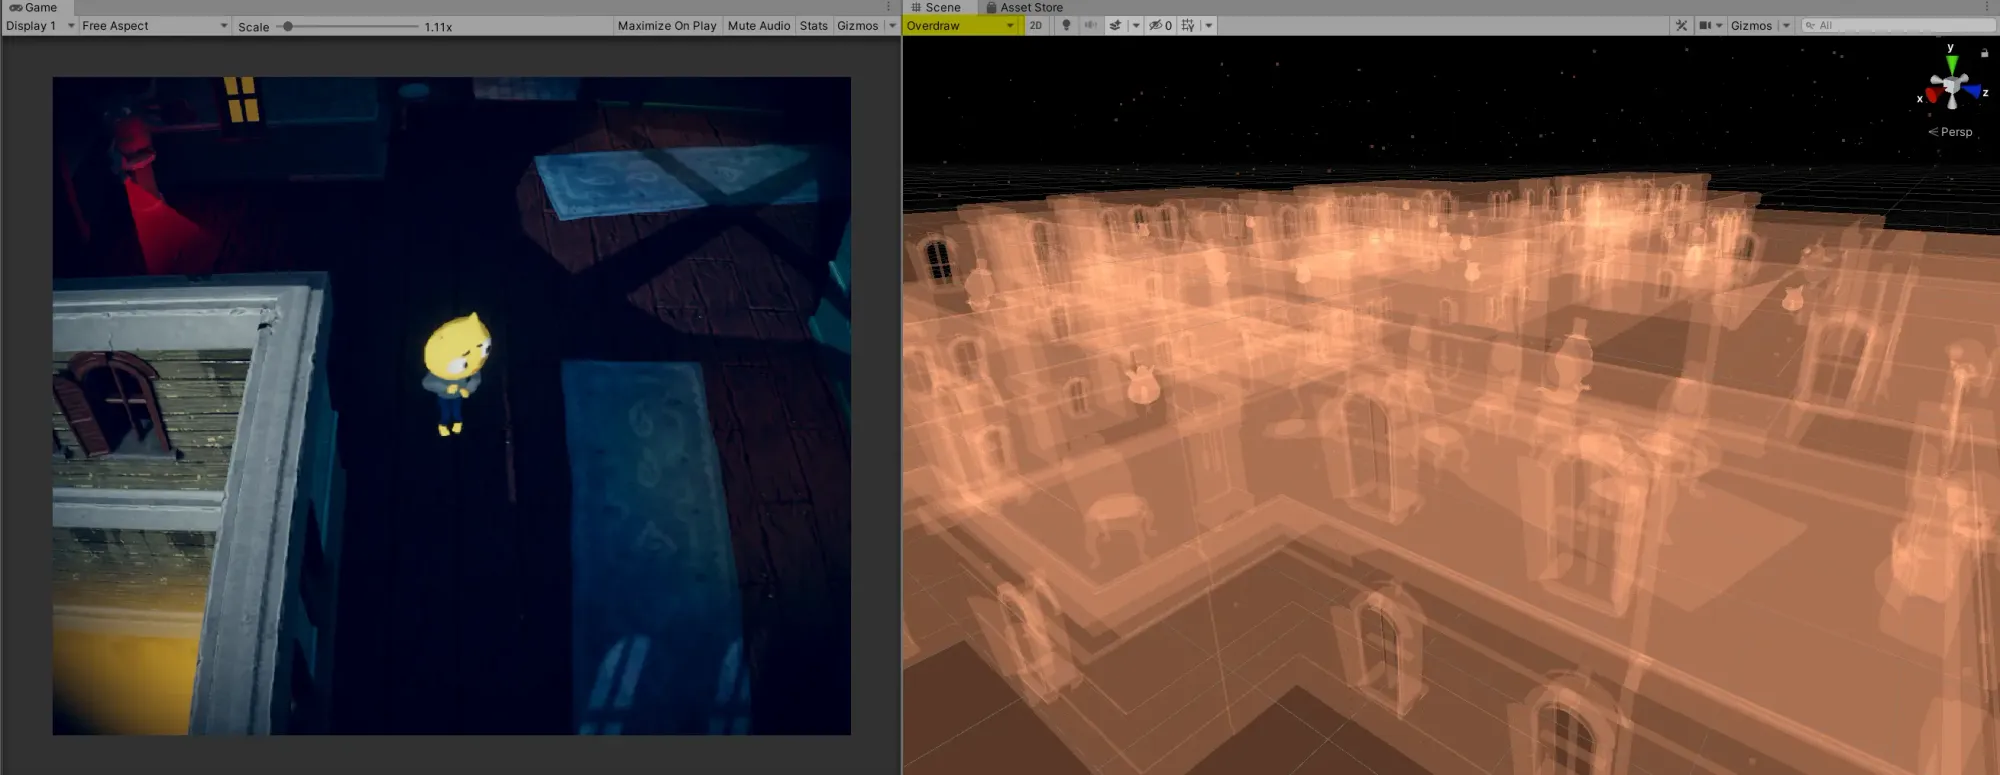
The most intense colors show the areas of the screen which have the highest overdraw. Some of the most intense areas you’ll find are probably related to particle effects.
If you see an area with a lot of overdraw, analyze what’s causing it. Chances are, those are caused by rendering semi-transparent elements.
Note that there’s a huge caveat on this approach…
→The Unity’s built-in overdraw visualization is technically very much incorrect.
Unity uses an additive shader without z-writing to display it, so most of the overdraw on opaque objects you’ll see are false positives.
Unity is not taking into account the per-pixel z-test rejection that the rendering pipeline is doing for you.
But hey, it’s still a helpful tool to have around as long as you’re aware of its limitations.
Luckily for you and me, there are more accurate tools.
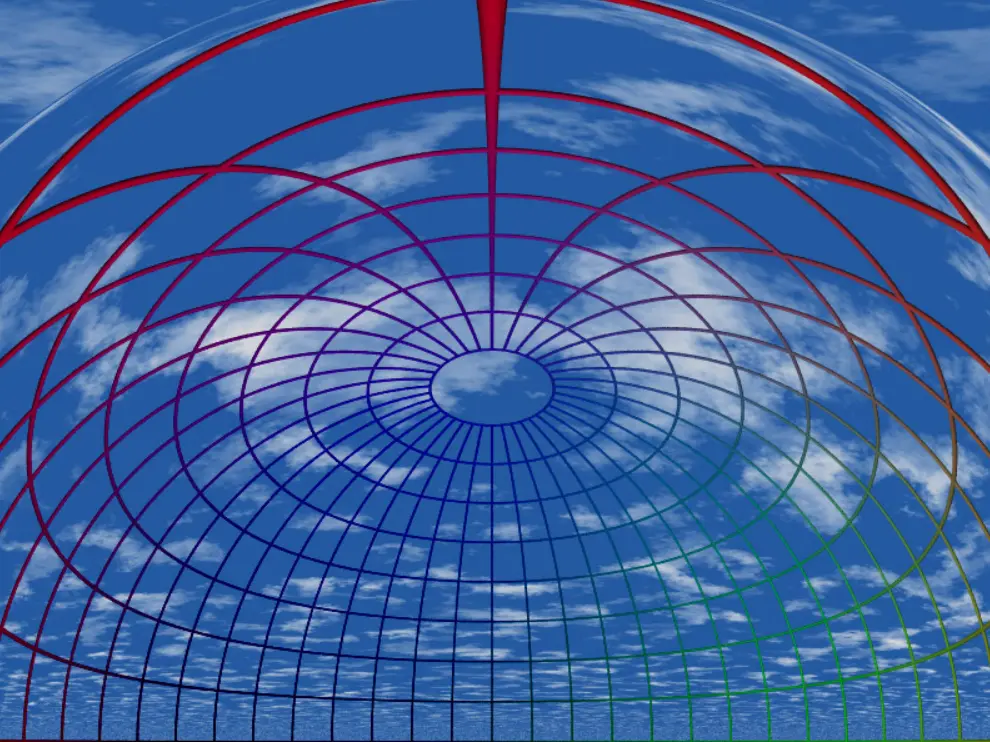
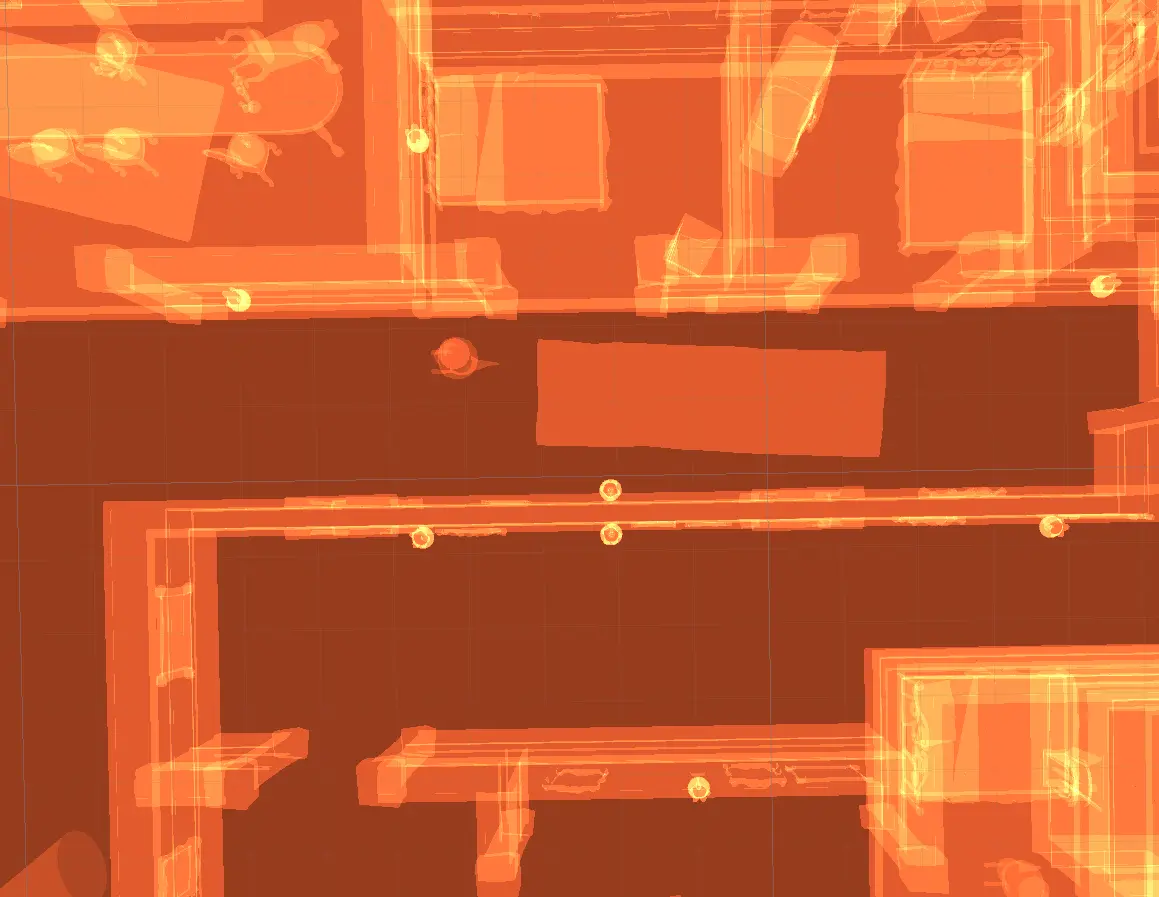
If you are using HDRP 7.1+ (High-Definition Render Pipeline), then you’ll be glad to hear there’s an enhanced overdraw visualization tool. You can access it through Window → Render Pipeline → Render Pipeline Debug → Rendering and set Fullscreen Debug Mode to “TransparencyOverdraw“.
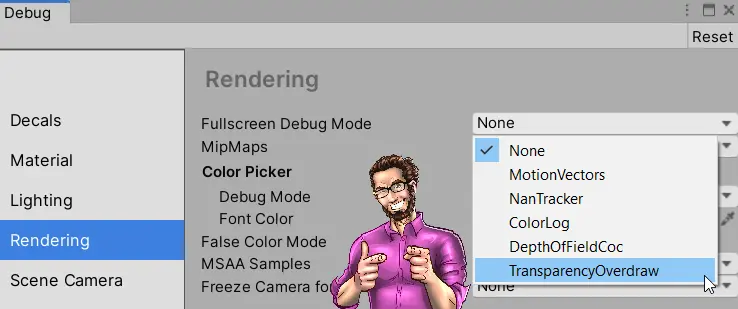
And here’s how pretty this render mode looks like on a sample UI:
Let’s check the next tool.
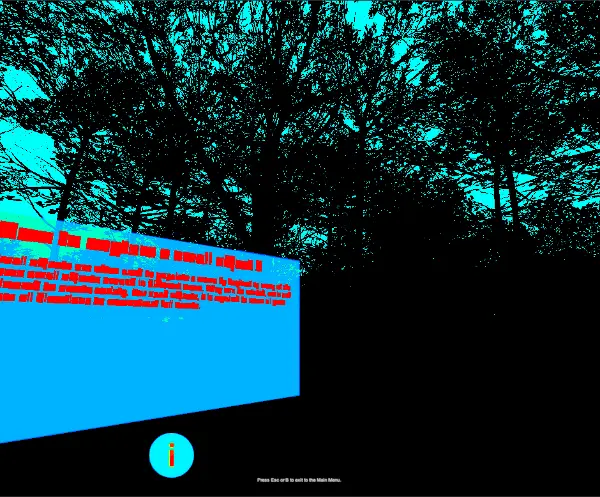
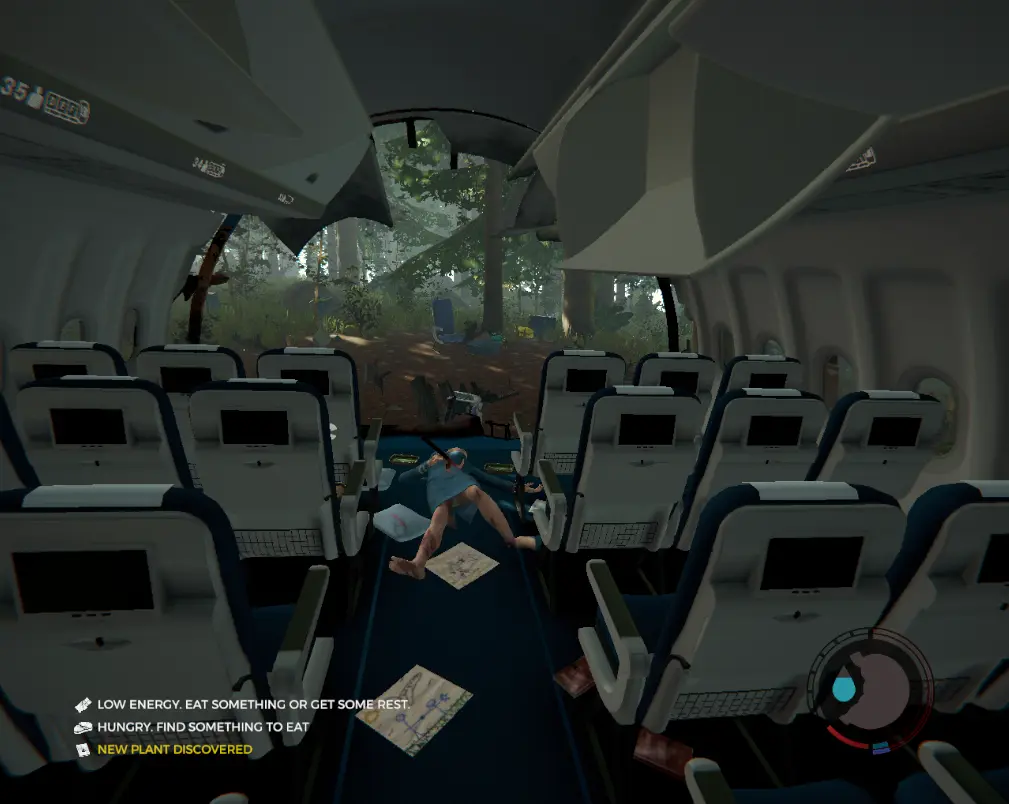
3.2. RenderDoc Overdraw Analysis (Example: The Forest)
Below is a screenshot of the starting scene of The Forest. If you didn’t play it, it’s a survival game that quite reminds me of the TV show Lost.
Here, give it a quick glance because we are about to analyze it.
How complex is that scene in terms of overdraw?
Well, there’s no way to know by looking at the screenshot because it mostly depends on the render order and shaders involved.
But we can use RenderDoc, a free GPU graphics debugger that has saved my butt more times than candies I’ve eaten as a kid.
The advantage? There’s a built-in Unity integration that works out of the box. You install RenderDoc and that’s about it.
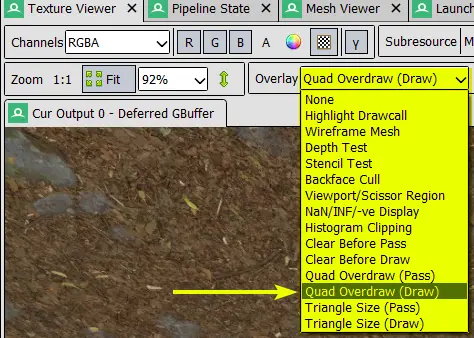
In this example, I used RenderDoc to capture the same frame as the previous image. I then walk through its draw calls and analyze the overdraw they produce by switching the overlay mode to Quad Overdraw (Draw), as shown below.
The next GIF animation shows the overdraw generated by drawing a part of the chassis of the airplane. That’s represented by the pink area.
The Forest: Opaque Overdraw Example
This overdraw happens because we first drew the pixels of the terrain, only to be overridden later by the airplane frame. That’s a waste of bandwidth — drawing the airplane first would be more efficient as you’d skip drawing the pixels of the terrain afterwards because of z-testing.
That case is a considerable amount of overdraw, covering around 30% of the entire screen.
Nop. You couldn’t afford this on mobile.
The last example from The Forest that I want to point out is UI overdraw.
In Unity, UI is most commonly drawn at the end of the rendering pipeline. That way, we make sure it remains on top of everything.
Here, it’s not a major concern since it covers only a smart portion of the screen. But guess what happens if you open a fullscreen map or crafting inventory?
Yeah, you know deep in your heart.
The Forest: UI Overdraw Example
So is RenderDoc. A very helpful tool every (graphics/performance) programmer should have around.
To learn more about this tool, visit my article on Unity RenderDoc integration. Note: the post is old, so my writing style there is very sucky. Still, good reference information.
So far, it’s been quite a graphical adventure. That was fun.
But that’s not enough.
You should become numbers-driven. That’s the ultimate key that will let you compare performance metrics.
The next strategy will help you become more numbers-driven in your quest towards performance expertise.
3.3. Measure Overdraw Using Compute Shaders
In one of the Unite talks on 2017, I met a brilliant engineer from a game development company called Nordeus.
I often got bored at Unite talks, as the topics they cover are shallow, technically speaking.
But this one was different.
A big part of the talk was about Unity GPU Performance, so as you can imagine I was in first raw carefully taking notes. You might actually see me in the video somewhere (but don’t look too hard, back then I was very much programmer-like skinny).
They really knew their shit, I thought.
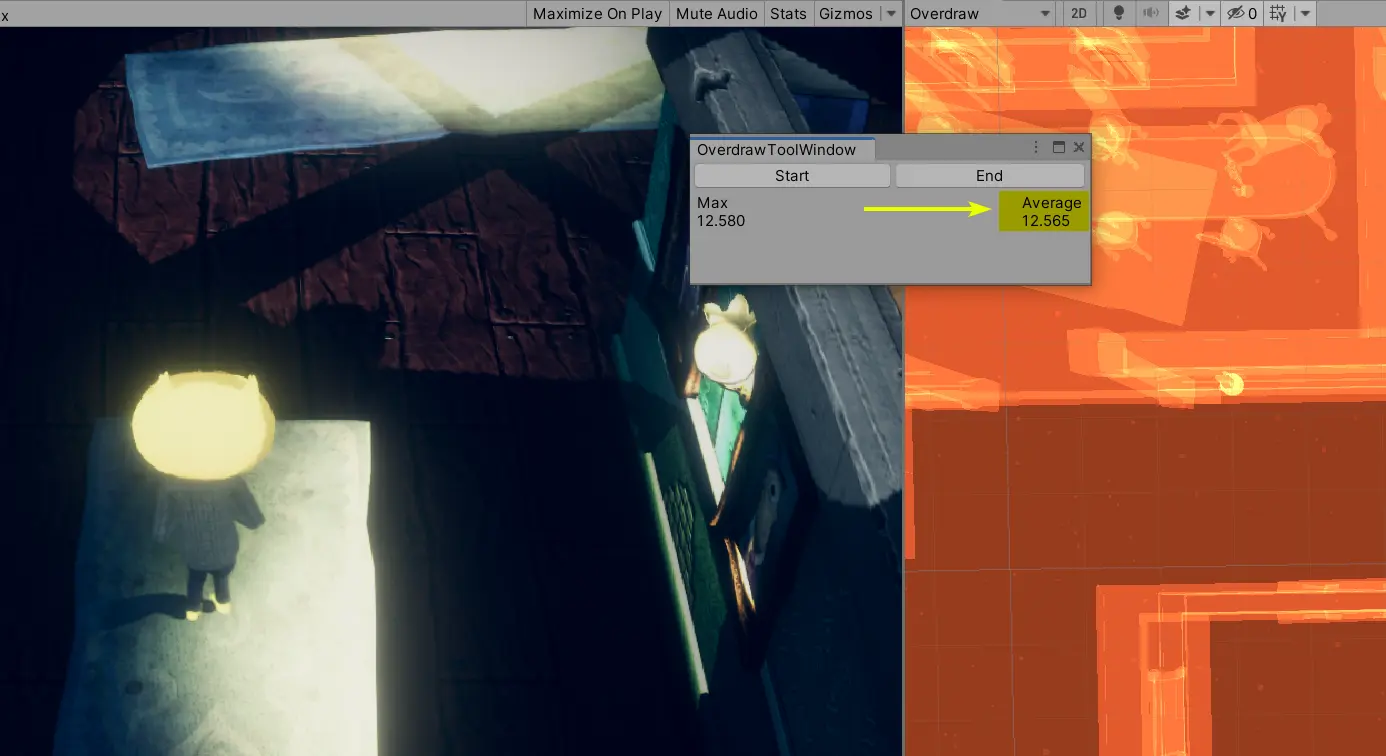
One of the engineers presented a tool they developed to analyze the overdraw metric of your scene with a number.
The tool literally gave you the amount of overdraw you had at each moment of your scene. And this is a very handy number to have.
Ever since that talk, I’ve met the same engineer every single year and we always shared a quick coffee and a great conversation about performance. GDC, Unite, you name it.
The Nordeus’ overdraw tool is at your disposal on GitHub and the video is naturally available on YouTube.
This tool was one of the main resources I used to analyze and optimize overdraw in each of my game scenes.
Whenever I saw an overdraw figure over 3x, I quickly went to that scene and started optimizing things away.
I’ll probably do a more in-depth post on how to use Nordeus’ overdraw tool, but here’s what you have to watch out for:
- The tool works out of the box for directx in the editor. I made it work for OpenGL with some modifications but I can’t share the code yet.
- Aim to have around 1x overdraw, avoid 2x as much as possible and certainly don’t go over 3x.
If you’re serious about performance optimization, this is a precious asset to integrate in your project.
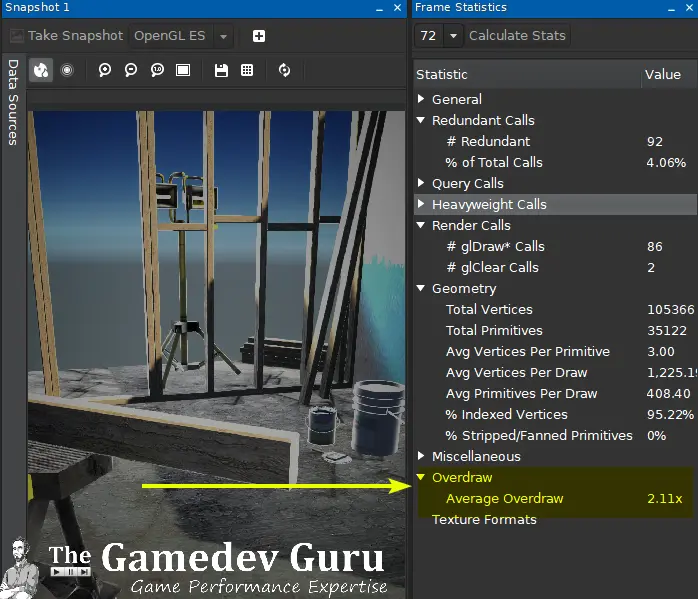
3.4. Bonus: Snapdragon Profiler
If you have a Snapdragon phone at hand (pretty much every Android phone on the market except Huawei), then it’s your lucky day.
There’s a tool that will let you profile your game providing very low-level metrics. Overdraw is one of them.
I am not a big fan of this tool — it’s very unstable and you might spend days to get something useful — , but it’s very valuable in specific situations. And this is one of those use cases.
Here’s a screenshot of what I was talking about.
4. How to Reduce Overdraw
Now that you know how your game is doing in terms of overdraw, the question becomes: how do I deal with it?
Also, there’s another important question that will lead to the same answers: how do I prevent overdraw?
In this chapter, I’ll share with you my best recommendations.
4.1. Reducing Opaque Overdraw
Contrary to popular game development belief, rendering opaque geometry can cause massive amounts of overdraw.
Now, opaque overdraw is cheaper than transparent overdraw because we’re merely substituting pixels. Transparency often comes with alpha blending, a somewhat expensive operation for mobile.
Do not underestimate the performance hit of opaque overdraw, though. Wasting memory bandwidth is far from being cheap.
Unity tries its best to render opaque elements front-to-back. That means, we render first the elements that are closer to the camera so that more distant objects’ pixels are discarded due to z-testing.
This sorting is based on the distance between camera and each object’s bounding-box center.
This sorting is great for GPU performance.
However, there are situations where sorting is kind of broken, and this increases overdraw.
Are you curious to know when?
GPU Overdraw Due to Inefficient Geometry
Here’s the thing: some meshes are definitely troublemakers.
Let’s assume you’re in the center of an inverted sphere that is huge, like a force field effect.
Well, what’s your distance to the sphere?
It is close to zero, as the center of the sphere is exactly where the camera is.That means, that sphere will be rendered first, even though there are some objects that are likely to be drawn in front of it. And this creates overdraw by default.
This is why skyboxes are (or should be) manually rendered after opaque geometry in Unity. Rendering the skybox first would create huge amounts of overdraw.
What about solving this?
You can split your object into smaller subobjects so Unity can take more accurate origin points to sort the draw calls more efficiently.
Another problem happens with geometry that intersects itself. Here, overdraw becomes not predictable because the pixel render order is not guaranteed within the same draw call.
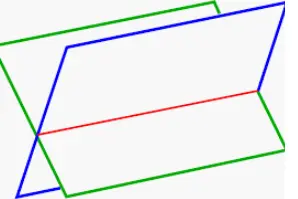
For self-intersecting geometry, you can also split it into different chunks of geometry in a sensible way. In the case of the previous screenshot, you can totally split it in four planes so distance-based sorting will do its job correctly (Note that you’re trading more draw calls for less overdraw).
Let’s see other cases.
GPU Overdraw Due to Unity Batching
I love batching. And you should, too.
Batching helps you and me reduce the CPU load of the render thread, which is often a huge bottleneck in non-optimized games. It does so by combining multiple draw calls in one.
However, merging draw calls means Unity won’t be able to sort them anymore — they’re one now. This causes overdraw and it can be significant.
This happens with all types of batching: static, dynamic and with GPU instancing. What happens is usually not deterministic, which makes your performance analysis job more difficult.
Sadly, the common solution is to disable batching for the troublesome objects.
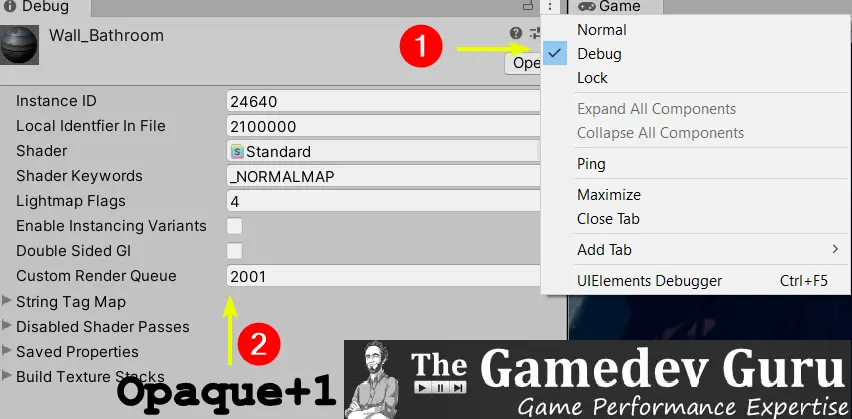
Another solution is to set the Unity render order manually by changing the render queue to Geometry-1, Geometry+1, etc.. This gives you almost full control of the render order, but that comes at a responsibility/risk. Materials using standard shaders require the inspector to be in debug mode, as shown below.
4.2. Reducing Transparency Overdraw
Probably the worst type of overdraw comes from semi-transparent objects.
Overdraw caused by transparency is especially bad for performance because rendering it often comes with alpha blending, which requires additional read and arithmetic operations.
Much worse, transparent materials do not write to the z-buffer so you end up writing more pixels that you can’t discard.
What you have to do here is to reduce the number of transparent pixels you draw and the cost they have.
- Decrease the amount of transparency layers you render.
- Reducing the screen size your transparent geometry takes:
- You can scale down the (screen) size of your transparent objects.
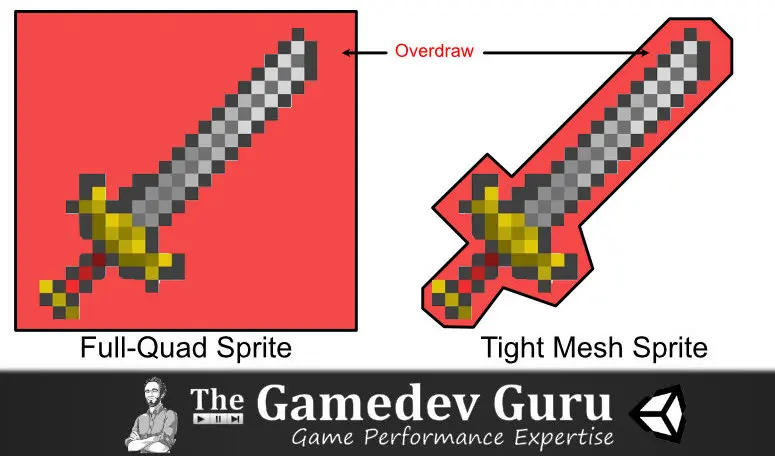
- Remove the 100% transparent texels from your sprites as best as you can.
- Make a tight mesh that reduces the fully transparent regions.
Unity UI is usually bad in terms of overdraw, as the system only supports full-quad rendering. It’s way too easy to stack drawable UI elements on top of each other. And these are rendered as full quads instead of tight meshes.
Sprite renderers, however, support drawing meshes that more accurately represent the opaque part of your sprite to reduce overdraw.
Check the difference below.
Making a tight mesh out of your sprite will significantly reduce your overdraw levels:
An advance technique you can try is to draw part of your UI in opaque mode, just before the geometry render queue. If you write to the z-buffer, then all pixels behind it won’t be rendered. Of course, that won’t look good for all types of UI controls.
Particle systems also excel at creating overdraw through transparency layers. The problem is that they often stack particles on top of each other, so the GPU has to render too many pixels in cluttered areas.
Last, I’d include here the post-processing effects. I’d totally advise against using any sort of full-screen post-processing effect on mobile and certainly limit the amount of them you use for other platforms.
Depending on the implementation of your post-processing effects, you might end up with a new layer of 100% overdraw per effect you introduce. And that’s soo bad for mobile GPUs.
Note: if you can’t reduce overdraw further, try to reduce its cost by going for additive instead of alpha blending. Additive blending is MUCH cheaper than alpha blending on mobile.

5. The Unity Overdraw Cheatsheet for 2025+
Woah, this was an intense post.
If you’re new to performance optimization, this might surely be a lot to digest.
And even if you’re not, you’ll eventually forget the important points of this post.
To help you further, I prepared a cheatsheet with a summary, resources and a checklist that you can keep at hand during game development.
Have it with you and your colleagues will wonder where you learn so much from.
Download it now (below)
Free resource download
Sign up to unlock this resource and related performance materials.