In this blog post, you'll learn what texture compression is, why it is important for your project and how to apply it to improve your GPU and memory performance.
(And no, we're not talking about PNG/JPG formats here)
Your browser does not support the audio element.


Why Should You Compress Your Textures in Unity?
To put it simply, there are 3+1 reasons you should compress your textures in any Unity project you develop.
First, let's talk about your build size.

Reduce Your Package Size
Choosing a size-efficient texture compression format will effectively reduce the size of your builds.
That's because, well, you are compressing your textures... which is one of the biggest memory robbers of all games.
Reducing your package size is important because the bigger your package is, the fewer people will install AND keep your app/game (think of 4G cost... or people freeing up space on their phone).
In other words, a bigger package size exponentially hurts your install and retention rates. It also affects your company's wallet (and possibly your salary as an employee).

Decrease your VRAM Usage
Some texture compression formats have strong compression ratios that will let you pack more textures in less space in your (V)RAM.
That means, you can use more space for the rest of the data your GPU needs to render your objects, such as meshes, shaders + shader data, etc..
On mobile platforms, your VRAM is actually part of your RAM so it becomes quite important to reduce your overall memory usage.
And these savings lead you to...

Improve your GPU Performance
Pushing fewer bytes from your textures to your VRAM (and later to your texture caches) reduces the memory bandwidth that your project demands from your target hardware. That will automatically reduce the cost of rendering, especially on mobile platforms like Oculus Quest where memory bottlenecks are notorious.
Reducing memory bandwidth will also decrease your power consumption and keep your device cooler. This is especially important for mobile VR during the hot days of summer.
Additionally, there's an extra motivator to select your texture formats carefully...
That is, choosing an unsupported format will kill your loading times and exponentially increase your chances of crashes.
This happens because Unity will decompress textures with unsupported formats on the fly. That takes time and especially memory, factors that every operating system doesn't like.
Now that your inner motivation grew, let's see what actually texture compression is.
What is Texture Compression?
Before you say something like "I already compress my textures with png/jpg", let me tell you: your GPU won't swallow these formats.
The reason being: your GPU needs random access to your textures, as fragment shaders often enough only require some texels and not all of them.
However, PNG's and alike are compressed with global information, which makes random access hard/inefficient. It's just like zip files.
The result is that we need GPU-specific compression formats that work with groups/clusters/blocks of texels.
Like I described earlier, the idea behind texture compression in Unity is simple:
- Reduce the size of your textures (in SSD, RAM, VRAM)
- To reduce the memory bandwidth your GPU requires to fetch your texels during fragment shading.
- And therefore improve your GPU performance.
We are talking about savings of up to 80% in memory here. Nothing a professional developer should ignore.
Let's start with the basics.

The Basics: How to Use Texture Compression in Unity
The simple answer is: Unity already compresses your textures by default.
But the more detailed answer you need to know is: Unity has likely chosen a non-optimal texture compression format for your textures.
So let's see how we can compress our textures ourselves. The process is simple:
- Select your texture in the project view.
- Inspect your texture import settings in the inspector.
- Per platform, choose your desired texture format from the dropdown.
Texture Compression in Unity: Steps
And these are the basics.
Select the texture compression you want for your textures and apply it.
Now, the dropdown view might well contain over 20 options. In other words, choosing the right format can be overwhelming if you don't know much about texture compression.
Let's talk about that for a second.

The (More) Advanced Topics of Texture Compression
Choosing Your Unity Texture Formats
The list of texture compression formats is huge and overwhelming. So how do you choose?
When my clients work with me, I always walk them through three important factors:
- Hardware support.
Modern GPUs support modern texture formats, e.g. PS4 supports BC7, but PS3 doesn't. An iPhone 6 also supports ASTC, but an iPhone 5 doesn't.
The question is: how much market are you willing to sacrifice*?
* Sacrifice means suffer from higher loading times and crashes, often enough. Unless you use split APK, but that's another beast. - Quality vs size.
Modern formats tend to offer better quality, but this is something you need to analyze in your project through A/B texture testing as I show in week #8 of the Unity Performance Taskforce.
Also, different texture compression formats will have different compression ratios. - Texture use case.
You don't necessarily want to compress albedo formats the same way as normal maps or even lightmaps. Different formats have different strengths. Also, your compression format also depends on how many channels your textures have: R, RG, RGB or RGBA.
In desktop/console, the choice is usually between DXT(C) and BC depending on your DirectX level. On Android/iOS, the choice is between ASTC or ETC(2) / PVRTC depending on many factors.
In the Unity Performance Taskforce (live lesson on week 8), I show you with examples how to choose your ideal texture compression format depending on these factors.

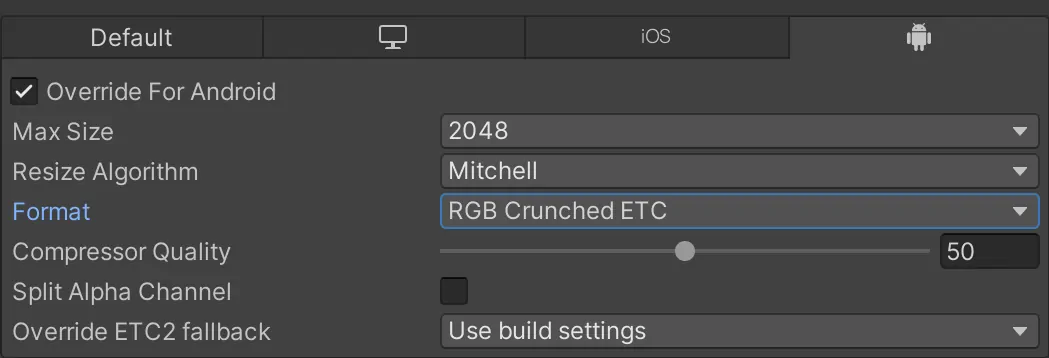
Crunch Compression in Unity
If you want to reduce your build size, you may be able to apply another compression pass to your textures. That's what we call crunch compression.
Note that it will reduce your quality and your textures will still take the same amount of VRAM, so only build size is affected.
To achieve this, you can select the Unity crunch compression variant for formats like ETC and DXT. The quality slider lets you increases quality at expense of size and the other way around.
We still have a bunch of factors to keep in mind, so let's just continue.

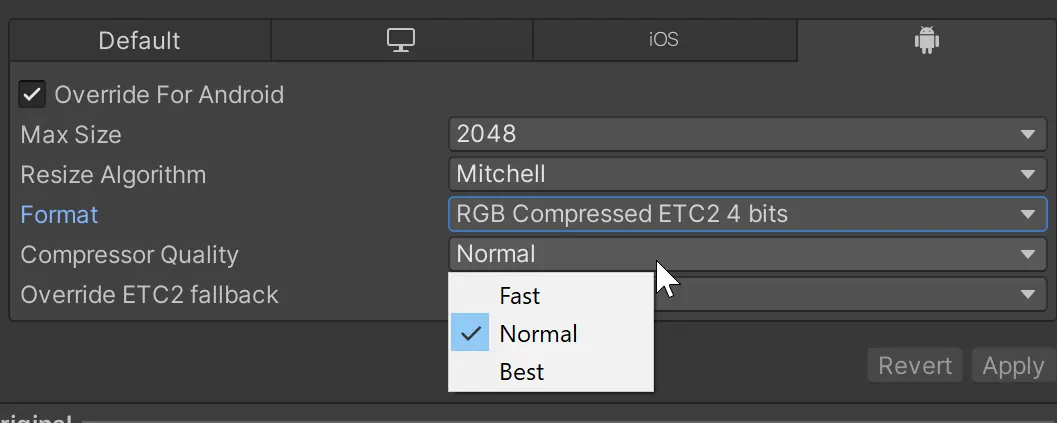
Texture Compression Quality in Unity
Higher compressor quality = better look on your textures BUT higher compression times in editor time.
The final size of your textures won't change, but the import times might increase from seconds (in fast mode) to hours (in best mode) in some cases.

Keeping Texture Format Policies Consistent
Let's be honest: you might forget to set your texture format in some of your textures in Unity. ANd that's not nice, because you want to be consistent at shipping efficient, high-quality textures.
To avoid that, ask Unity to set the texture compression for you.
You can use scripts that automate the import settings on import/build time... But there's an easier version: use this technique I show you in my free training series.
I hope by now you have gained awareness on the importance of handling your texture compression with love & care. So, what now?

What's Next?
If you want to go deep in texture compression, check out week #8 of the Unity Performance Taskforce. In that lesson, we cover in detail the topic of texture compression, the features of the main formats and visual comparisons that will help you decide.
You'll also gain access to the online texture compression comparison tool that shows you the visual diff between the different compression formats for albedo textures, normal maps and single channels textures. That way, you'll be able to easily choose which texture formats you should stick to.
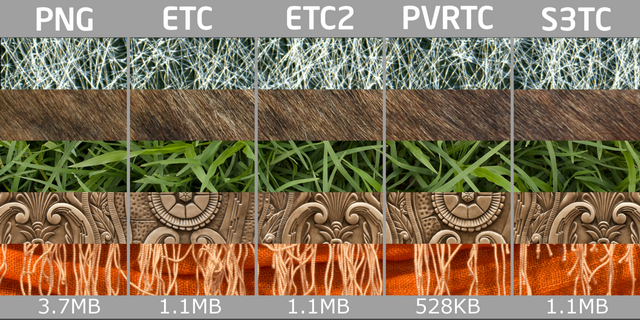
Here's a preview of the texture compression comparisons you'll get access to:
The pink dots highlight the relevant visual differences between the formats you select. That's an excellent way of comparing texture formats like DXT1 and BC7. Especially interesting is the ASTC comparison based on the several block sizes.
Let me know if you found this useful & see you next time,
Ruben (The Gamedev Guru)