
Here’s a question for those of you who develop for Oculus VR… How much do you really know about the Oculus CPU and GPU hardware levels? Let’s see what these hardware levels are doing to your game.

- Oculus CPU and GPU Hardware Levels: what are they and what are they doing to your game?
- How to correctly use Oculus Hardware Levels to achieve your game performance goals
To put the concept of Oculus Hardware Levels in perspective, I’ll tell you how I discovered the importance of this concept.
If you are a mobile VR developer, you know how hard it is to optimize your game to fit within the technical budget. One of the biggest offenders to your Unity GPU performance is the famous and deadly overdraw.
Overdraw happens when you draw the same pixel more than once within the same frame. Overdraw often happens with transparent objects, as they are normally drawn after opaque objects for correct alpha-blending calculations.
Let me ask you… do you wear glasses?
If you’re looking at the world through dirty glasses, then you’re adding a layer of overdraw to your view. This is so because your oily fingerprints are “rendered” on top of the rest of the world. The light going through your eyes goes through another render pass occurring in your glasses.
The issue is, the overdraw your glasses produce will not only obscure the things you might want to look at, but it will also add great complexity to the GPU rendering pipeline.

So in my last project, I did several overdraw optimizations that, under my experience, were assured to give me substantial GPU performance gains, e.g. approximating complex overlapping alpha-blended geometry to simpler shapes.
However, after doing such optimizations, I got only marginal improvements on the GPU performance. While I was expecting gains of at least 1ms, the improvements barely touched the 0.1ms barrier.
How weird, I thought.
The scenes were not that complex, visually speaking. No real-time lights, inexpensive shaders, about 2x-2.5x overdraw and yet… it was not performing as well as I would expect.
In other words, the performance results I was getting were not linear with the effort I put into optimization.
Weeks passed and it slowly became clear that I was missing something.
Something is sabotaging my game performance, I thought.
The question is… who?
One day, I was digging in the Oculus SDK, looking for rendering parameters I could adjust to perform my usual A/B performance tests.
And… That was exactly the place where I found the real gold.
I came across the concept of Oculus hardware levels. Checking the documentation wasn’t all that optimal, as it was highly outdated, but it gave me a good start.
After some experimentation, I experienced the natural adrenaline rush that comes with finding a possible solution after such a long period of frustration.
Would the oculus hardware levels be the savior?
What Are the Oculus Hardware Levels?
Two years ago, just before I moved to Amsterdam, I had the luxury to own a Seat Cupra, a small turbocharged gas car that gave me about 300 HP of love. I had quite some fun driving it in the snowy mountains of Saxony (Germany), as well as in the German highways where I could try my car without speed limits. You can see a picture below.

As with any powerful car of that style, gas mileage was only acceptable as long as you treated the car with granny-like speed.
But I knew the car wanted more than that (yeah… sure).
The problem was: the higher the revs, the more power it produced (but also the more gas it burned).
You see, it was hard to find the balance between fun and wallet. They were clearly in an inversely proportional relationship.
And that was the kind of challenge I saw while developing for Oculus Quest.
The concept of hardware levels gave me the pedal I could press to increase the revs of the VR headset… at the cost of increasing its battery consumption.
With higher oculus hardware levels, I noticed the huge jump in performance that Oculus Quest was able to deliver… but it also got pretty hot inside the headset. A red forehead was becoming more common and people started asking if I went on selective holidays.
The Oculus SDK offers a property you can adjust to specify how much power your hardware should operate with.
But, just like with a car: the higher your power expectations, the more heat it’ll generate and more battery it’ll drain.
So the question is: how should we go about the hardware levels?
How To Use The Oculus Hardware Levels
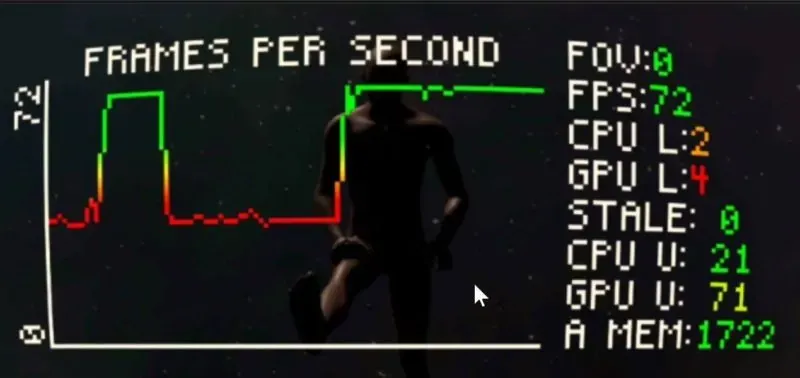
Oculus offers you two hardware levels: CPU and GPU levels.
And, different to what the documentation says, on Quest you have 5 Oculus hardware levels ranging from 0 (low power, low consumption) to 4 (maximum power, incandescent face).
Level 0 might be just enough for 2D VR (don’t try this at home).
But with level 4, you’re unlocking the headset’s full potential… you’re telling the OS: I don’t care about my users’ utility bills, just give me all the juice you’ve got.
Hardware levels work by setting the frequency of your processors
Here’s my opinion: it is best to develop at level 2 and to optimize your game to fit within that budget. Only when you can’t really optimize further, you should consider going beyond level 2.
Why?
Because there’s an underestimated correlation between battery life and user reviews. The more battery your game draws, the more upset your users will be.
You don’t want to realize the impact of battery consumption when the 2-star reviews have been upvoted so much that they cover your game title.
This is how you set these levels in run-time through code:
OVRManager.cpuLevel = 2;
OVRManager.gpuLevel = 2;
Somehow, my first Hello World seemed more challenging than that.
In any case, you can find the current cpu/gpu level at any time by checking the output of logcat:
adb logcat -s VrApiAnd
you might try setting it in the console with adb, although I haven’t personally tried it yet.
adb shell setprop debug.oculus.cpuLevel 2
adb shell setprop debug.oculus.gpuLevel 2
My advice?
Always set it to a value. Otherwise, the OS will choose it for you and you’ll get inconsistent profiling results.
My experience?
The CPU levels didn’t seem to help that much with performance, but it was welcome. GPU level 4, however, gave me a jaw-dropping 60% jump. I mean, just try it for yourself.
Conclusion — Next Steps
Don’t do the mistake of letting the OS choose the right level for you.
Take the advantage you have of developing for a specific platform to tweak it to your optimal use case.
Just be responsible with the hardware levels.
Last thing…
Avoid this performance mistake and 90+ others by downloading my Unity Performance Checklist for 2026+.
Get the Unity Performance Checklist
Sign up to access the checklist and companion resources in your members area.