
The common wisdom says “profile, optimize, repeat”. Let me warn you: this won’t always work. Optimizing low-hanging fruits can gain you a whole millisecond in a day. But when those are gone, speeds of 0.1 milliseconds gains per week can become normal. When that happens, you need other tools such as the Unity CPU Slicing technique.

In this blog post, you’ll learn how to apply:
- Update Batching: reduce the costly overhead of Unity calling your Update functions
- CPU Slicing: Split your CPU load across multiple frames to multiply your scripts’ performance

How Did I Get Into This Mess?
2019 was a tough year for me.
I was in charge of porting a high-demanding PC/PS4 VR title to Oculus Quest, a mobile VR platform.
It was a daunting task for many reasons… and performance was surely the toughest objective to accomplish.
So I had a few months to make the rendering of each frame take less than 13 milliseconds. If you’re a veteran, you know that doesn’t really give you much room for fancy 3d graphics and complex gameplay.
And 13 milliseconds was a very distant goal from the 40+ milliseconds I started with.
At the beginning of the project, I was confident I’d pull it off. After all, I had done huge mobile optimizations in the past.
Weeks passed by optimizing every single aspect of the game I could think of. Days where I saved a whole millisecond were kind of common. And those days brought me closer to my objective relatively fast.
However, by the middle of the project… I wasn’t that confident anymore.
After optimizing all the low-hanging fruits, the CPU performance gains were becoming much rarer. I was used to gaining whole milliseconds within single days, but my speed dropped to the painful figures of 0.1-millisecond gains per day — if lucky.
I remember how excited I got when I jobified the audio system we used to update 200+ audio sources. I was really proud. But after careful examination, that optimization only got me 0.3 ms ahead but stole about 3 days of my budget.
… And I still had 3 milliseconds to go with little time left.
That was really a big problem considering the optimization speed I dropped to.
Draw calls were fine. Physics were also very optimized for this type of game. And the whole game logic was already pretty well optimized and partly multithreaded.
I had just a few weeks left and I didn’t have any idea on how to approach the situation… and I knew thetraditional wisdom of “profile game, optimize script, repeat” wouldn’t get me there in time.
If you know me, you can probably guess what I would do in these type of situations…
Radical solutions.
I opened my notebook and started an unusual brainstorming session that would end up with a crazy idea.
As I re-read the Oculus Quest guidelines, I saw that indeed I had to render the game at 72 FPS.
But this is the key I realized back at that point: rendering at 72 FPS doesn’t mean you must execute everything at 72 FPS. In fact, physics already execute at a different pace.
So I asked myself: what if I run the logic at lower framerate?
I quickly stood up from my seat, grabbed a sugarless double espresso and went straight to the drawing board.
At the drawing board, I started by making an inventory of all the expensive gameplay functions (funny how code that stole milliseconds from a CPU would steal hours from my sleep in the previous months).
Then I divided the gameplay functions into three groups:
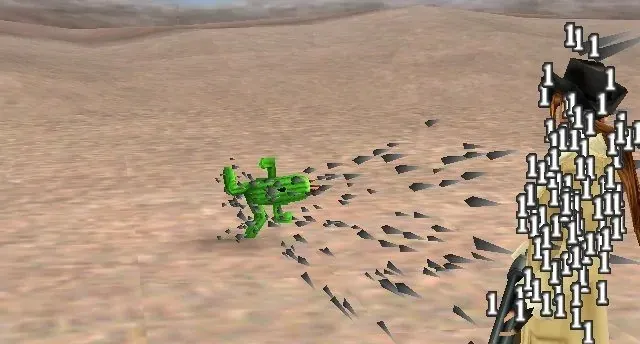
- Cactuar group: thousands of inexpensive scripts that, when combined, created a terrifying panorama. The name comes from the deadly 1000 Needles attack from Cactuar in Final Fantasy, each needle making just 1 point of damage.
- Serious troublemakers: about ten scripts, each taking an average of 0.1 millisecond per frame.
- Final bosses: massive monster scripts you wouldn’t want to mess with. Each took about 0.5 milliseconds.
Was making these groups critical?
Probably not, but I had fun doing it… and it helped me with the next step.
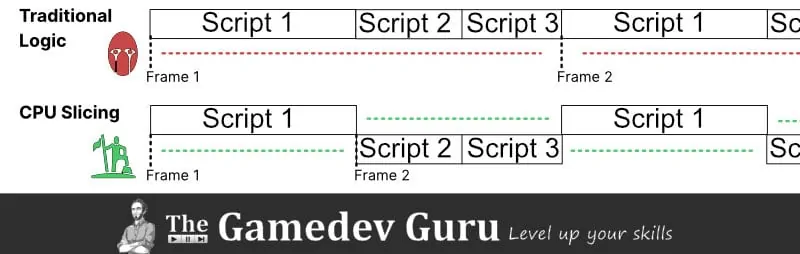
Script groups in sight, I then re-arranged the scripts into two new separate groups that I called Group Alpha and Group Beta. I moved them around with one goal in mind: to make each group take about the same time to execute, i.e. 1.5 milliseconds per group.
The idea was simple: to execute the logic of Group Alpha in frame 1 and the logic of Group Beta in frame 2. And then I just had to repeat the cycle to literally halve the per-frame CPU cost of my scripts.
Within an hour I implemented a prototype to split the execution of my logic into these two groups.
Naturally, the next step was to test it. As soon as I went into gameplay I saw the game breaking into pieces from 8 different angles. Even Unity crashed (but that was nothing new).

Another sugarless double espresso gave me the well-deserved caffeine kick that helped me tweaking my scripts. I had to make them less CPU-attention sensitive. They’d need to let go of all the CPU love they used to get each frame to be content with half of it.
After some time and tears, I got it all to work.
I reduced the CPU time I spent each frame executing scripts by using what I call logic interlaced execution. I think the whole internet calls it CPU Time Slicing… so I guess I’ll stick to that name.
Slow down, though… this system comes with its side effects.
I excluded scripts driving noticeable visual elements, as alternating their execution would make the game kind of jittery. I found it funny but my client wasn’t that enthusiastic about these.
The benefit of this system is that eventually I could add a third, fourth, fifth group depending on time-critical the scripts were.
Also, by using a centralized update manager I got rid of the overhead that comes with having too many Update functions in Unity.
This system helped me get the last few gains that I so desperately needed.
Back to you… let me share with you the trick about implementing this powerful strategy in your game.
Unity Performance: What’s CPU Time Slicing?
If you read my story, you might have a vague idea about the meaning of Unity CPU Time Slicing. But just in case, I’ll share an analogy that I like with you.
As a kid, I was always told to keep the house clean.
I was supposed to clean the dishes, throw the garbage, take care of the dishwasher and laundry, to mop and sweep the floor… Everything had to be done daily, of course.
And as I kid I was, I naturally had a tendency to rebel against this unjust oppression against my freedom.
I knew I couldn’t get it all done every day. So I prioritized my tasks and split the work across several days.
On Mondays I’d sweep the floor and play videogames. On Tuesdays, I mopped the floor and played videogames. On Wednesdays, I did the ironing and played videogames. You know how the rest goes on.
I didn’t know yet, but this kiddo had intuitively developed and applied the concept of time slicing.
You see, each day I had a budget of a few hours for too many tasks… So I prioritized them accordingly.
There was only one set of tasks that I would execute every single day: the critical ones (playing videogames). The rest I spread across the days of the week.
Yes, I was supposed to do it all, but I had no budget for it. So the second best option (after delegating them to my younger brother) was to apply time slicing.
You can apply the same principle to game development.
At some point, you might push way too much work to your CPU. So you can split some of that CPU work across different frames.
You do the critical work every frame and split the rest.
That’s time slicing in a nutshell… Let’s see how you can start applying it today.
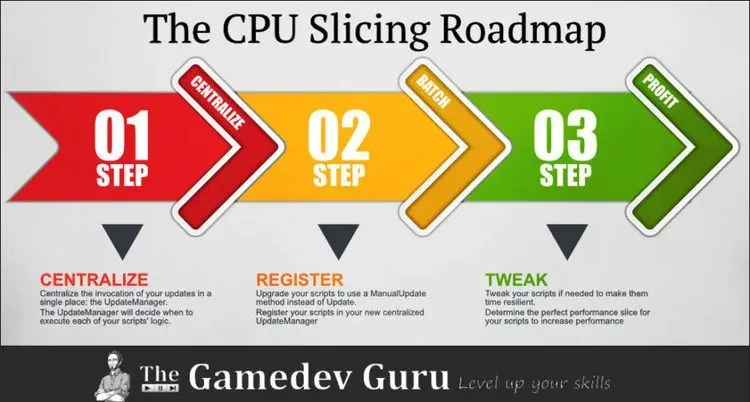
How To Apply CPU Time Slicing In 3 Steps
This is how you and I will get Unity CPU Time Slicing to work:
- Make your functions implement a manual Update function, e.g. ManualUpdate or BatchUpdate
- Have a centralized manager that regularly calls your BatchUpdate, e.g. UpdateManager
We want to gain control over when to execute your scripts instead of letting Unity choose it for us.
1. Create an UpdateManager
We will create a simple UpdateManager that contains a list of MonoBehaviours to update. Instead of calling their Update functions, we rename that function to BatchUpdate and call it ourselves in the appropriate frames depending on the bucket we are in.
Below is a basic example implementation.
public class UpdateManager : MonoBehaviour
{
    public enum UpdateMode { BucketA, BucketB, Always }
    public static UpdateManager Instance { get; private set; }
    private readonly HashSet<IBatchUpdate> _slicedUpdateBehavioursBucketA = new HashSet<IBatchUpdate>();
    private readonly HashSet<IBatchUpdate> _slicedUpdateBehavioursBucketB = new HashSet<IBatchUpdate>();
    private bool _isCurrentBucketA;

    public void RegisterSlicedUpdate(IBatchUpdate slicedUpdateBehaviour, UpdateMode updateMode)
    {
        if (updateMode == UpdateMode.Always)
        {
            _slicedUpdateBehavioursBucketA.Add(slicedUpdateBehaviour);
            _slicedUpdateBehavioursBucketB.Add(slicedUpdateBehaviour);
        }
        else
        {
            var targetUpdateFunctions = updateMode == UpdateMode.BucketA ? _slicedUpdateBehavioursBucketA : _slicedUpdateBehavioursBucketB;
            targetUpdateFunctions.Add(slicedUpdateBehaviour);
        }
    }

    public void DeregisterSlicedUpdate(IBatchUpdate slicedUpdateBehaviour)
    {
        _slicedUpdateBehavioursBucketA.Remove(slicedUpdateBehaviour);
        _slicedUpdateBehavioursBucketB.Remove(slicedUpdateBehaviour);
    }

    void Awake()
    {
        Instance = this;
        DontDestroyOnLoad(gameObject);
    }

    void Update()
    {
        var targetUpdateFunctions = _isCurrentBucketA ? _slicedUpdateBehavioursBucketA : _slicedUpdateBehavioursBucketB;
        foreach (var slicedUpdateBehaviour in targetUpdateFunctions)
        {
            slicedUpdateBehaviour.BatchUpdate();
        }
        _isCurrentBucketA = !_isCurrentBucketA;
    }
}
We make this script a singleton to make sure we keep it alive across scene loads.
As you can see, UpdateManager offers other scripts the option to register themselves in either bucket A or B, or always. The manager will then take care of invoking the BatchUpdate function whenever the time is right (line 40).
Simple, but powerful.
The interface can hardly be simpler:
public interface IBatchUpdate
{
    void BatchUpdate();
}
Now, let’s see how your scripts can profit from this.
2. Link Your Scripts to the UpdateManager
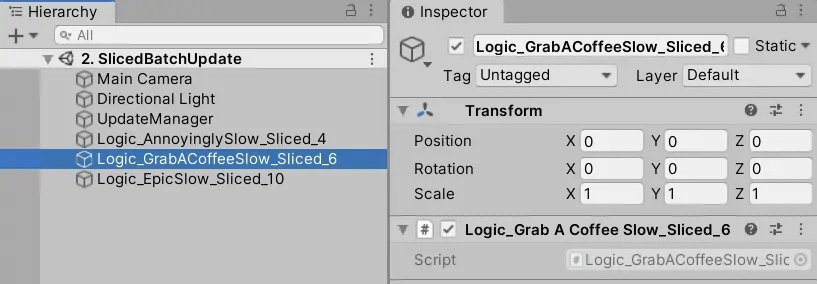
To show my point, I created a script that mysteriously takes exactly 6 milliseconds per frame:
public class Logic_GrabACoffeeSlow_Sliced_6 : MonoBehaviour, IBatchUpdate
{
    private void Start()
    {
        UpdateManager.Instance.RegisterSlicedUpdate(this, UpdateManagerLite.UpdateMode.BucketB);
    }
    private void OnDestroy()
    {
        UpdateManager.Instance.DeregisterSlicedUpdate(this);
    }
    public void BatchUpdate()
    {
        SlowWork();
    }
    private void SlowWork()
    {
        const float Time = 6;
        Thread.Sleep(Time);    // A lot of calculations, trust me!
    }
}
This script implements our IBatchUpdate interface so we can register and deregister this per-frame behavior in our UpdateManager.
I created another two identical scripts that take 4 and 10 milliseconds to prove the following point:
Executing the three scripts would normally take 20 milliseconds per frame (4 + 6 + 10). Since that’s above our budget of 13 milliseconds, we should split their execution into two buckets:
- Bucket A: 10 milliseconds (4 + 6)
- Bucket B: 10 milliseconds (10)
That’s how we apply Unity CPU Time Slicing to remain within our performance budget. Both buckets are well balanced so we literally halve the time spent per frame in script execution.
See the difference below.

CPU Slicing Version
3. Tweaking CPU Time Slicing
Now, bear with me… This is important.
You must be selective while adopting the Unity CPU Time Slicing strategy.
There are some gameplay logic elements that are more sensitive to correctly timed updates, such as animations. If you start moving your objects only every other frame, you won’t get a silk-smooth visual output.
My suggestion is to start with systems that you understand well. In my case, AI behavior trees gave me a huge gain, for instance.
You can always time-slice everything, but you’ll have a hard time figuring whatever breaks where.
Here are a few ideas:
- Artificial Intelligence (AI): Behavior Trees, path finding, perception, triggers, etc.
- Visuals: low frame-rate animations, such as updating low-quality spreadsheets, certain UI updates, manual LODs..
- Transform updates: especially if they’re not visually important, such as abstract sound emitters
- General scripting: any polling mechanism you have in place, e.g. checking player position to trigger events
Get Started Now: Your Toolkit
I’ve shown you the basics.
If you like this approach, check out the upgraded version of UpdateManager. The UpdateManager+ toolkit includes the whole project with example scenes plus critically important enhancing features.
(I might move this asset to the store anytime soon, so grab the advanced version for free while it lasts)
Boost your game performance now up to 33% with your Free CPU Slicing Toolkit:
- Unlimited CPU Performance Buckets
- 2 Operation Modes: Performance + Profile
- Bonus: LateUpdate and FixedUpdate
... And get rid of the 1-star reviews and refunds due to low performance
"
/>