
If you never came across an occlusion culling tutorial for Unity, let me ask you:
Can you guess what's wrong in this game's indoors scene? Have a look:
What Is Wrong Here?
Any guess what the problem is?
This problem, by the way, will happen to you in Unity by default.
Let's see what's going on and what you can do about it.

Level 1 Developer: Before Dating Occlusion Culling
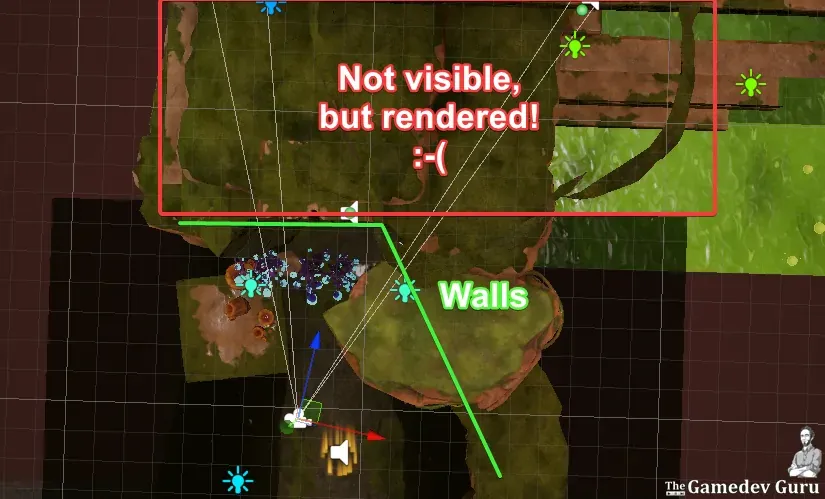
In the video above you can see two areas:
- What Unity renders
- What the player actually sees
If you compare both, you'll notice that we are rendering MANY more elements than what the player sees. Like, everything past that door.
That's a frustrating issue many developers are used to live with. And it's pure garbage because rendering unnecessary elements is making your scenes look worse than they could.
After all, if you managed to render what you needed and only that, you could ramp up the visuals of your game.
The time Unity wastes in drawing elements hidden behind walls is not spent where it matters most: rendering more detailed elements that the players actually see.
And not just visuals.
A more forgiving performance budget will let you implement more advanced gameplay elements, AI, sound, physics, you name it.
By the way, I probably said it already, but this "over-rendering" happens by default in Unity.
To combat this, some developers go through the constant pain of manually activating and deactivating entire rooms depending on where the player is.
But let me tell you: if you are settling for less than what your game could offer or you are putting extra hours on tedious workflows, then I have good news for you.
Once you swipe right and decide to date this feature, you'll make your life easier and your game will perform better.
We call this technique occlusion culling. And you have it integrated in Unity at no extra cost.
The reason most developers ignore this technique is because it is not intuitive. And heck, even this feature is somewhat hidden from typical gamedev workflows.
But starting today, you won't miss it again.
Ready for a date?

Level 2: How to Use Occlusion Culling in Unity (Tutorial)
What Is Occlusion Culling?
Let's start with the wording. To cull means "to remove from a flock".
And in rendering, this means to remove from our render pipeline.
But what are we removing?
Well, you want to stop rendering elements that do not affect the final image.
So occlusion culling is all about NOT rendering elements that are hidden behind surfaces.
Let me explain.
If we have a closed loot chest in front of us, we don't have to render its coins until we open it, right?
Also, we don't have to draw the NPC sitting in the living room if the door to it is closed.
Now, one would expect Unity does this removal automatically, right?
Well, Unity doesn't by default.
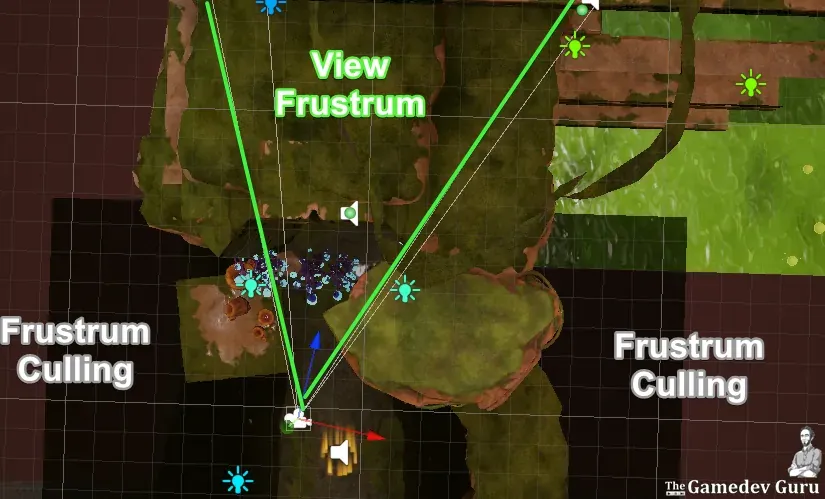
What Unity does is frustum culling, which is another type of object removal.
With frustum culling, Unity removes the objects that are outside of your field of view (FoV).
Like, with frustum culling you don't render the rogue who is about to backstab you from behind because you cannot see them. The rogue is outside your FoV (specified in degrees).
Occlusion culling is disabled by default because:
- It can be expensive.
- It requires tweaking depending on your scene.
- And it's not appropriate for every type of scene.
Unlike frustum culling, you need to bake occlusion culling in the editor.
The baking process takes take anything between seconds and hours.
In this tutorial, you will learn how to use occlusion culling so that you stop wasting resources rendering objects that are occluded (hidden) behind other surfaces.
This technique will give you a beefier performance room to work with for the rest of your game :-)
So, How Does Occlusion Culling Work in Unity?
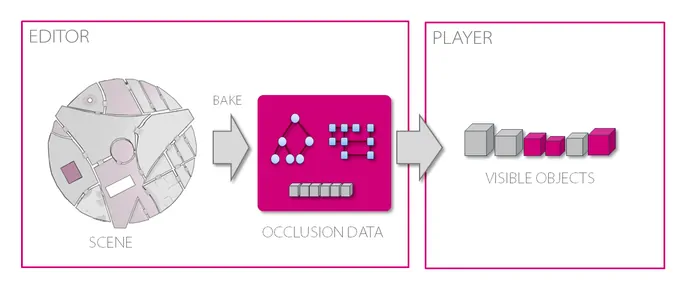
Unity uses an occlusion culling technology powered by Umbra. And Umbra works in two different modes:
- During Unity editor time, you bake occlusion culling. This is itself a 3-step process: 1. Umbra "voxelizes" your scene to work with discrete elements instead of with a polygon soup. 1. Umbra creates cells out of these voxels by merging empty voxels, i.e. without geometry inside. 1. Finally, Umbra creates portals that connects these cells.
We store this combination of cells and portals into data structures that we access during run-time. - During run-time, Umbra takes the position of your camera to find in which cell you are at right now. Then, Umbra does occlusion queries against the data structures that contain cells and portals to determine which elements your camera can see and which ones are occluded (hidden).
Once Unity knows which objects are occluded, well, you just don't render them.
The result of applying occlusion culling is often:
- Fewer draw calls (improves CPU performance)
- Additional culling cost (worsens CPU performance)
- Less overdraw and fillrate (improves GPU performance).
Doing occlusion queries in run-time is not free, but we'll talk about that later.
This process might sound complex. I mean, there's a reason there's a company fully dedicated to this matter.
But luckily, you don't have to understand the internals.
And actually, using occlusion culling is fairly simple.
But before you use it, you must know when it is the right moment to do so.
After all, we don't want its cost to be higher than its benefits :-)
When Should You (Not) Use Occlusion Culling in Your Unity Games?
The short, general answer is:
- Use occlusion culling in interiors.
- Avoid occlusion culling in exteriors.
The reason is simple: in interiors you are more likely to have big occluders that hide elements behind them. Think of walls, doors.
And having rooms separated by corridors is also a big help.
Interiors scenes are often smaller, which may make your occlusion queries cheaper (less memory and CPU times).
Of course, there are exceptions, that's why you can always give your use case a try.
Like I said, occlusion culling costs you CPU performance in run-time.
Yes, you will save on draw calls (CPU time) and reduce GPU rendering cost due to less overdraw.
But making occlusion queries in run-time implies:
- Traversing large data structures
- Rendering depth + testing a software depth buffer on the CPU
This all takes time. And power. And heat. And may make your VR players vomit.
Not only that, occlusion culling is not the silver bullet, since Unity still renders shadows for obvious reasons.
The time you save in draw calls and GPU operations must be worth its extra CPU cost.
Let's start with the basics.
The Basics: Baking & Previewing Occlusion Culling in Unity
Using occlusion culling in Unity is a simple 3-step process:
- Set up your game object static flags.
- Bake occlusion culling
- Visualize the result and tweak parameters necessary.
Let's see these steps in detail.
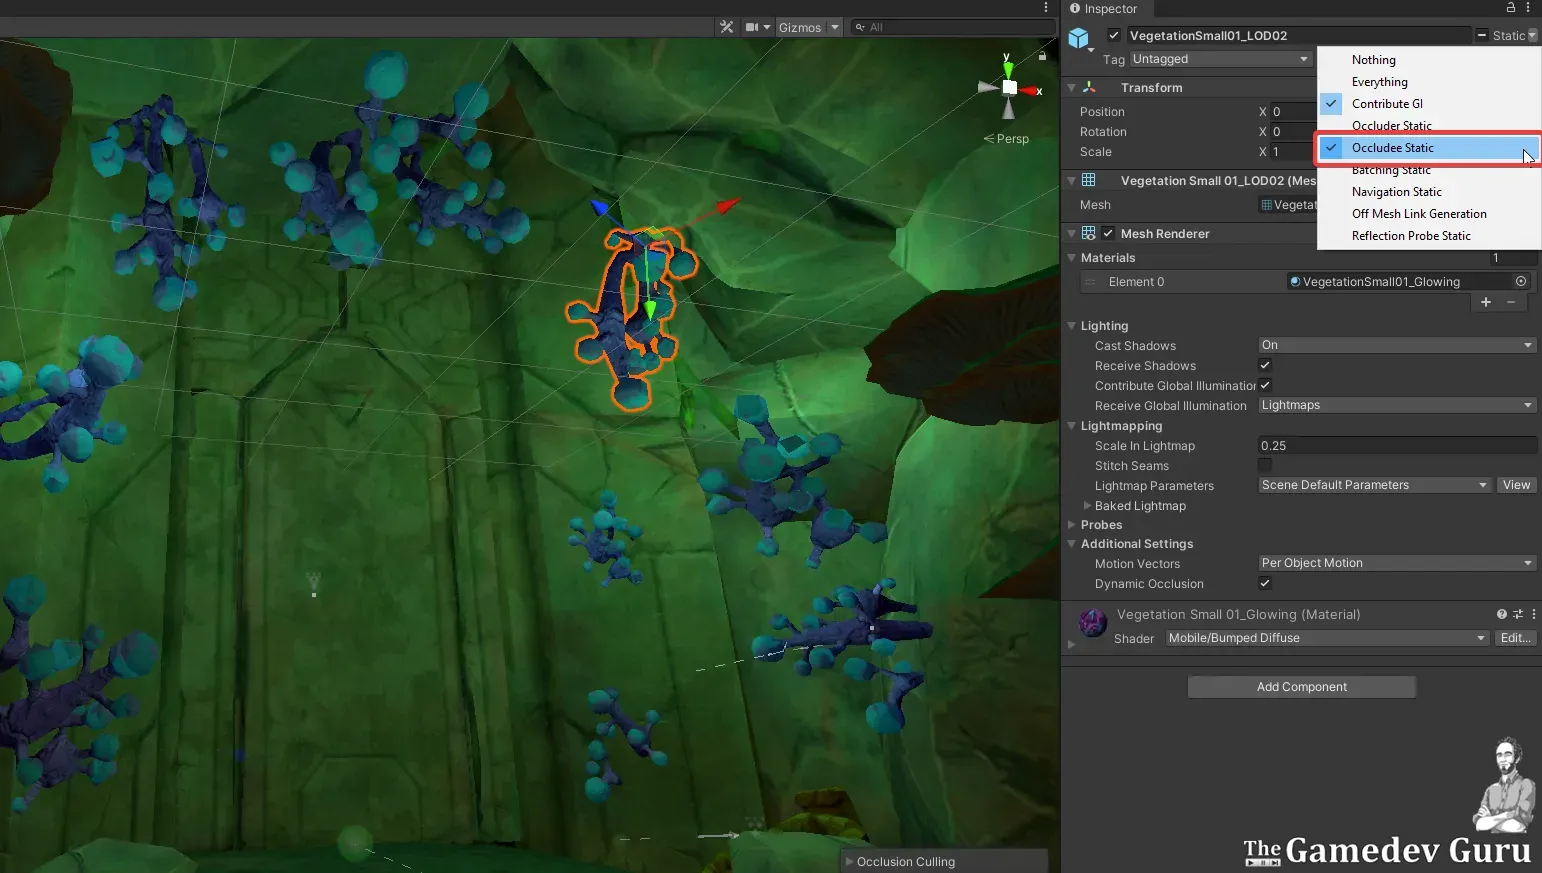
Set Up Your Flags: Occluder & Occludee Static
The first step is to make Unity aware of the scene elements relevant to occlusion culling.
You have two types of objects:
- Occluders: big things like room walls that cover elements behind them.
- Occludees: smaller elements like chairs that might hide behind occluders.
And those are exactly the static flags you will find in the inspector of a game object.
So for occlusion culling to work, you need to mark your static "big objects" as static occluders.
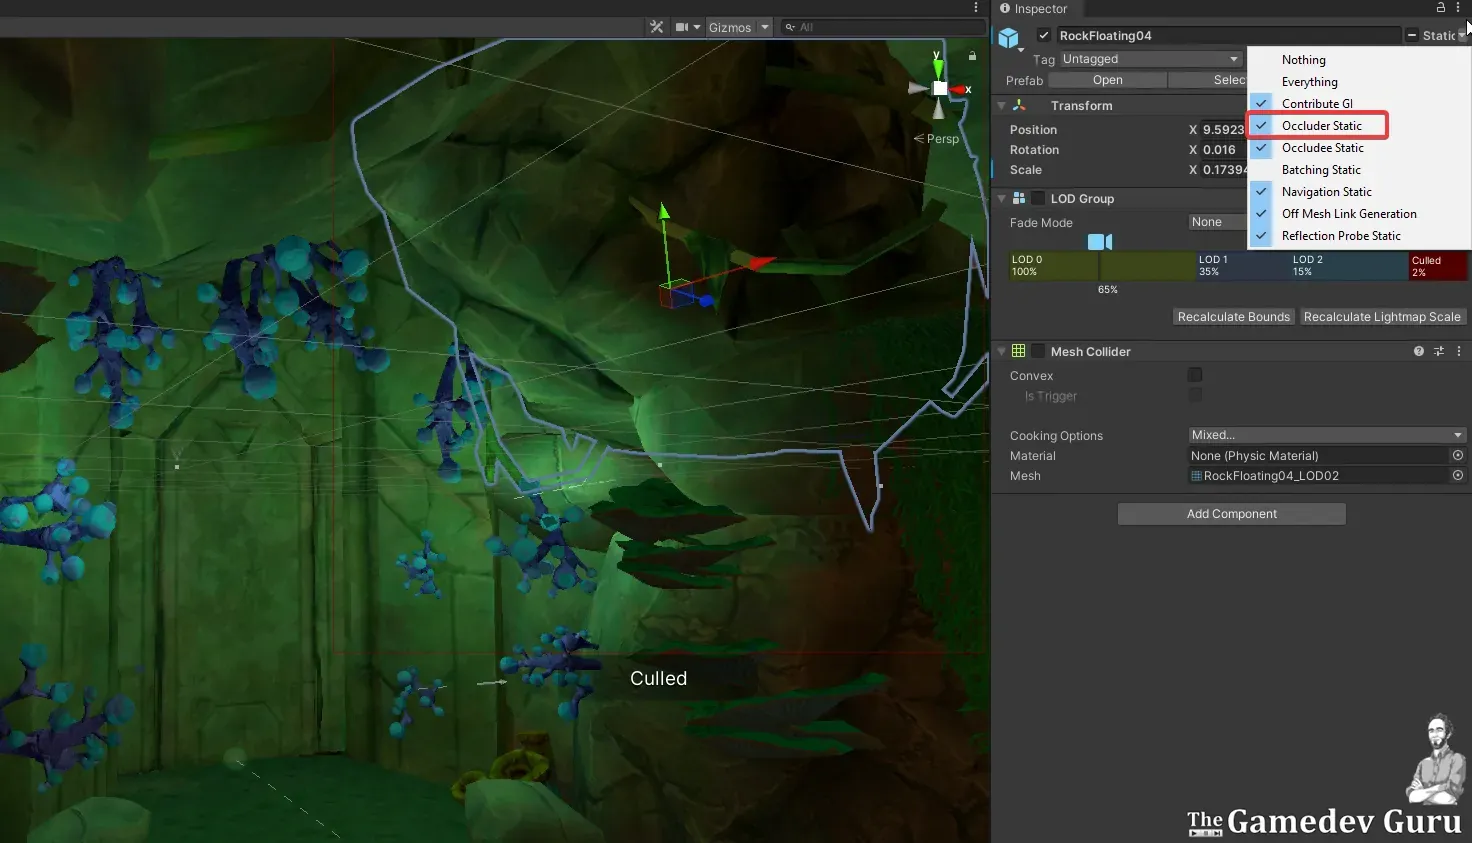
And ideally, you should mark your static occludees as such. That is, the smaller objects that are likely to be hidden behind surfaces.
Sure enough, one object can be an occluder and an occludee at the same time.
Your occludees can also be dynamic, such as moving monsters like the one below.

Dynamic occlusions works by default on every mesh renderer, as they have their dynamic occlusion flag enabled.
But it's cheaper to handle static occludees than the dynamic variants, so mark them as such if you can.
There are times where you don't want static geometry to be occluders. A window, for instance, wouldn't be a good candidate since you can see through.
If you marked a semi-transparent object as an occluder, then you wouldn't be able to see through it. The objects behind it would disappear.
Once you set up your static flags in the hierarchy, you are ready to bake the hell out of your culling.
Show Me The Window: Bake Your Occlusion Culling in Unity
Open the occlusion culling window at Window → Rendering → Occlusion Culling.
There, you will see three tabs:
- Object: this mode lets you change the occlusion behavior of your selected object.
- Bake: this is where we ask Umbra to generate the run-time data structures.
- Visualization: here you can preview how well (or poorly) occlusion culling behaves in your scene.
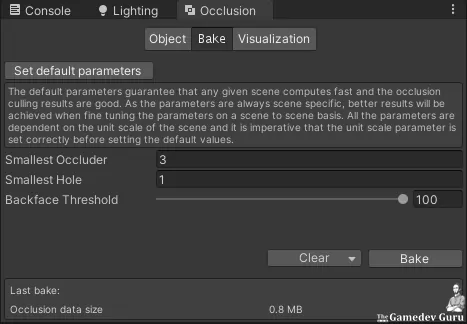
So go ahead to the bake tab.
You'll see three occlusion culling baking parameters. Ignore them for now, I'll explain them in a bit.
Just hit the bake button and serve yourself a soda.
Note: if you are using LOD groups, Unity will use LOD0 (the most detailed version) for baking. So be careful that your LOD levels don't differ too much in shape.
Preview Your Culling: The Visualization Mode
When you finish baking your occlusion culling data structures, select a camera in the hierarchy and open the visualization tab.
Do you see what happens in the scene view when you move around your camera?
Have a look below:
Pay attention to these two factors:
- Scene view: see how Unity stops rendering elements that are not visible to the camera (both frustum culling and occlusion culling).
- Stats panel: compare the difference in draw calls.
That's occlusion culling in action.
And you just unleashed its power.
ROAR!
Now, let's get to more advanced features of occlusion culling you should know about.
After all, I guarantee you'll run into issues at some point. Understanding what I'll explain now will help you deal with them.
So let's start with the occlusion culling baking parameters in Unity.
The (More) Advanced Features
Let's talk about the things you'll need in practice when you work with this system: occlusion culling parameters, occlusion portals and occlusion areas.
The Occlusion Culling Parameters in Unity
The Smallest Occluder
Think of the smallest occluder the output resolution of your baking process.
This is the size (in meters) of the smallest element in your scene that might work as an occluder.
- Large values cause a smaller occlusion culling effect, faster occlusion queries and lower memory usage. In other words, you will render more elements that won't be visible.
- Smaller values will get you a more accurate occlusion culling during run-time. But occlusion queries will take longer in the CPU and it will also use more memory.
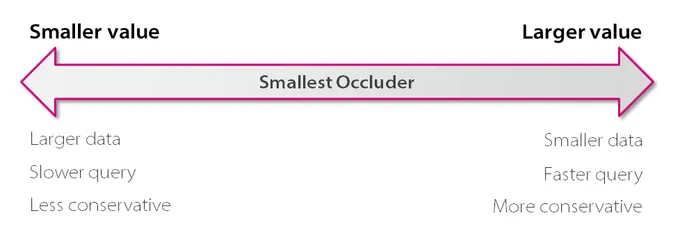
A value between 2 and 5 works well in human-scale environments.
Have a look at the impact this makes in the generated cells and portals:
And remember: you can place occlusion areas to control the output of your occlusion culling.
The Smallest Hole.
Think of the smallest hole as the input resolution for your baking process.
The smaller value you put here, the more detailed the baking process will be. That means this process will take longer and more memory in the editor (not in run-time).
The smallest hole is the size in meters of the smallest hole you can see through, for example the empty distance between the bars of a fence.
This parameter is important because this is the voxel size Umbra uses to generate these cells.
- If you set the smallest hole to a high value, the voxels will be too big. The chances of these voxels containing geometry and therefore blocking the sight will be higher. Here you are likely to skip rendering geometry that you should actually be able to see.
- If you lower it, your occlusion culling baking process will be more accurate and Unity will be better able to discern when occluders are actually occluders. But baking will take longer time and more memory.
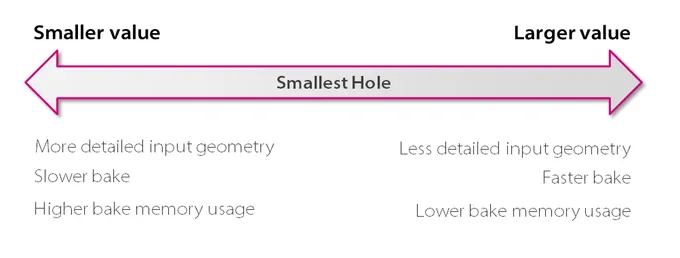
Normally, a value between 0.2 and 0.5 meters works well in normal scale environments.
The Backface Threshold
The last parameter, the backface threshold, is useful to optimize the run0time memory usage of occlusion culling.
If you set this value to 90%, Umbra will ignore a specific cell whenever 90% of the faces you see in that cell are on their back side.
Here's a way to understand this...
Imagine you are walking on top of a terrain. When you look down, you can see the terrain because its normals are pointing upwards.
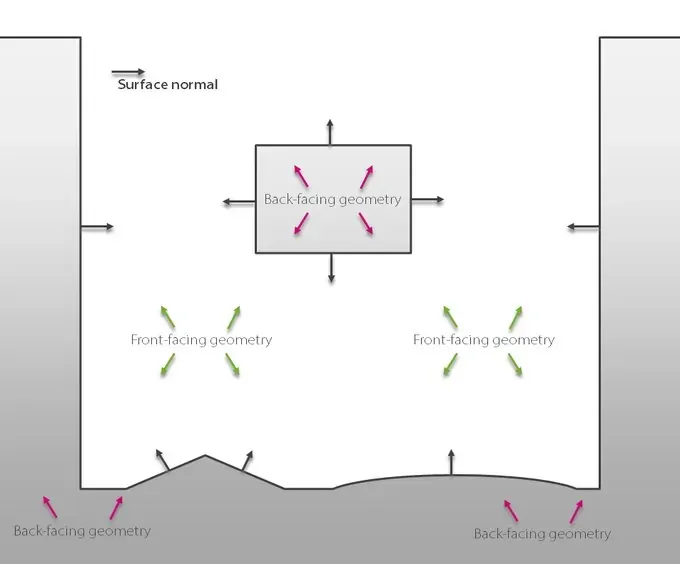
Now, if you cheated and got beneath the terrain you wouldn't be able to see it because of backface culling, right?
So that would be an "invalid" position for which we can safely ignore occlusion culling.
In other words, we can remove the occlusion culling data for cells we are not likely to be in. And that's the case when most of the geometry faces you can see from that cell are facing the other way.
By default the backface threshold is 100%, but you can lower it in the occlusion culling window to remove more entries from the data structure whenever these cells see at least that percentage of backfaces.
Be careful though: if you set the occlusion culling backface threshold too low, you might "optimize" away valid cells where the player can actually be.
If that happens, the result is undefined. And you don't want to leave your rendering output to chance.
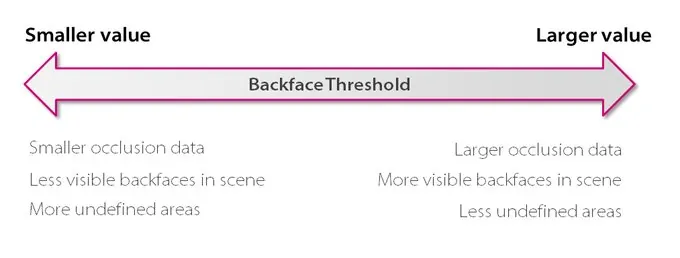
My suggestion is to leave this at 100% unless your occlusion culling takes too much RAM (anything above 40MB).
And even if you want to optimize memory, you might want to start by increasing the smallest occluder value.
Now that I briefly touched the Unity occlusion baking parameters, let's have a look at other features you might find useful.
What Are Occlusion Areas?
One of these parameters is the concept of occlusion areas.
An occlusion area is an area of interest where we want to bake occlusion culling at a higher precision:
- Bake time: Unity generates higher precision data within View Volumes.
- Run-time: higher precision calculations when the Camera is within a View Volume.
These areas are typically where the camera can go through.
If you don't specify one, Umbra will create one for you that covers the entire map.
Ideally, you want to create occlusion areas in every place where the camera can go through.
What about occlusion portals?
When & How Should You Use Occlusion Portals?
Think of a dungeon.
It's usually a set of rooms interconnected by corridors and you often have some sort of doors to separate them.
If you think about it, it makes no sense to render a room behind a closed door (considering the door is opaque).
But as soon as you open the door, we should render the room, right?
How do you deal with this in Unity?
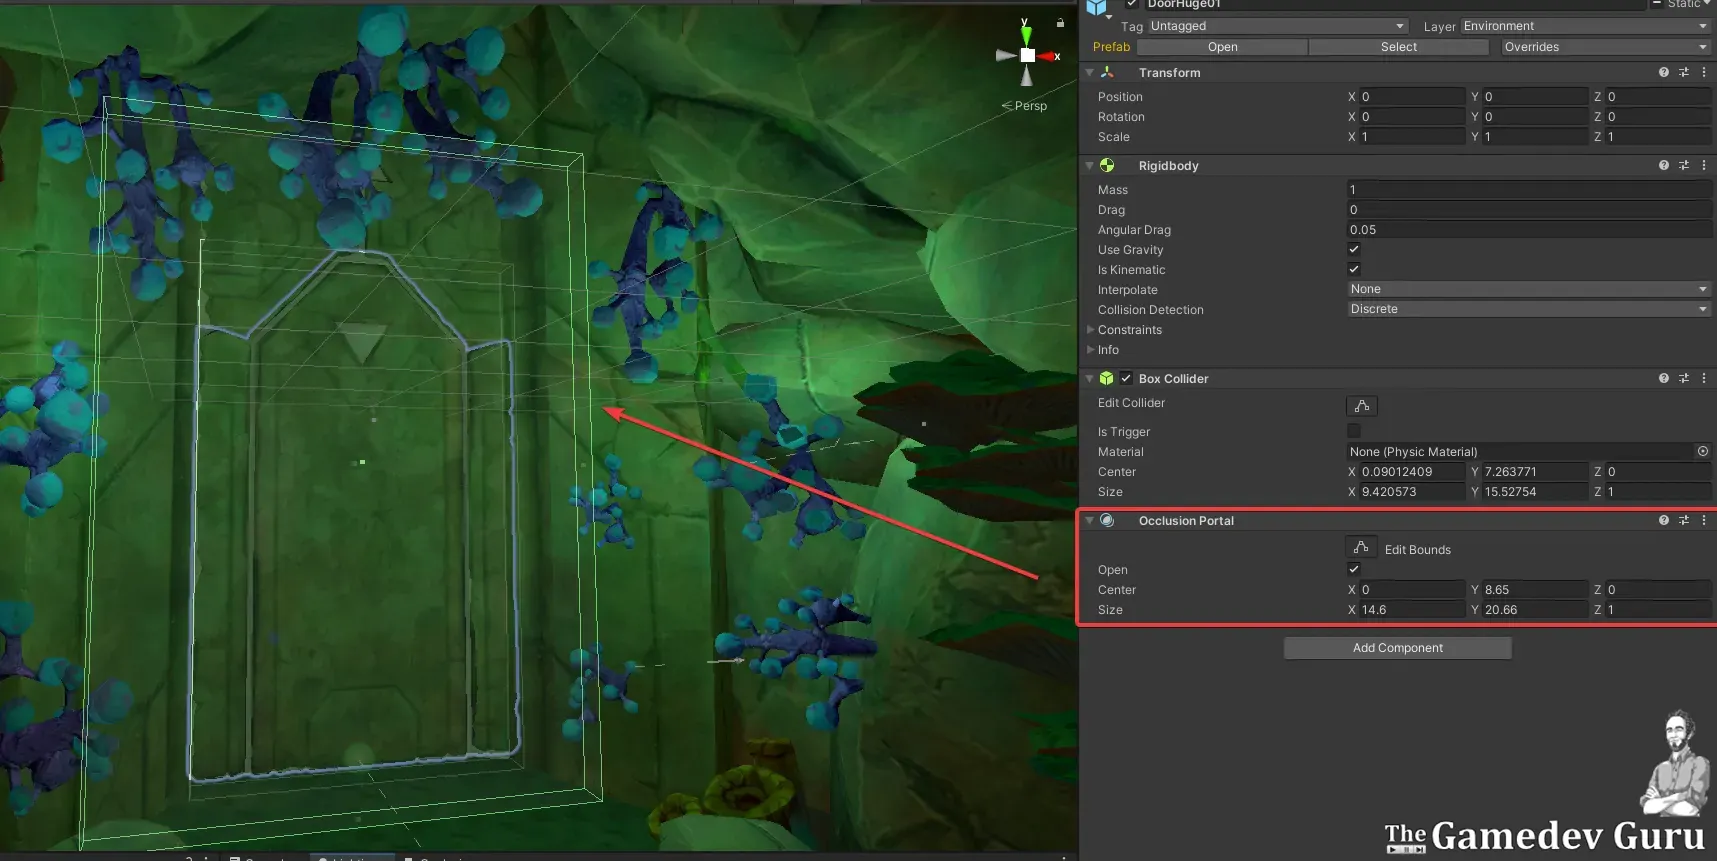
You guessed it right: with occlusion portals.
An occlusion portal is a box-sized component that you can mark as open or closed.
- If it's open, then that volume does NOT act as an occluder.
- If you close it, then it acts as an occluder and helps cull the objects behind away.
Just think of occlusion portals as doors that you can open or close.
You can open/close these occlusion portals in Unity by clicking on their open flag in the component or by code as follows:
void OpenDoor() {
    // Toggle the Occlusion Portal's open state, so that Unity renders the GameObjects behind it
   myOcclusionPortal.open = true;

   // Call a function that plays a door opening animation, or otherwise hides the GameObject
   …
}
So basically occlusion portals are some sort of "dynamic occluders". You can't move them, but you can turn them on/off.
By the way, these portals are invisible volumes and don't require geometry. Just give them the dimensions you want them to have as occluders and you'll be good to go.
You can attach them to your door prefabs, for instance, and open/close them accordingly.
Now, while baking occlusion culling is trivial in single scenes, there's a catch when dealing with multiple scenes...
Occlusion Culling With Multiple Scenes
If you load scenes additively, then you need to bake occlusion culling with all of them open in the editor at the same time.
Not only that, you also need to set the active scene to the scene that you first load as a single one.
Let me give you an example.
Suppose you load your scenes like this:
- Level2 (Single)
- Level2_AreaA (Additive)
- Level2_AreaB (Additive)
- ...
For occlusion culling to work, you must open all these scenes in the editor and mark Level2 as the active scene.
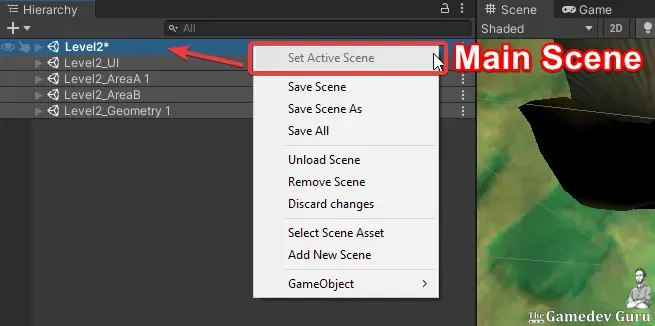
The Dungeon scene will contain the occlusion data for every scene that you load additively.
You can still place your occlusion portals and occlusion areas in your additive scenes. Just pay attention to bake occlusion culling from your active scene (loaded as Single).
Lastly, I'd like to address one of the most important questions...
The Performance Cost of Occlusion Culling
What is the tradeoffs of occlusion culling?
And more importantly, what are your expected performance gains with occlusion culling?
As you expected, this entirely depends on:
- Your scene(s).
- Baking settings
- Target hardware.
Heck, even the Unity and Umbra version will make a difference.
However, just saying that isn't that useful. I'll get into specifics.
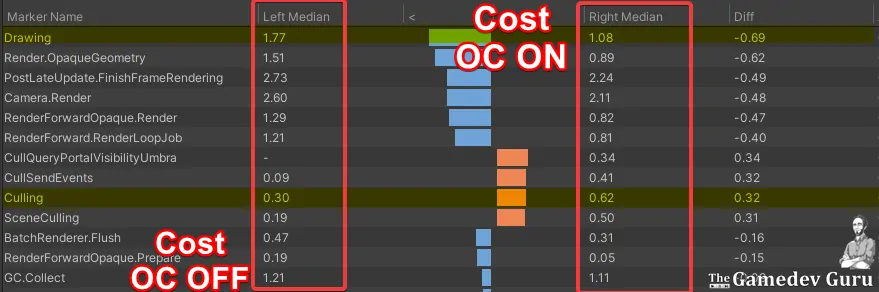
Let me share with you the results I got when I measured this scene on Quest 2:
- Occlusion culling added an average cost of 0.32 ms/frame in the profiler marker Culling (SceneCulling → CullSendEvents) in form of occlusion queries
- Occlusion culling gave an average performance boost of 0.69 ms/frame in Drawing (Render.OpaqueGeometry)
- My draw calls went from 180 to about 120 when I activated Occlusion Culling.
- The occlusion data I baked stole 0.8MB of RAM.
Now, if you ran this experiment in an outdoors scene, you'd probably be disappointed to see a higher cost for a smaller benefit.
After all, exteriors tend to have fewer occluders and are often larger areas. And fewer occluders means less potential gains through occlusion culling.
Don't forget: this runtime cost in milliseconds and memory correlates directly to the smallest occluder baking parameter.
So that's the parameter to touch in the occlusion culling window if you run into trouble.
I probably said this already, but occlusion culling is a complementary technique to frustum culling in Unity.
While frustum culling is a must, occlusion culling is highly dependent on your project.
No matter what you do, experiment and measure.

Level 3: The BIG Picture
Indeed, occlusion culling can help you improve your frame-rate.
But there are more things to keep in mind, such as general rendering cost, physics, scripting, AI, audio, shader cost, etc..
Dealing with so many performance areas in game development quickly gets overwhelming.
Yes, these topics take time to learn, especially if you are on your own.
That's why you shouldn't be on your own in the first place.
Want help hitting frame-rate targets faster? Explore Unity Performance Taskforce.
P.S. click here for a mindmap of a tutorial I recently did for XR Bootcamp