
I normally do not share my past struggles, but this topic deserves it. What do you do when you lose hope with Unity UI?

I still remember that weekend, about five years ago…
I spent the entire weekend worried about all the technical debt I was accumulating over the months in one of my projects. I had done things too quickly, without really understanding them. Clearly enough, that had to stop working at some point.
The thing is, I owed my clients results but I had no idea how to bring them. That morning though, I said to myself: Rubén, this is enough. Stop the excuses, you are becoming a professional today.
So, I decided to gather every single resource I could find about user interfaces in Unity, because that was the biggest hurdle I was dealing with for several weeks. I read forums, best practices, Unite videos, read all blogs I could find on that topic and did my own research.
Did you ever experience this feeling of slowly getting overwhelmed by technical debt? It accumulates over time and someday you either give up or decide to crush it. In my case, it was the later.
You probably heard that optimizing UI in Unity is challenging. Or, if lucky, you know it from first-hand experience. Yes, Unity UI is a powerful tool and I love it. However, its mightiness can quickly transform into a deadly weapon if it falls into inexperienced hands. And so were my hands back then.
If I had to confess anything to you today, it would be this: I wished I had had a solid foundation on Unity UI before I designed the UI of several games.
It is SO easy to do it wrong, SO easy to get frustrated. In my opinion, there’s something even easier than that. That is, for your client to ask you to do over-hours to get your shit together.
In my experience in the professional sector, companies do not want developers who design poorly optimizable interfaces and leave the tuning task to experienced programmers. They rather want developers who create visually stunning interfaces, but also performant.
And even in the indie development scene, where would you choose to spend your time on? Bringing fun to your players, or spending hours clicking through the profiler to find bottlenecks?
In my opinion: no matter your role, you should understand basic Unity UI design principles. But this takes time and project experience. You might not have any of these.
Hopefully, I can help you there.
Today, I will give you one of my most powerful tools: The Guru’s UI Development Diagram
As usual, I’d like to start with the Level 1 Developer construct.
Level 1 Unity UI Developer: Free-Style UI
This is where we all start: free-style design, free-style results.
I used to import sprites with whatever settings. Then, I would add them as images everywhere with no predefined criteria. And so I ended up with an unstructured hierarchy full of components that I didn’t need. I used the wrong systems for the wrong reasons.
Overlapping UI elements, a motherload of batches, profiler spikes. Those are all common.
Do I have anything against this?
Partially. I think it is great to play around and to make mistakes. Breaking and repairing help learning.
But if you want to do this for a living, at some point you might want to level up your skills and embrace professionalism.
This becomes unacceptable in the games industry, especially in Virtual Reality. If you do this in VR you will turn players into patients.
Such a chaotic Canvas hierarchy structure could look like this:
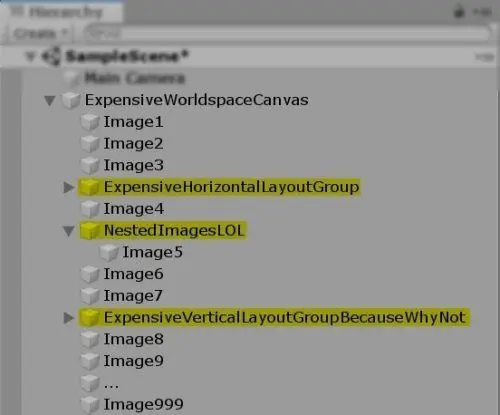
You do a lot of nesting, you use auto-layout components everywhere and there is a lack of rules.
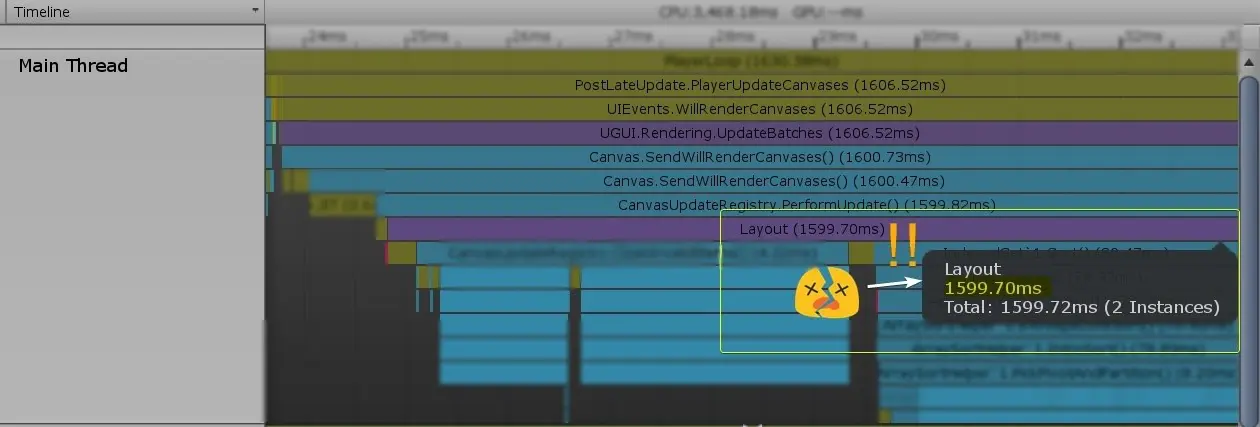
At some point, someone will ask you to optimize your UI. That could be your players, your boss or even your own pride.
But you might not be ready for this. You might be caught off-guard having other tasks on your plate. And UI development is daunting at the beginning.
The reason for its complexity lies in the amount of factors it involves. Leaving the visual appeal aside, you can say that the way you work with Unity UI will have a big impact in three critical hardware pieces: the CPU, the GPU and the developer theirself.
If you are lost, it’s good, because…
I am about to show you something cool
Let’s level up as a developer!
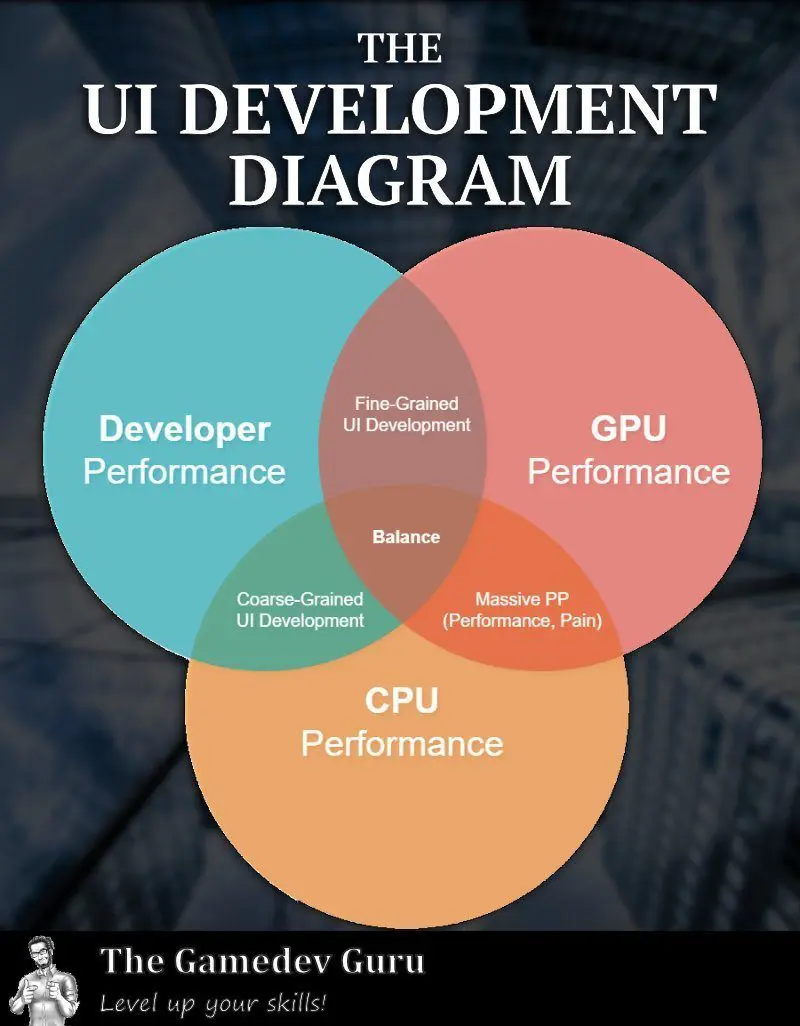
Level 2 Unity UI Developer: The Guru’s UI Development Diagram
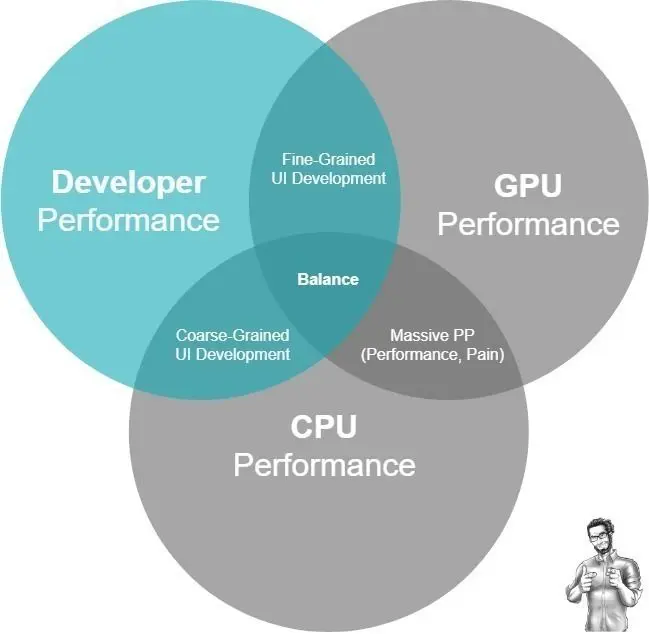
Here we are with a Venn Diagram. I decided to call it The Guru’s UI Development Diagram.
There we see three big chunks related to Unity UI Optimization: CPU, GPU, and Developer. Those are the main resources you will have to spare when developing UI.
I want to give you a short overview before we start digging in the topics.
You pay the CPU toll mainly when generating and submitting batches of UI. You can think of them as UI components, such as images. The more of those you have, the more strain you will put in your processor.
The turn for the GPU. You pay the GPU resources mostly in concept of overdraw. This means, stacking layers of graphics on top of each other.
Lastly, the developer pain is paid in time. You spend time every time you design or maintain your UI. Unity offers you some tools to make it easier for you, e.g. auto-layout helpers.
The cost of the three components rely mostly on you, but they sometimes counteract each other. It’s very challenging to perform in every aspect, unless you are very experienced and you have the right tools.
Eventually, you will get there.
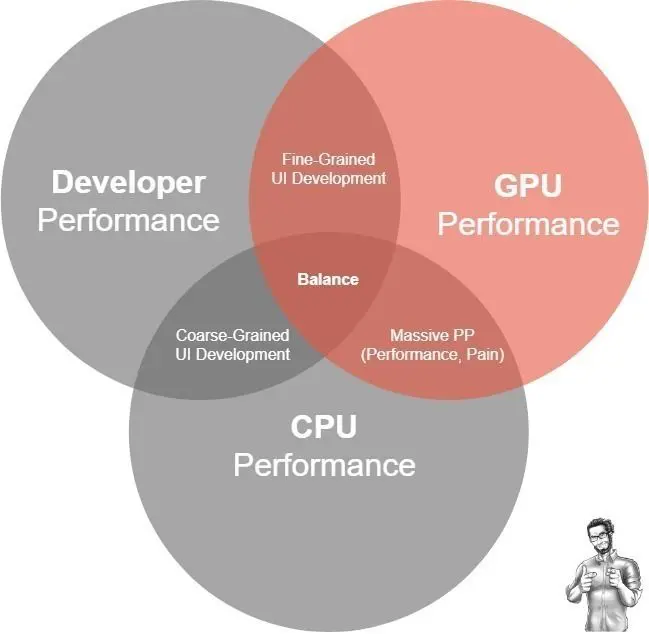
I would like you to have a closer look at the attached Guru’s UI Development Diagram.
You might be confused. That’s alright, because we are going to cover each section separately. You will get to understand all of it.
For now, you only have to understand one thing: in the end it will be up to you to find the balance between the three variables in your game.
Before we start with each component, have a look at these general rules:
- The easier you want the UI design workflow to be, the less performant your UI will be.
- If you want more GPU performance, you will have to focus on finely tweaking graphical elements and avoid element stacking.
- For more CPU performance, you will need to reduce the amount of graphical elements present in the hierarchy.
Let’s move on, I can’t wait to show you the CPU side of Unity UI Optimization!

A. Optimizing the CPU for UI Performance
In my opinion, this is very simple.
The golden rule is:
Every time you add a UI component in your scene, you are adding CPU overhead
Each component increases the CPU cost for the following reasons:
- RectTransform calculation: this is pretty much free in simple canvas hierarchies. However, your CPU will have a harder time if you are using auto-layout components to ease your UI design workflow, such as vertical layout groups and such. The issue with those is that most RectTransforms present in the hierarchy will now depend on each other, so the calculation becomes more complex.
- Vertex generation: the GPU understands vertices, thus those must be provided by the CPU. Vertices must be generated based on the entire canvas hierarchy of the involved RectTransform elements. The vertices depend as well on the specific type of UI element you added (images, texts). Under this category, we also include the cost for the CPU to add other per-vertex attributes such as colors and UVs.
- Dynamic batching: because draw calls are expensive, Unity does its best to dynamically batch as many of them as possible.Think of this as combining a large number of small groups of vertices into a single, huge group of vertices. Because… would you rather go to the supermarket ten times to bring an apple each, or go just once and grab them all together?Batching is, however, an expensive operation for the CPU which increases with the amount of UI elements you have.
- Draw call emission: finally, the generated batches must be sent to the GPU. These graphical processing units are very picky with the data formats they accept, so the CPU has to make extra work to pack them in a way that they like.
This is expensive, yes. But luckily for us, Unity is kind of smart and caches the canvas so these expensive processes do not happen in every frame.
Just as I brought you good news, I will give you the bad ones: this cache is super easy to break.
Changing almost any attribute of any UI element will break the cache of your canvas. If that happens, we go through most of the process again. These changes, by the way, trigger what is called a canvas rebuild.
Common advice suggests to split canvases into static and dynamic canvases. On top of that, you can nest canvases to reduce the effect of the canvas rebuilds. Some of these optimizations are listed here.
I’ll give you some examples of the breaking changes: scaling, positioning, rotation, color, image swapping, animations and more.
After exposing the basics, I want to conclude with three practical observations:
- The more elements you have in your Unity Canvas, the more CPU overhead you will have on each canvas rebuild.
- Avoid any kind of changes in UI to avoid canvas rebuilds.
- Canvases are either static or dynamic. Design accordingly.
B. Optimizing the GPU for UI Performance
Now is the turn for the friendly Graphical Processing Unit, don’t you think?
The GPU is the piece of hardware that makes us fall in love with games. We owe them so much. What about showing it some affection? Well, we can…
By treating it well.
But guess what? UI can make the GPU pretty upset. Especially mobile GPUs, where it is relatively easy to be memory-bound. To put it simply:
In mobile, there is a massive reason UI is expensive: overdraw!
Overdraw happens when we render the same pixel multiple times per frame. And this is soooo easy to achieve with Unity.
Every time to add a Unity UI Image, you are commanding your GPU to draw a full rectangle, rendering every single pixel inside that rectangle. And it does not matter if the pixel you are drawing is transparent, it will cost you still.
That means, I advise you to be careful with the transparent regions of your sprites!
This has some implications for you. If you add 10 full-screen images, then you get 10x overdraw. As my grandmother used to say, WTAIWYG! (What You Add Is What You Get).
Stacking of layers on top of each other will slowly enrage your GPU. It will add milliseconds to it, which is a crime in VR games where your budget could very well be under 13ms.
I do not want to get too technical in this post… but I can’t just help it! Someday you will be having a delicious coffee break conversation with your colleagues and you might feel tempted to drop a few intellectual lines. If that’s the case, say this one aloud:
UI Overdraw is expensive in mobile because you devour the precious memory bandwidth of the device and this is further worsened by the alpha blending happening internally
You’ll make some jaws drop.
The key lesson is easy: avoid stacking UI elements on top of each other and you will be fine
- GPU cost mainly comes from stacking graphical layers on top of each other. Avoid these.
- Reduce the space UI takes in screen to reduce GPU cost
- Implement sprite atlasing to improve CPU and GPU performance
Extra: GPU – Pro Tips
PRO TIP #1: Sprite Atlasing
As a side note, you will see improvements if you apply Sprite Atlasing techniques.
Essentially, this will combine different small textures into a big single texture. This will make things easier for the GPU and CPU by not making it fetch a different texture per Image you are drawing.
PRO TIP #2: Opaque Shading (Advanced)
Now, bear with me. This is one of the biggest optimizations I can offer you for your game. You will avoid a big chunk of the overdraw.
However, this comes at a price. And its currency is time and complexity.
What we are aiming for here is to get an opaque shader working on UI. But it is not just a normal UI shader, because you and I are picky and want the following:
- Render type: opaque, so we render front to back.
- Render queue: normally set to 2000; we want this to happen as soon as possible.
- Z-Testing: set to default (LEqual) to avoid overwriting “opaque” pixels.
- Z-Writing: Enable so other opaque objects do not overwrite the UI rendered pixel.
- Blending: Disable to improve the GPU output merger performance.
Let me warn you:
Highly optimized opaque UI shading is a hard feat to pull off
For those kind of shaders to work, we need many manual tweaks needed plus a solid understanding of the entire render pipeline. If that was not enough, you have to be creative coming up with an opaque UI design that is not annoying for the gameplay.
I cannot get into more details in this post, but if you want to see an example, make sure to visit our level 3 section. Just be aware, this is not for everyone!
C. Optimizing the Developer’s Lifespan
I am afraid we often under-estimate the effort required to design, implement and especially maintain optimized user interfaces in Unity.
Surely, Unity improved in this area during the last few years and now it is easier and faster than ever to create those. But this comes at a cost.
In general, the more Unity UI extras you use, the worse your game will perform.
The auto-layout helpers are especially expensive. Unfortunately, they are the most helpful. For instance, I find Vertical Layout Groups especially handy when designing responsive UI. These neat scripts help you organize your elements in a manner that is structured and therefore visually appealing.
The problem I see with those is that they incur on a big CPU cost whenever there are canvas rebuilds!
You might be able to get away with UI helpers if your UI is static 99% of the time, but the frame it isn’t, you will notice it.
We love working with helpers, but we don’t want to ruin our performance. Here’s one trick you can try: keep the auto-layout helpers around while designing but disable them all just before saving your scene. By doing this, they will be deactivated for run-time players, but they already did their work for you!
I don’t want to disappoint you, so just remember that this auto-layout disabling secret will not work if your UI content is dynamic.
At the end of the day, the more tasks you delegate to Unity, the more work your hardware will have to do. Find your own balance here! You can start using those helpers but be ready to remove them if you have to.
While optimizing, do the biggest gains for the buck first. Only advance in the ladder of diminishing returns if the profiler tells you that you have to.
For instance, creating sprite atlases is easy and will bring you good fortune. Tweaking graphics to avoid transparent regions, however, is more time-consuming. Lastly, creating your own UI shaders might bring you big gains but at a big cost.
Remember, saving a few microseconds in your game might not be worth if it costs you weeks of your life-time and your application does not need it. This should not be taken as an excuse to never care; optimizations in the future are more expensive than in the present.
- Profile before you optimize
- Keep profiling
- Go for the biggest gains for the buck first
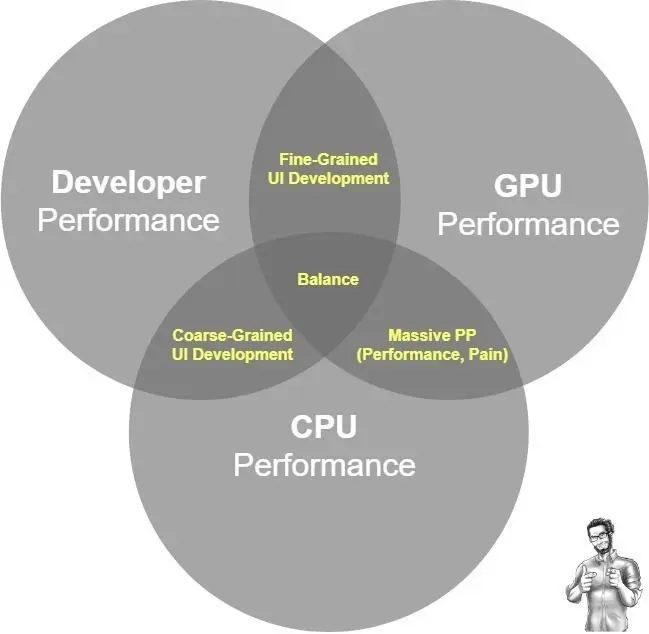
Level 3 Unity UI Developer: The Sweet Spots
From the Venn Diagram you might see several sweet spots where you could find yourself in: fine-grained UI development, coarse-grained UI development, Massive PP and Balance.
They sounded quite obscure to me at the beginning, but then, with time, it all started to make sense to me. Experience brought understanding.
What I still hold true is that, the more tools you know, the better. This is the main way I am able to recognize the subtle patterns in all problems. And, when you recognize the heart of the challenge, you know which tool to take out of your toolbox.
Nothing will help your team more than having a developer possessing both a high-level overview of UI and an eye for detail.
A Level 3 developer would confidently answer important practical questions that only come through experience. I can think of a few that any client could ask you:
- Here’s a UI architecture for you. How performant is it?
- What are 3 alternatives I have to optimize this user interface?
- Can you show me numerical proof?
You see, I prepared a few Unity examples for you.
The examples you will have access to illustrate each of the UI optimization methods I propose.
Not only that, I provided a Performance Analysis for you, so you can feel safe that the information is accurate. You’ll also get access to a sneak preview on Opaque Shaders, so you make sure you keep your overdraw figures under control.
Because… do you know what comes after speaking out of our gut feelings? Speaking with certainty, based on real experience.
Are you serious about becoming a Level 3 Unity UI Developer?
Subscribe and get Instant Access to the free Level 3 Guide on The Guru's UI Development Diagram"/>