
Do you have a Christmas present for your players? Well, just make sure it’s not a memory crash. Those happen when greedily using countless assets from the store. Don’t dump the assets, just adopt a clever strategy with Unity Addressables Prefabs.

It’s pretty easy to go crazy buying assets in the asset store. I’ve been guilty of purchasing some discounted bundles this month. You keep adding stuff to your cart and you know how it goes.
What is common is to miss the problems that come afterward, though.
Integrating assets in your projects is always in detriment of your players who have the least capable hardware. Adding content decreases the performance characteristics of your game. And if you go wild adding content, you’ll exclude players from playing your game. And these people will be angry, trust me.
The key is to engineer a proper content management strategy.
That said, here’re some{' '} signs you don’t have a scalable content management strategy:
- The loading times of your game increase and become unbearable (>30s)
- You get reports of players experiencing random crashes
- Your user checks on Tinder and comes back to your game only to see that Android/iOS killed it and they lost all their progress
- Your development iteration times explode (time-to-play over 15s)
When you experience these symptoms, it’s time to upgrade your game to the next level.
Integrate any smart content management strategies:
- Use additive scene loading as I detailed{' '} here
- Implement Asset Bundles
- Leverage the power of Unity Addressables
There’s a fourth option that is not really an option. Do not use the Resources directory/API.
In this post, I’ll show you how to profit from the most modern option. We’ll be leveraging the power of Unity Addressable Prefabs.
The project setup used in this post is simple. The user can spawn or despawn copies of two types of prefabs: a tank or a soldier.
So, you expect memory usage to go up when you spawn the tanks. And you also assume the memory to sink when you despawn them, right?
Nope. That’s how Unity works.
But luckily, you can make it work the right way with Unity Addressable Prefabs.
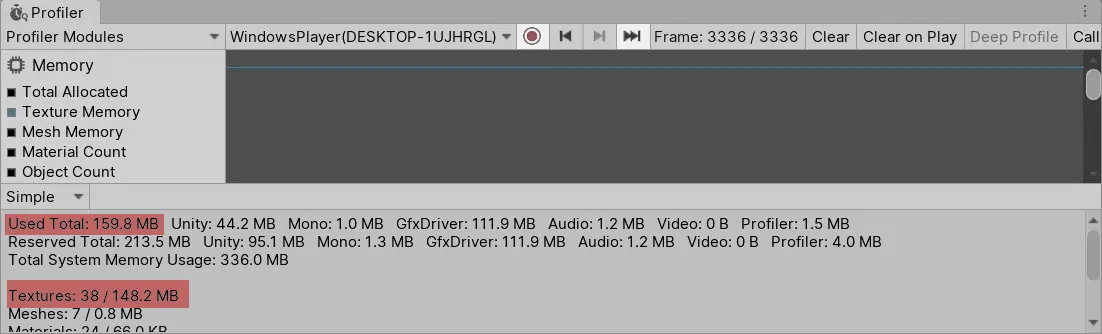
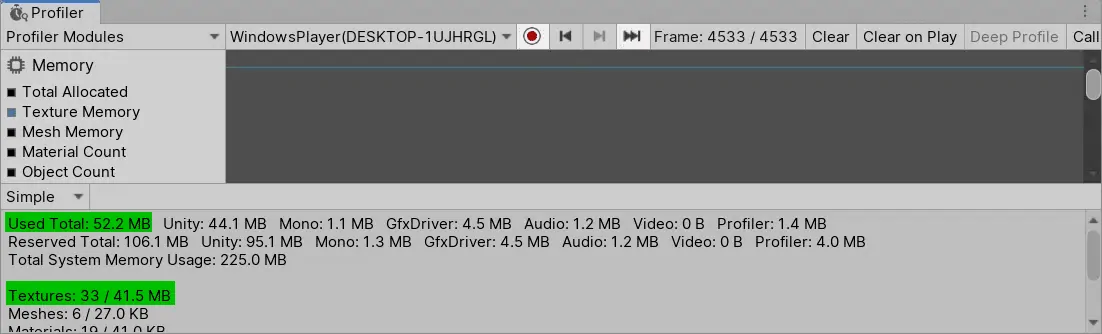
Below is a memory profile comparison animation showing the result with and without Addressables. See for yourself.
Default vs. Addressables-Based Content Management
This is only two random prefabs. Any guess what happens with your real game assets?
Let’s see how you get to pay only for what you use.

Level 1 Developer: Traditional Workflow
In Unity it’s straightforward to add references to your new content. You can easily link meshes, materials, prefabs to your scripts. And then you spawn them in run-time to add enemies, bullets and all the like.
The problem is that you pay the memory price constantly whenever that reference is alive in your scene. It doesn’t matter if your asset is currently spawned in the level, you still pay it. See the high memory base cost below.
That’s the #1 reason your game won’t scale.
The level 1 scene contains a manager that takes care of spawning/despawning the prefabs. Find below its code.
public class Level_1_HandlePrefabLifecycleTraditional : MonoBehaviour
{
  [SerializeField] private Transform spawnAnchor = null;
  [SerializeField] private float separation = 1f;
  [SerializeField] private int instanceCount = 10;
  [SerializeField] private GameObject prefabReference = null;

  List<GameObject> _instances = new List<GameObject>();

  public void HandleLifecycle()
  {
    var hasSpawnedInstances = _instances.Count > 0;
    if (hasSpawnedInstances)
    {
      Despawn();
    }
    else
    {
      Spawn();
    }
  }

  private void Spawn()
  {
    for (var i = 0; i < instanceCount; i++)
    {
      var newGameObject = Instantiate(prefabReference, spawnAnchor.position + i *separation * Vector3.right, spawnAnchor.rotation);
      _instances.Add(newGameObject);
    }
  }

  private void Despawn()
  {
    foreach (var instance in _instances)
    {
      Destroy(instance);
    }
    _instances.Clear();
  }
}
As you can see, there’s nothing wild going on there. It’s just the traditional flow of handling the lifecycle of your game objects.
A reference to the prefab, an instantiate and a destroy call.
That’s all you need to eventually make your game unscalable.
Ideally, we should only pay for the content that we actually use. How can we achieve this?
Let’s find out in the next section.

{' '}
Level 2 Developer: Unity Addressables-Based Prefabs
Addressables is a relatively new Unity package that will help you implementing smart content management strategies.
There’s no special diploma required to get started with Addressables. Just follow my Unity Addressables Tutorial and you will be set for the journey in a matter of a few hours. I’ll assume you know the basics and have the Addressables package installed.
In this section you and I will update the traditional code of the previous section to the Addressables era.
We will follow the next steps:
- “Address” the original tank and soldier prefabs
- Replace the direct references to the prefabs with indirect references.
- Add loading and release phases.

Addressing Prefabs
This is the easiest step.
Once you have the Addressables package installed, you’ll see a new inspector option to mark your assets as Addressable. This will add your prefab to the addressables database.
Setting up Unity Addressable Prefab

Replace Direct With Indirect References
In the previous code, we had a direct reference to our prefab.
That direct reference causes the increased memory base cost.
So we’ll get rid of it. Just like that.
// Remove direct references
// [SerializeField] private GameObject prefabReference = null;

// Add indirect reference instead
[SerializeField] private AssetReference prefabReference = null;
This step alone will power up your inspector (provided you remove the non-compiling code). You’ll soon be able to assign the new indirect reference to your prefab like below.
Assigning Unity Addressable Prefab Reference

Add Pre-Loading And Post-Release Phases
We now have to finish modifying our spawn and despawn functions to take advantage of the indirect reference.
public class Level_2_HandleAddressablesPrefabLifecycleManually : MonoBehaviour
{
  [SerializeField] private Transform spawnAnchor = null;
  [SerializeField] private float separation = 1f;
  [SerializeField] private int instanceCount = 10;
  [SerializeField] private AssetReference prefabReference = null;  // Indirect reference

  private AsyncOperationHandle<GameObject> _asyncOperationHandle;
  private readonly List<GameObject> _instances = new List<GameObject>();

  public void HandleLifecycle()
  {
    var hasSpawnedInstances = _asyncOperationHandle.IsValid();
    if (hasSpawnedInstances)
    {
      Despawn();
    }
    else
    {
      Spawn();
    }
  }

  private void Spawn()
  {
    _asyncOperationHandle = prefabReference.LoadAssetAsync<GameObject>();
    _asyncOperationHandle.Completed += handle =>
    {
      var prefab = handle.Result;
      for (var i = 0; i < instanceCount; i++)
      {
        var newGameObject = Instantiate(prefab, spawnAnchor.position + i *separation * Vector3.right, spawnAnchor.rotation);
        _instances.Add(newGameObject);
      }
    };
  }

  private void Despawn()
  {
    foreach (var instance in _instances)
    {
      Destroy(instance);
    }
    _instances.Clear();
    Addressables.Release(_asyncOperationHandle);
  }
}
Here’re a few explanations about the new manager:
- Line 6 contains the indirect reference as I shown you in the previous point. We assign the prefab in the Unity inspector.
- Line 8 contains an AsyncOperationHandle variable we use to keep track of our prefab memory loading/release operation. It is specialized to track a prefab (GameObject).
- In line 13 we ask whether the AsyncOperationHandle is valid, i.e. it the prefab data is loaded.
- In line 26 we start loading the prefab data based on the indirect reference of line 6. We store this handle for the future memory release. Note this is an asynchronous process, that’s why…
- … We add a callback in line 27 so Unity notifies us when the prefab data has been loaded. In line 29 we then access the loaded prefab through the Result field passed by the callback. The result field will always contain the data we initially asked for, in our case a GameObject prefab.
- Instantiate and Destroy work exactly as shown in the Traditional Workflow (Level 1).
- When despawning, we also release the data we loaded in line 45. For that, we pass the AsyncOperationHandle we stored in line 26.
The result?
A variable memory cost based on what we actually need. And it is always below the traditional workflow approach.
This code though… it’s ugly, to say the least. In other situations, we also risk releasing the prefab data before we destroy all instances.
If we release the prefab memory that is currently being used by its instances, nothing beautiful will come out of that.
So let’s see how we can get this to the next level.
- Traditional content management doesn't scale with memory
- Use Addressables to pay only for what you use
- Profit from faster loading and iteration times with Addressables

Level 3 Developer: Unity Addressables Reference Counting
I have a proposal for you.
Let’s delegate some of the memory management responsibilities to Unity. Let’s focus our time on our game instead.
How do we do this?
By getting rid of the traditional Instantiate and Destroy calls. We will use the Addressables equivalents for those: InstantiateAsync and ReleaseInstance.
The advantage of the new API calls is that they have memory reference counting built-in.
That means, you cannot mess up (but don’t try hard).
When all instances using your prefab are gone, Unity will unload the prefab data automatically.
Instancing works similarly. If there’s no previous instance alive, Unity will load the prefab first and then instantiate it. If there was an existing prefab, then it skips the loading phase as it is already in memory.
We can simplify the code to this:
public class Level_3_HandleAddressablesPrefabLifecycleReferenceCounting : MonoBehaviour
{
  [SerializeField] private Transform spawnAnchor = null;
  [SerializeField] private float separation = 1f;
  [SerializeField] private int instanceCount = 10;
  [SerializeField] private AssetReference prefabReference = null;

  private readonly List<GameObject> _instances = new List<GameObject>();

  public void HandleLifecycle()
  {
    var hasSpawnedInstances = _instances.Count > 0;
    if (hasSpawnedInstances)
    {
      Despawn();
    }
    else
    {
      Spawn();
    }
  }

  private void Spawn()
  {
    for (var i = 0; i < instanceCount; i++)
    {
      var asyncOperationHandle = prefabReference.InstantiateAsync(spawnAnchor.position + i *separation * Vector3.right, spawnAnchor.rotation);
      asyncOperationHandle.Completed += handle => { _instances.Add(handle.Result); };
    }
  }

  private void Despawn()
  {
    foreach (var instance in _instances)
    {
      Addressables.ReleaseInstance(instance);
    }
    _instances.Clear();
  }
}
The biggest change is in the Spawn method. Instead of using LoadAssetAsync first, we directly call InstantiateAsync in line 27. As you already know, Unity will take care of its loading if needed.
As with the traditional Instantiate method, we pass the position and rotation parameters. We just skip the prefab argument, as we’re invoking it on the prefabReference object itself.
When loading and instantiation are complete, we add the new instance to our list.
Line 36: Despawning works by calling Addressables.ReleaseInstance with the instantiated game object as its parameter. This function will take care of releasing memory for you if the reference (or game object instance) count drops to 0.
The result?
Our memory profile will look exactly the same, but our code will indeed be sexier.
Note there’s a small performance hit by using reference counting, but unless you’re spawning thousands of these objects, you can stick to this simpler method.
I suggest you grab the full Unity project below to test this yourself.
Free resource download
Sign up to unlock this resource and related performance materials.
Already a member? Open this resource.
And that should be it for today.
Take care,Ruben