
Let’s be honest. Videos are crucial elements for high caliber games, but they feed on storage space. They’ll milk till the last bit of your players’ drives. They’ll skyrocket your game installation times by hours. Would you enjoy staring at a progress bar for 12 hours? Your players won’t. No problem, Unity Addressables for Videos comes to the rescue.
Who doesn’t enjoy action-packed cinematics?
Your SSD.
And even your users, if it means they must wait till the next day to play your game. Especially if that next day is Monday.
Luckily for us, those are good times to add videos in our games. Unity has prepared some surprises for us so we don’t have to choose between low installation times or high-quality cinematics anymore.
Let’s see how we can apply Unity Addressables for Videos.
Why Are Videos a Problem?
Videos are heavy regarding storage space.
No surprise here.
Having a long cinematic with high bitrate and 4k resolution can very well add 350MB per minute. Stacking multiple of those will give you gigabytes of pain.
It is not uncommon to see 100GB+ games nowadays. And videos take a significant portion of that pie.
The thing is, downloading a game as heavy as that takes many hours. And that’s not necessarily the problem. The issue is when you block user progression due to huge download times.
But it doesn’t have to be that way.
You see, you don’t have to force users to wait to download all videos. You don’t need them all to show your main menu, right? You play most of them at later stages of the game.
So it helps to split video into two categories: primary and secondary videos.
The primary or mandatory videos are those for which users must wait before proceeding in the game. These videos usually come together with the original game package. The game introduction cinematic is an excellent example.
However, you can download the rest of the videos in the background.
The idea is to let the user have some fun instead of forcing them to stare at the progress bar for 12 hours.
We can apply Unity Addressables for Videos to do just this.
Let’s see how.
As a side note, Unity Addressables won’t help in RAM usage, as videos are played via streaming techniques. You won’t make big gains in memory usage but in installation/download times.

Unity Addressables Videos: Path to Success
This article assumes you’ve basic knowledge on Unity Addressables. If you don’t, don’t risk not understanding a word. I advise you to check my Unity Addressables Tutorial first.
Here’s what we will do in this blog post:
- Import one primary and one secondary video clips into Unity and play them
- Convert the videos to the addressables workflow
- Split the videos into two categories: primary and secondary
- Upload the secondary videos asset bundles to a CDN for background downloads
Importing Video Clips Into Unity
The first step is to have some videos.
If you have your video pipeline already set up, you can ignore this section. I’ll assume you have a video player set up somewhere.
I added two videos I found in the public domain. They’re not representative in size, but that doesn’t matter. Just replace them with your 4k videos later on.
We will not go on detail here, as there are great tutorials out there.
Basically:
- Drop the video files into your Unity project.
- In the Unity scene hierarchy, right-click and press Video →Video Player
- Tweak your VideoPlayer settings, e.g.:
- Set video clip to your video file.
- In Render Mode, choose Camera Near Plane
- Add a reference to your current camera
That should be it to play a video the classic way.
Playing Unity Video Clips
Now we’ll step up the game and befriend the Unity Addressables package.
Upgrading to Unity Addressables Videos
The first step is to have the Unity Addressables package installed (you do, right?).
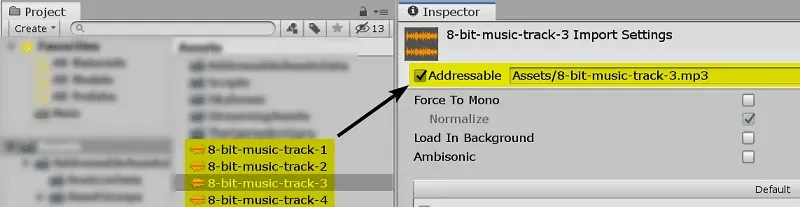
Then, select the videos in your project view and mark them as Addressable in the inspector. Below is a recycled example for audio clips.
Now, we cannot play videos as we used to do. We have to get rid of the direct reference to the videos in the video player.
The reason is that the Unity addressables technology works instead with indirect references.
For this we’ll create a simple script. If you already have one in place, you can adapt it instead.
The idea is to add an AssetReference field that will point at the video we want to play. We then load the video, assign it to the Unity video player and unload it when it’s finished.
If you follow my blog, that should give you no trouble.
Here’s the code you can use.
[RequireComponent(typeof(VideoPlayer))]
public class AddressablesVideoPlayer : MonoBehaviour
{
    [SerializeField] private AssetReference[] videoClipRefs = null;
    private VideoPlayer videoPlayer;

    public void PlayVideo(int index)
    {
        StartCoroutine(PlayVideoInternal(index));
    }

    private IEnumerator PlayVideoInternal(int index)
    {
        var asyncOperationHandle = videoClipRefs[index].LoadAssetAsync<VideoClip>();
        yield return asyncOperationHandle;
        videoPlayer.clip = asyncOperationHandle.Result;
        videoPlayer.Play();
        yield return new WaitUntil(() => videoPlayer.isPlaying);
        yield return new WaitUntil(() => videoPlayer.isPlaying == false);
        videoPlayer.clip = null;
        Addressables.Release(asyncOperationHandle);
    }

    void Awake()
    {
        videoPlayer = GetComponent<VideoPlayer>();
        PlayVideo(1);
    }
}
The important piece of the cake happens within the PlayVideoInternal function.
In lines 14-15, we load the audio clip through the indirect asset reference. We wait for this to finish through the Unity coroutine. Note that loading may include its download if you prepare your asset bundles that way, as we will see later.
When the loading is complete, we assign the resulting video clip to the video player. We play it and wait for it to start and also to finish.
Finally, we unload it in lines 20-21.
These operations are happening locally so far. This is perfect for primary/mandatory videos, as they must be available before launching the game.
But this is not optimal for secondary videos. In the next sections we’ll upgrade our project to download them from a CDN.

Tweaking Unity Addressable Video Groups
Here we’ll create Unity Addressable Groups: Videos-Primary and Videos-Secondary.
As you might know, Unity addressable groups are there to give you access to special settings. Each of these two groups will differ on how they’re built and loaded.
Navigate to the groups window: Window → Asset Management → Addressables → Groups.
There, create the two groups by clicking on Create → Group → Packed Assets.
Select Videos-Primary and go to its inspector. Here we’ll set the settings for this addressable group.
The default settings are mostly fine for our use case. I’d suggest setting the compression mode to uncompressed, though. We do this because videos are already compressed, so re-compressing it will be a waste of CPU time, battery and even storage space.
In the Videos-Secondary group, we do the same. The difference is that we will set the build path to RemoteBuildPath and the load path to RemoteLoadPath. This way, we exclude the secondary videos from the build. We’ll upload it to a remote server separately. Under the same rule, we’ll load them from that server.
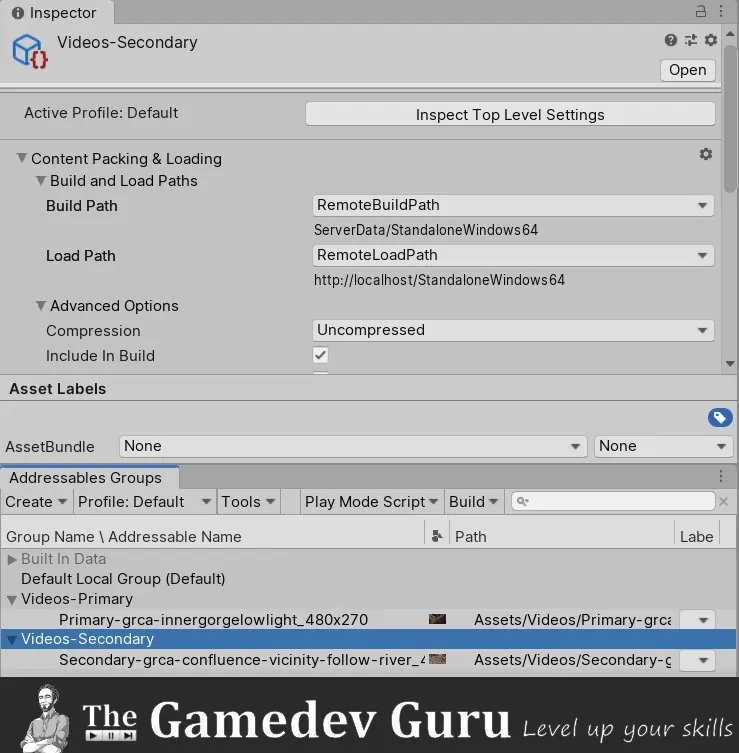
The primary videos group is ready for local building and loading. The secondary videos group, however, will be built for networking distribution and loaded from a server.
Addressable Profiles and Uploading Videos for Network Distribution
To finish the puzzle, we’re missing two essential pieces:
- Setting the server URL to download from
- Uploading the content to your server
You set the server URL through the Addressable Profiles. You can manage them by navigating to Window → Asset Management → Addressables → Profiles. There you can set the RemoteLoadPath to include the base URL of your CDN.
Uploading the content to your server is, well, up to you. You can do that through FTP, web interfaces, SCP, etc..
I described in detail the steps to follow to finish this up in my previous blog posts:
With this done, your players will download the videos during the load process.
To have finer control and download videos in advance, check this Addressables API call: DownloadDependenciesAsync()
This function will let you download your videos in the background while your user plays through the first parts of your game.
Remember, aim to keep your user engaged at all times.
What’s Next?
If you liked this content, I highly recommend you to check out the rest of the blog posts in the Addressables series. Addressables will help you enormously decreasing your memory consumption, which will lead to you selling more copies of your game.
To get a quick reference on Addressables, make sure to get my free Level 3 Addressables PDF.