
January 07 2020
Unity Draw Call Batching: The Ultimate Guide [2021]

Draw calls are never a problem. That is, until you add one more element and suddenly your render thread becomes your new bottleneck. Can you guess why keeping Unity draw calls at bay is today more relevant than ever?

Warning: this is an in-depth post, make yourself comfortable and grab a tea. Use the table of contents if you’re in a rush.

My Background Story
Just a few years ago, I was an inexperienced young lad… Especially when it came to game programming.
I was working on one of my first professional assignments and my task was clear.
I just had to improve and implement several gameplay systems for an existing game.
Fair enough.
So that’s what I focused on for months. Creating fun for my players it is.

The thing is, every other area in game development remained pretty much unknown to me.
And I couldn’t stop asking myself…
What if I have to put off a fire in one of these areas I have no idea about?
That simple thought made me very uncomfortable. After all, I didn’t want to disappoint my boss. He hired me for a reason so surely he expected me to know my stuff.
Yet I knew it was only about time I had to face problems I never dealt with.
And I didn’t feel prepared.
In any case, I happily kept adding content and worried no further. Everything was going smoothly and I received good feedback on my work.
Even better, performance was great all long…
Until it wasn’t.

After several months, I noticed something was off.
I went to the stores and started noticing more and more negative reviews.
I was used to a certain proportion of negative reviews. That’s always part of exposing your work to the world.
But the trend worried me. It was getting worse than ever.
More users started complaining about battery draining faster, the device heating more than ever and the gameplay feeling too slow.
It took me some time to connect the dots.
That must be the performance thing, I thought.
I started worrying that I messed up the user experience.
Even worse, what would my client think of me? It surely had to be the work I did on gameplay.
Worry quickly transformed into stress.
I was used to stress. After all, I often spent over 12 hours a day at the University just a few years before.
But this time it was different. It was not about me anymore. It was about real people that I was disappointing.
Armed with courage, I started digging into the unknown world of performance.
And that I did especially over my free time.
I quickly learned about the Unity Profiler. That valuable tool showed me how the render thread appeared to be taking just too long. But I didn’t know why.
So I kept investigating.
However, no matter how much time I put in, problems arose faster than I could fix them.
I was about to give up.
Maybe game development wasn’t for me, after all.

But then, I became one of the luckiest developer of the world.
I was lucky enough to come across a great online article about technical debt. And I realized I dug my own graveyard.
But at the same time, I became inspired.
Over time, I introduced content that exploded the amount of unity draw calls I had in the game. And draw calls were supposed to be kind of requests to draw something on the screen.
Are 130 draw calls too much? Yeah, that must be it, I thought. I added non-optimized content that is causing the battery drain and slow gameplay, so now I just need to optimize it.
So I got to work and started the long journey of optimizing my materials. After all, draw calls were highly related to the material setup in Unity. The juicy over-hours were on me. I caused that problem, so I was ready to suck it up.
I couldn’t stop thinking about the long-term problems, though.
If I had this problem, chances were other people had it as well.
As I saw it, the only way to solve this problem was to create processes to continuously monitor performance metrics.
That was my second job.

In a matter of days, I implemented a prototype system to continuously monitor the number of unity draw calls in the game. I wanted to make sure people submitted only optimized content in the future, especially myself.
Still, I struggled to keep the deadlines.
I knew I had to be resilient. And that I became.
With endless effort, I unified game materials substantially and greatly reduced the number of shaders.
This long journey brought me to a draw call count well under 60.
Performance was great again, as everyone held to the performance guidelines. The processes made sure of that.
And I was proud of that.

However, I still had my inner voice reminding me about these players that I upset.
They used to have great times playing the game. They made friends through it. They went as far as to strengthen their relationships with their family members.
That’s why I worked hard to alleviate the pain they showed through the reviews.
But these players never came back. I lost them forever.
And that was heart-breaking.

Losing these players taught me how important it was to monitor performance all along the project.
Loading times, frame-rate, performance spikes, battery and power efficiency… All of that way matters more than I thought.
This was one of the defining moments that made me focus so heavily on game performance optimization. I learned the lesson.
The game is still performing well today. And thanks to the optimizations, the ports to weaker platforms became much easier.
Ever since then, I monitor the performance of my games almost daily.
But I don’t do this alone.
I have systems in place that report me these numbers automatically. When something is off, I go and investigate.
Monitoring unity draw calls is now more important than ever with Virtual Reality gaining so much traction. We have to render at consistent frame-rates of 72, 90 or even 144 Hz. Those timings don’t give you a substantial CPU budget.

Signs You Have Too Many Draw Calls
At any specific moment during gameplay, there are some important signs to watch for.
Over time, you’ll develop a sixth sense that will spawn some chills running down your spine whenever you experience these situations.
However, symptoms are just symptoms. They do not always reveal a draw call problem, as bottlenecks can origin from many corners. To make the distinction more clear, I divided them in two categories.
Soft symptoms are a weak indication for high draw calls; they can perfectly come from other performance factors such as overdraw.
Lastly, hard signs are those that strongly show that your game might have too many draw calls.

Soft Sign: Battery Draining Too Quickly
Phone batteries usually last for a day or two under average use.
But games excel at stealing the energy from your users’ lithium ions.
However, realize that power consumption varies across different games. Optimized games will relax your CPU and GPU so they consume fewer watts.
And optimizing your game is important because your users became pretty good at noticing how much battery your game takes for breakfast.
Even if you didn’t care about your users (who doesn’t?), this is still a relevant factor for you.
This is why…
Efficient games let your players play for longer sessions. And the more they play, the more money will land in your pocket (or your employer’s). More In-App Purchases sold, more ads consumed, more word-of-mouth marketing, you name it.
Optimizing for battery is a good return on investment.

Soft Sign: Device Heating Up
Most of the energy you take from your users’ devices is converted into heat (and light). Surprise.
This might be handy in winter to warm up your hands. But still, there are 3 seasons left where your users would prefer to go around without a portable battery pack.
I still remember my times in Berlin ordering Glühwein just to warm up my hands during winter. I didn’t enjoy the wine-based drink, but I learned to appreciate the warm sensation in my hands.
So I kept buying it.
If you’re targeting a VR headset, you should especially optimize for energy efficiency. That is, unless you’re developing an application to replace a conventional face tanner.

Soft Sign: Game-Play Not Running Smoothly
Picture this…
You’re playing a slow-paced multi-player shooter.
But as you’re new to it, so everybody plays it better than you.
After hours of frustration, you finally have your chance: a distracted sniper.
You’re sneaking upon him from behind. They didn’t notice you yet, but you know it’s only about time they turn their back to you. So you get ready to aim for the perfect head-shot.
You slowly move your mouse to aim a few pixels higher.
But after a delay of half a second, your cross-hair is now suddenly pointing at the sky.
The sniper notices you and by the time you realize it you’re already dead.
What the hell has just happened?
Low frame-rate.
Now, low performance could happen for multiple reasons, but a high amount of unity draw calls is surely one of them.
I remember the early days of Counter Strike where people with the beefiest GPUs threw smoke grenades to gain an unfair advantage. Players with low-end computers couldn’t really handle smoke that well, so they ended up dying of low frame-rate. This was probably more due to overdraw than draw-calls, but I still find it memorable to mention.

Soft-Sign: VR Users Look Paler Than Ever
The lower your VR game performs, the worse your users will feel.
Wait, I can say this in a different way.
The more potential draw calls you have, the worse your worst case becomes.
Yeah, that’s better.

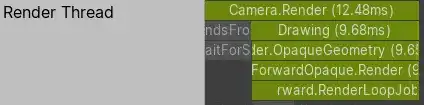
Hard Sign: Unity Profiler Reveals a Render Thread Bottleneck
If your render thread is taking too long to execute, chances are you have too many draw calls. Or worse, you might have too many SetPasses (we’ll see the difference in the next section).
Your main thread is probably just idling around while the render thread finishes processing all draw calls.
You can identify this situation through the Unity Profiler, as seen below.
The more of these signs you have, the higher the chances are that your game has way too many draw calls.
And we’ve been speaking about draw calls for a long time.
But what’s exactly a draw call?
Wait… What’s a Draw Call?
Simply put, a draw call is your CPU asking your GPU to draw something.
It’s your CPU saying: hey, draw this chair in that corner over there with these textures and lighting information.
If you have many “things”, then you prepare many draw calls:
- I want a chair in that corner
- And also another chair there in the other corner
- Oh, and a bookcase as well.
The issue is, preparing unity draw calls steals a huge portion of your CPU time and energy. Unity has to convert your scene content into a format your GPU understands. And a very expensive part of this process is to set the correct render parameters, such as textures, shaders, meshes, etc…
Setting rendering parameters manually is tedious. That’s why game developers introduced the concept of materials.
A material is a data structure with information about how to draw an object. It contains a shader with all its parameters, plus information about how to set the GPU render state.
And every material you add to your scene increases the complexity of your rendering pipeline. Each material adds at least one SetPass (this sets rendering parameters). And you really want to minimize those if you want your game to perform well.
Does this mean we cannot draw too many objects at once?
Not necessarily.
Game developers use batching to group the rendering of similar objects into the same draw call.That way, the CPU pays the price of a single draw call to render multiple objects.
With batching, we ask the gpu once to draw three chairs here, there and behind instead of asking three different times.
Now, the key is understanding what “similar” (objects) means.
In batching, it all comes down to using the same material across different objects. Really. If you get this done, you achieved the most complicated step.
With the help of the Unity Frame Debugger, you can see below the sequence for 4 draw calls: 3 for the furniture and 1 for the floor.
Unity Draw Calls: No Batching
That was expensive.But batching will help us reduce these draw calls. This, in turn, will reduce the CPU load of your players. Having more resources lets you add more gameplay features or just keep it that way to reduce the energy consumption of the device.
Batches vs SetPasses
There’s a little detail that few developers know of.
There’s a difference between the Batches and SetPasses metrics you see in the profiler and stats window.
But this difference has a huge impact.
Batches are what we usually describe as draw calls. Those are plain draw commands, e.g. draw this object here and then this other one there. This is mostly about drawing an object with the current global render state. Same shader, similar parameters.
SetPasses, however, describe a more expensive operation: material changes. Changing a material is expensive because we have to set a new render state. This includes shader parameters and pipeline settings, such as alpha blending, Z testing, Z writing, etc…
Let me explain this to you with an example.
Let’s consider we have 3 chairs sharing the same mesh.

We’ll now explore three scenarios with different batching and material setup. Each scenario will result in different batches and SetPasses. Check the following table.
| | Scenario ”You’re Screwed” | Scenario ”You’re Still Screwed” | Scenario”Getting Better” | Scenario ”Kicking Ass” |
|---|---|---|---|---|
| Batching Setting | Disabled | Enabled | Disabled | Enabled |
| Material Setup | Individual (x3) | Individual (x3) | Shared (x1) | Shared (x1) |
| Draw Events | 1. SetPass (chair 1) 2. Draw call (chair 1) 3. SetPass (chair 2) 4. Draw call (chair 2) 5. SetPass (chair 3) 6. Draw call (chair 3) | 1. SetPass (chair 1) 2. Draw call (chair 1) 3. SetPass (chair 2) 4. Draw call (chair 2) 5. SetPass (chair 3) 6. Draw call (chair 3) | 1. SetPass (chair mat) 2. Draw call (chair 1) 3. Draw call (chair 2) 4. Draw call (chair 3) | 1. SetPass (chair mat) 2. Draw call(chair 1+2+3) |
| SetPasses | 3 | 3 | 1 | 1 |
| Batches (D.C.) | 3 | 3 | 3 | 1 |
| Performance | Worst | Worst | Good | Best |
The first and second scenarios are similar: different materials skyrocket our SetPass count. And those have the worst performance hit in the render thread. Batching is not possible, as batching requires using identical materials.
However, we see a hint of light with the third scenario. Sharing materials makes all the difference. Having a unique material reduces the SetPass count to 1, which gives you an incredible performance boost. Sure, we still have three draw calls, but those are very cheap.
Finally, if you really want to kick ass, then the fourth scenario is for you. Here, we enable batching. And batching loves unique materials. Enabling batching reduces the Draw Call count to 1. Here we have the perfect output: ❤️ 1 SetPass, 1 Batch ❤️️
Counting Unity Draw Calls
Before we dig into fighting draw calls, we first need the proper tools to measure them. There are many tools available for this, such as RenderDoc, but we will stick to the simplest: the stats window and the Unity Frame Debugger.
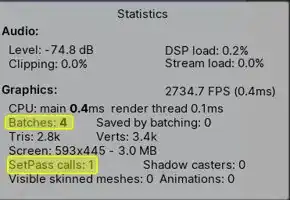
You can access the stats window any time by clicking on the Stats button on the top-right corner of the game view. This panel shows you metrics for the current game view. Expect these numbers to evolve if your screen contents change (which should if you’re serious about game development).
There, pay attention to Batches (draw calls) and SetPasses (material changes). As we saw, these are connected but have a different performance impact profile.
Lastly, you can and should use the Unity Frame Debugger. This tool will show you the specific draw calls (batches) that you’re issuing for the current view. You can open it in Window → Analysis → Frame Debugger.
3 Reasons to Keep Draw Calls at Bay
My experience has taught me it is crucial to reduce SetPasses and draw calls even if they are not the bottleneck of your game. Here are my top reasons to reduce draw calls from the start of a project:
- It makes porting to future platforms much easier.You surely spent thousands of hours working on your game. That’s a baseline cost everyone has to pay to get their game shipped.Once you paid that price, why not profit from it further and port it to other platforms? It will take you a fraction of the cost to multiply your sales.The thing is, the more optimized your game is, the less effort you must put in the porting process.
- Save time and pain by optimizing now rather than in the future.Just optimize them today, really. You probably know how it feels to optimize a dozen of assets a colleague of yours created a year ago. Especially when that colleague of yours left your project.This becomes crucial when shopping in the asset store. Most assets from the store are poorly implemented and use multi-material setups. Those will make your life impossible when targeting mobile.
- It improves the efficiency of your game.Your game will use less CPU resources and perform better, which is critical in VR. You’ll steal less energy from your players’ batteries. The players and environment will reward you for that with better reviews and more in-app purchases. The longer your users play your game, the more ads they will see, the faster they’ll consume and pay for your content.
You see, while working with Unity you are adding draw calls by default. Assets tend to use different materials unless you pay attention to them. And by using different materials, you’re adding draw calls that you cannot batch. Over time, this will explode.

Fight the Battle: Batching Unity Draw Calls
Instead of drawing one object 10 times, we draw 10 objects once.
That’s the power of batching.
The main requirement to batch draw calls is to get the objects to use the same drawing properties (material). When that happens, Unity can then merge the different meshes into a single chunk that uses the common material.
As we said, most assets will use different materials by default. But worry no further, we’ll see several ways to merge materials into a single one.
Below there’s a flowchart diagram that summarizes the options you have for batching in Unity.
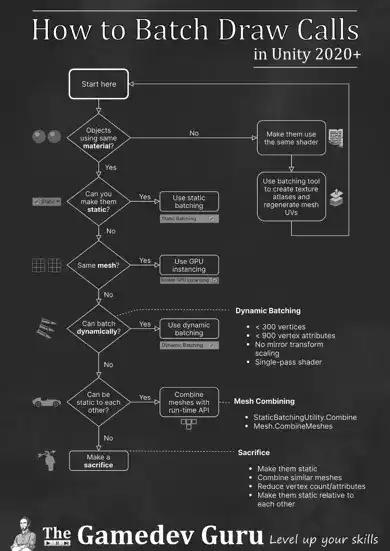
Your entry point is to find out if the objects you want to batch share the same material.
Sharing materials is a precondition for batching to work. Different materials have different drawing settings that change the global GPU render state.
If these objects don’t use the exact same material but they’re similar enough, then you must merge them into a single one. This usually involves creating shared texture atlases and updating the individual objects’ UV coordinates to point at the new correct locations. There are tools to help you out here.
Once your objects use the same material, you have many options to batch these draw calls.
The batching technique I suggest you to use use depends on the nature of the objects you want to batch.
But before getting into batching, let’s see how to merge materials.
Next…
Requirement: Merging Unity Materials
The first requirement to merge materials is this:

Changing the current shader is one of the most expensive operations you can do. This slows down rendering significantly.
Almost every game must change shaders to some degree, and that’s fine as you’re aware of its cost. Try to reduce the shader count you have in your project (including shader variants).
If you can merge two shaders that look alike into the same one, you’ll get huge wins in performance.
So the first step is to remove shaders from your project, whenever you can. Chances are, you can get many original materials to look similarly under a common shader.
Once your target objects use the same shader, the next step is to merge their materials. That is probably complicated, as they probably had different material parameters such as:
- Textures: each material often has one or more textures that are not shared with other materials. One way to use the same texture across different materials is by creating bigger textures that contain all individual textures. Those textures are called atlases.
- Decimal values: such as metallic, specular and other parameters. To merge those, you can either find a common average value that suits them all or create a texture atlas containing that value in a specific channel. You can re-purpose the 3 or 4 texture channels for different parameters, e.g. storing the metallic value in the red channel.
Now, if you have several objects with the same material but they must have different parameters, you can give MaterialPropertyBlock a shot. Instead of creating individual material instances, you can create a MaterialPropertyBlock for each renderer that needs custom parameters. You can then set your individual parameters in each of these blocks. This will not reduce your draw calls but it will make rendering much cheaper, as you’re explicitly telling Unity what’s different about each object.
Creating texture atlases for materials sharing a shader often follows this pattern:
- Create a big texture we’ll call texture atlas.
- Take a texture channel of all materials and fit its textures into the newly created texture atlas.
- Go over the meshes using these materials to recalculate their UVs. The new UVs will point at the new sub-region of the texture atlas that contains the original texture.
- Disable the old mesh and instead use the new mesh with the updated UVs.
- Unlink the original material to use the merged material.
- Repeat all these steps per additional texture property your shader takes.
I recommend you to do this in your 3d software. If you have the time, this is the best method because it gives you fine control over the process. This will improve the output quality because you can tweak critical variables such as texel resolution. You can also apply more advanced techniques such as palettes.
If you don’t have the time, resources or experience to do this, then I’ll take you through another path…
Use tools to do this for you.
As a programmer, I’m not as efficient with 3d modeling tools so I often use this approach.
In no particular order, here are some Unity packages you can use to merge materials within Unity:
- Mesh Baker: premium or free
- Super Combiner
- Advanced Batcher
- One Batch
Once we merged multiple materials into a single material, then we can start batching our draw calls.
You need criteria that help you choose between the different batching methods.
There’s always a price to pay with all batching techniques. They all have some requirements that might be hard to meet depending on your gameplay situation.
Let’s explain it following the diagram sequence.

Technique 1: Unity Static Batching
Static batching is enabled by default (and I suggest you to keep it that way).
Unity applies this technique automatically to all static objects in the scene that share a material. If we start with the following draw calls:
- Draw static chair 1
- Draw static chair 2
- Draw static table
Then static batching creates a single draw call out of them:
- Draw the static dining furniture (containing 2 chairs and a table).
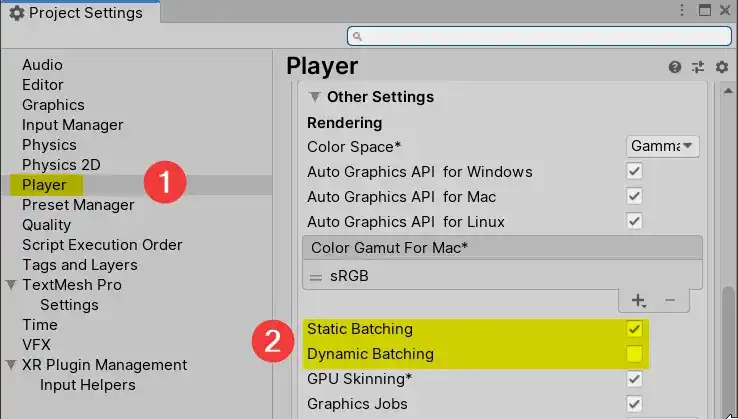
You can find this setting under player settings, as shown on the image. Select the target platform you’re aiming for to enable it.
Note for later that dynamic batching is also enabled/disabled in the player settings.
More precisely, Unity will look for objects whose batching static flag is enabled. Then, Unity will attempt to merge those that share a material.
Unity static batching works by creating a huge mesh containing the individual meshes. But Unity doesn’t discard the individual meshes. Instead, Unity keeps the original meshes intact so we are still able to render them individually. We need this for frustum culling to work. This way, we can draw only the objects that lie within the visible field of view and discard those who aren’t.
By having all meshes in a single mesh, we’re able to draw them all without changing the render state.
Static batching happens just before you hit the play button on the editor and also happens while making a build. Unity goes through each scene and tries to batch as many static objects as possible.
The main limit to static batching is the amount of vertices and indices each batch can have. This is often 64k for each, but check the updated requirements here.
The downside to static batching is an increased memory usage. If you have 100 stones and each stone model takes 1MB, then you can expect memory usage to be around 100MB+. This happens because the huge batched mesh contains all stones together as a single mesh.
But memory usage shouldn’t be a concern for you. After all, you can check out my Unity Addressables Tutorial that will help you get huge memory savings.

Technique 2: Unity GPU Instancing
GPU instancing is one of my favorite batching techniques because it works with non-static objects.
If we have these draw calls:
- Draw dynamic stone 1
- …
- Draw dynamic stone 100
Then with GPU instancing we convert them to a single draw call:
- Draw 100 dynamic stones here and there and there…
This is a setting you activate per material, as seen below.

GPU instancing lets you draw the same mesh several times very efficiently. Unity does it by passing a list of transforms. After all, each stone had its own position, rotation and scale.
This is a powerful technique because it does not skyrocket the memory usage and it doesn’t require the objects to be static, compared to static batching.
To make GPU instancing work, you just need to enable it in the material inspector. If you have multiple objects with the same mesh and material, then they’ll batch automatically.
However, there’s a performance cost of creating the list of transforms. You pay this price once if no object moves/rotates/scales during gameplay. But you can pay this once per frame if an object changes per frame.

Technique 3: Unity Dynamic Batching
If you cannot meet the requirements of static batching and GPU instancing, you still have hope.
You can still batch dynamic objects that use different meshes with dynamic batching.
However, bear in mind that Unity dynamic batching is heavily limited. You can apply it only to meshes that have less than 300 vertices and 900 vertex attributes (colors, UVs, etc). The material should use a single-pass shader as well. Make sure to check the full list of requirements here.
The reason for this limit is the CPU performance cost of creating these batches in run-time. Above 300 vertices it becomes hard to justify the batching CPU cost compared to issuing the draw calls individually.
Not only that, dynamic batching is highly unpredictable. You cannot really tell how your objects will batch. And the result often changes from frame to frame. It’s confusing to check out the Unity Frame Debugger and see how results dramatically change across frames.
In my opinion, this should be your method of last resort. But hey, it’s still a tool, don’t overlook it.

Technique 4: Unity Run-Time Batching API
For all special cases where you want to have finer control over batching, you can just do it manually.
Don’t worry, you won’t have to deal with vertices yourself.
Unity gives you access to 2 powerful APIs to combine meshes in run-time.
Let’s say you’re driving a car. In the interior you see several elements such as the seats, the handles, the windshield and all the coffee mugs you accumulated over time. You customize these elements before the race starts.
Once you made your choice and start the race, these elements become kind of static within your car. Let me explain this…
The car itself is dynamic. After all, you’re driving it .
But all its non-moving inner parts? They can be considered static relative to the car object. The windshield will always remain at the same place within the car.
Yet, Unity considers all these pieces to be dynamic. That’s why static batching won’t work in this situation.
Still, we can profit from the static batching APIs to create these batches manually.
The easy way is to use StaticBatchingUtility.Combine. This function takes a root game object and will iterate over all its children and merge their geometry into a big single chunk. One requirement that is easy to forget is that the import settings of all sub-meshes to batch must allow CPU read/write.
The second way is by using Mesh.CombineMeshes. This function indirectly takes a list of meshes and creates a combined mesh. You can then assign that mesh to a mesh filter and you’re good to go.
I simplified the explanation for both functions. Check the documentation for details on how to use them.
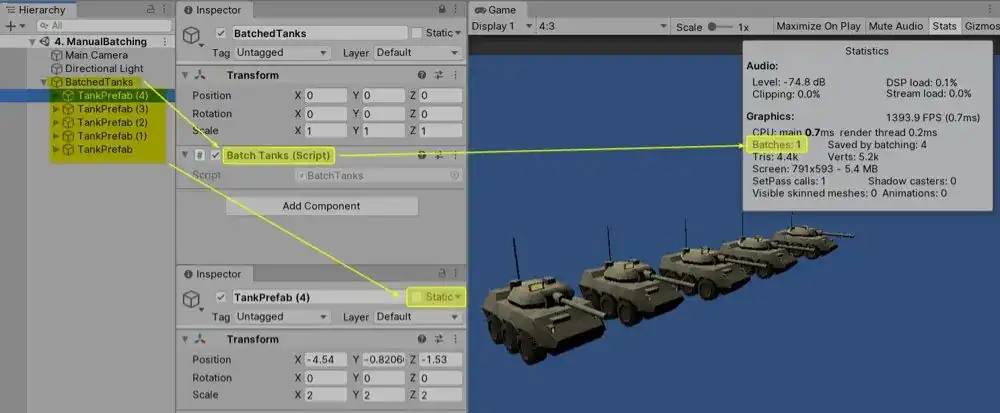
In the image below, you see how I applied the power of the StaticBatchingUtility API to batch a few dynamic tanks into a single static batch. And I do this in run-time.
See Draw Call Batching in Action
I know…
With so many possibilities, benefits and limitations, batching draw calls in Unity can be overwhelming at first.
It’s hard to understand in an hour what took me years to master.
But you can take shortcuts.
That’s why I prepared a resources pack to guide you in optimizing your game.
This is what you’re getting:
- A full-resolution image of the batching diagram, including a printable version to keep at hand
- The Unity project with four scenes showing you how I apply the four batching techniques
Get it below.

- Full-resolution workflow diagram
- Printable version of the Diagram
- ... And the Unity project